Conjure Oxide
Welcome to the documentation of Conjure Oxide, a next generation constraints modelling tool written in Rust. It supports models written in the Essence and Essence Prime constraints modelling languages.
Conjure Oxide is in the early stages of development, so most Essence language features are not supported yet. However, it does currently support most of Essence Prime.
This site contains the user documentation for Conjure Oxide; other useful links can be found on the useful links page.
Contributing
The project is primarily developed by students and staff at the University of St Andrews, but we also welcome outside contributors; for more information see the contributor’s guide.
Licence
The Conjure Oxide source and documentation are released under the Mozilla Public Licence v2.0.
Side Projects
Conjure Blocks
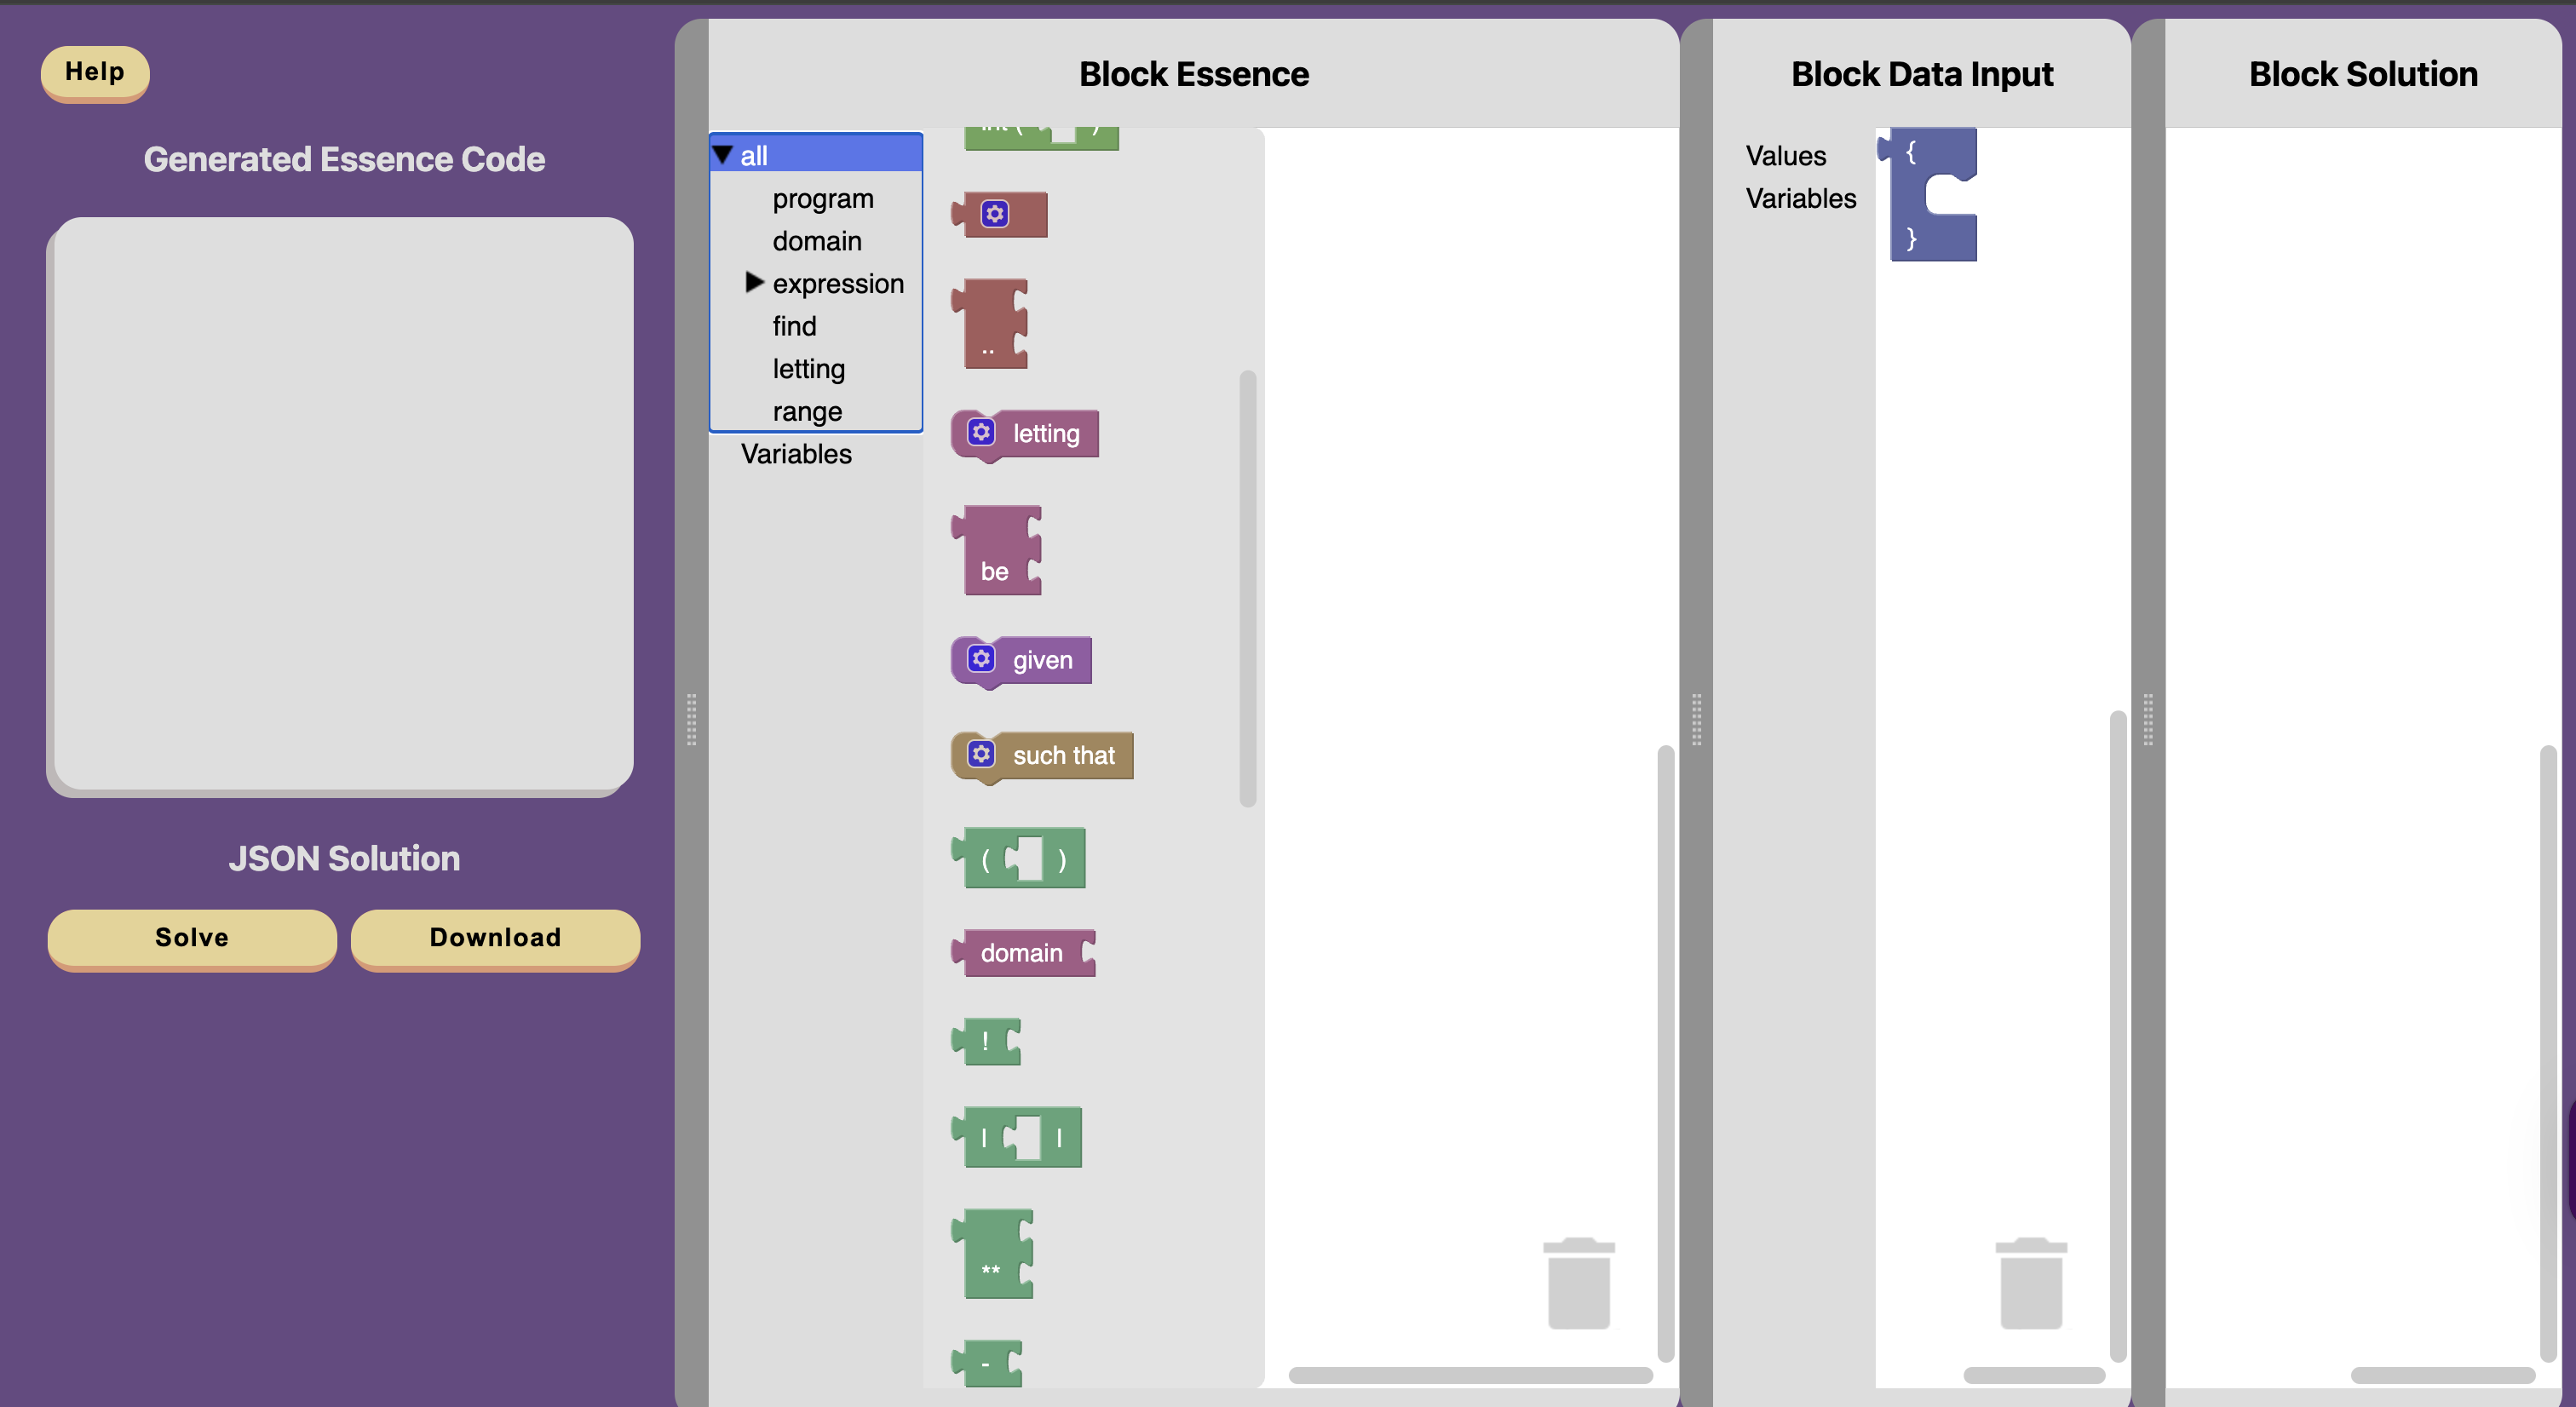
Conjure blocks is an online block editor for Essence. This tool allows you to write constraint programs in blocks, which are then translated into Essence. Conjure-aaS is used to solve these problems. Conjure blocks is an ongoing project.
See the the Conjure Blocks repository, the Conjure Blocks Documentation and the live site for more information.
Useful Links
API Documentation
Internal crates
The following crates are internal, and are re-exported by conjure-cp:
- conjure-cp-cli
- conjure-cp-core
- conjure-cp-essence-macros
- conjure-cp-essence-parser
- conjure-cp-rule-macros
- conjure-cp-enum-compatibility-macro
Code Coverage
Code coverage reports can be found here.
Miscellaneous
For Interested Students
This project is developed as part of the “Artificial Intelligence for Decision Making” Vertically Integrated Project module. For more information on the VIP, click here.
Glossary
-
PR: Pull request. It’s a proposal to merge code changes into the main branch, and allows collaborators to review and suggest modifications before it’s accepted.
-
Branch: A branch contains a different history of code changes (commits). You can start a new branch A’ off of any branch A and push new commits to A’ without affecting the contents of A. Merging branch A’ into A adds all new changes from A’ to A.
-
RFC: Request for Comments. It is a design proposal, often written before or alongside major changes.
-
Essence: A high level constraint modelling language. Essence is declarative, i.e. it states the problem rather than how to solve it. It also lets us model things at the class level.
-
A class-level model (i.e. description of a problem) may have some parameters. To get from a class-level model to an instance model, we provide concrete values for all the parameters.
The following describes a problem class:
given N : int
find x
such that x < N
The following are instances of that class:
letting N be 3
find x
such that x < N
letting N be 42 find x such that x < N
-
-
Conjure: Constraint modelling tool that translates Essence problem descriptions into Essence’ models that constraint solvers can execute.
-
Essence’ (Essence prime): Intermediate representation automatically generated by Conjure
-
Savile Row: It transforms high level Essence’ constraint models and outputs solver-specific model that can be executed. Written in Java.
-
Minion: Constraint solver. It takes low level constraint models (like Savile Row output) and searches for solutions. Specifically, it has its own input language that is extensively documented.
For an in-depth glossary of GitHub terms, see the GitHub Docs Glossary. This Git Cheat Sheet also contains resources about git commands.
Installation
Currently, Conjure Oxide is installed either by building from source or by downloading a nightly release.
Building From Source
Dependencies
The following dependencies are required to build and use Conjure Oxide:
- Conjure including solvers.
- Conjure is currently required for some components of Conjure Oxide. This is something that will change in the future as Conjure Oxide becomes more independent.
- Ensure that Conjure is placed early in your PATH to avoid conflicts with ImageMagick’s
conjurecommand!
- Clang and libclang.
- CMake.
- Rust installed using rustup.
Building
- Clone the repository:
git clone https://github.com/conjure-cp/conjure-oxide.git cd conjure-oxide - Run the install command to install
conjure-oxide(this may take some time):cargo install --path crates/conjure-cp-cli - Verify
conjure-oxideis installed and working by running a command:conjure-oxide --help
Downloading a Nightly Release
- Download the appropriate archive from the latest nightly release.
- Make sure you choose the correct archive for your system. Conjure Oxide currently supports ARM-based macOS (
aarch64-darwin) and x86-based Linux (x86_64-linux-gnu). - Make sure you choose the correct archive containing the dependencies you need:
- If you do not have Conjure or solvers on your system, download the archive for your system ending with
with-solvers. - If you have the solvers on your system but not Conjure, download the archive for your system ending with
with-conjure. - If you have both Conjure and the solvers on your system, download the archive for your system ending with
standalone.
- If you do not have Conjure or solvers on your system, download the archive for your system ending with
- Make sure you choose the correct archive for your system. Conjure Oxide currently supports ARM-based macOS (
- Extract the archive using your preferred method.
- Open a terminal in the extracted directory and run a test command:
./conjure-oxide --help
- If you are on macOS, you may run into a problem with binaries being blocked from running. If this is the case, run the following command in the extracted directory:
xattr -dr com.apple.quarantine . - If you would like these commands to be available everywhere on your system, copy the binaries into a directory which is in your PATH.
Troubleshooting
Unknown command: conjure-oxide
Check the path at which cargo install places binaries (see cargo-install(1)) and ensure it’s in your PATH environment variable. You may need to restart your shell for it to pick up these changes.
ImageMagick Conflicts
If the conjure command that is part of ImageMagick conflicts with your Conjure installation, ensure that the directory containing Conjure binaries is earlier in your PATH than the directory containing ImageMagick binaries.
macOS Quarantine
If you are running into problems on macOS, make sure you remove the quarantine attribute from all pre-built binaries using the following command in their containing directory:
xattr -dr com.apple.quarantine .
Quick Start Guide to Running your first Essence Model
This guide walks you through running your first Essence model with Conjure Oxide.
Your First Problem
Create a file called my_problem.essence with the following content:
find x : int(1..3)
find y : int(2..5)

such that x > y
If you are curious about more complex models, you can check out the models that we use to test Conjure Oxide, available in the tests-integration/tests/integration directory of the repository.
Running with Different Solvers
SAT Solver
--sat-encoding specifies the encoding strategy used by the SAT solver. This affects performance and solution structure.
Supported options:
log(default)directorder
Default usage (uses log):
cargo run -- solve --solver sat my_problem.essence
Specify an encoding:
cargo run -- solve --solver sat my_problem.essence
Minion Solver
cargo run -- solve --solver minion my_problem.essence
Expected output for both solvers:
Solutions:
[
  {
    "x": {
      "Int": 3
    },
    "y": {
      "Int": 2
    }
  }
]
Understanding What Happened
Conjure Oxide transformed your high-level Essence model through several steps:
- Parsing - Your Essence file was parsed into an internal AST
- Rule Application - Backend-specific rules transformed the model
- Solving - The transformed model was sent to the solver
- Solution Extraction - The solver’s output was converted back to Essence format
Want to see exactly what rules were applied? Check out the Logging guide.
Functional Programming Style
For developers who come from programming languages like Scala or Haskell, or those who favour a functional programming style, we have a Functional Rust guide that you might find useful.
Logging
This document is a work in progress - for a full list of logging options,
see Conjure Oxide’s --help output.
To stderr
Using --verbose, and the RUST_LOG environment variable, you can control the
contents, and formatting of, Conjure Oxide’s stderr output:
-
--verbosechanges the formatting of the logs for improved readability, including printing source locations and line numbers for log events. It also enables the printing of the log levelsINFOand above. -
The
RUST_LOGenvironment variable can be used to customise the log levels that are printed depending on the module . For more information, see: https://docs.rs/env_logger/latest/env_logger/#enabling-logging.
Example: Logging Rule Applications
Different log levels provide different information about the rules applied to the model:
-
INFOprovides information on the rules that were applied to the model. -
TRACEadditionally prints the rules that were attempted and why they were not applicable.
To see TRACE logs in a pretty format (mainly useful for debugging):
RUST_LOG=trace conjure-oxide solve --verbose <model>
Or, using cargo:
RUST_LOG=trace cargo run -- solve --verbose <model>
Example: Tracing SAT Solver Rules
When working with the SAT solver, you can trace the complete transformation pipeline:
RUST_LOG=TRACE cargo run -- solve --solver sat my_problem.essence --verbose
This will show:
- Integer-to-boolean conversions
- Operation transformations
- Tseytin transformations
- All rules that were tried and applied
This also applies for the other possible SAT solver encodings such as
sat-direct,sat-logandsat-order.
For more detailed testing output (including JSON traces and rewritten models), run specific tests:
cargo test <test_name>
This generates .json and .txt files containing rule traces, parsed Essence, solutions, and the rewritten model.
Contributors Guide
We love your input! We want to make contributing to this project as easy and transparent as possible, whether it’s:
- Reporting a bug
- Discussing the current state of the code
- Submitting a fix
- Proposing new features
- Becoming a maintainer
Contributing
This project is open-source: you can find the source code on Github, and issues, questions, or feature requests can be posted on the Github issue tracker.
Currently, Conjure Oxide has been primarily developed by students and staff at the University of St Andrews. That being said, we welcome and encourage contributions from individuals outside the University. Over the course of this section, we will expand further into how you can contribute.
For more detailed information regarding our contributing process, please refer to CONTRIBUTING.md
Licence
This project is entirely open-source, with all code released under the MPL 2.0 license, unless stated otherwise.
This section had been adapted from the ‘home’ page of the conjure-oxide wiki, and CONTRIBUTING.md
Onboarding
Congratulations you are joining a very exciting project, pushing forward the field of Constraint Programming. However, there is a lot to learn before you are up to speed. Expect to spend the first few weeks on the project learning, and so do not rush starting to contribute right away.
Here are some tips for starting out.
What You Need to Learn
The Conjure-Oxide project fundamentally involves the development of a constraint modelling tool in the Rust programming language. Therefore, learning about constraint programming and Rust will be your initial challenges. Getting a solid understanding of Rust and constraints now will stand you in good stead for the rest of the project so do not worry that spending time learning is not productive, this learning is expected.
Constraint Programming
Constraint programming is a paradigm for solving combinatorial problems. Instead of defining an algorithm to solve a complex problem, we instead model it as a constraint satisfaction problem (CSP), and let one of many optimised solver programs solve it from there.
Whilst not essential to be a fully-fledged constraint programmer it is useful to understand roughly how this works. There are good video lectures online that would be worth a watch for a general understanding, such as the CP Summer School lectures.
Conjure-Oxide uses the input language Essence. Getting an understanding of how to code in Essence will be really useful when it comes to debugging and testing anything. Reading through Essence’s documentation will be useful for this. Another very useful method of learning Essence and some aspects of constraint programming is to explore the selection of example Jupyter notebooks.
Conjure-Oxide is built to fulfil a similar role to Conjure. Conjure is the current constraint modelling tool built in Haskell, which we are basing a lot of our implementation around. Understanding a little bit about Conjure will be useful for you, as you may find yourself needing to refer to Conjure’s source code later in your project.
Rust
If you do not currently know how to program in Rust, this is very important to learn to contribute to most parts of the project.
The best resource for learning Rust is The Rust Programming Language book, alongside the Rustlings resource. Rustlings will give you exercises to practice what you learned in the book as you go. If you find the book slow-going there are also great video tutorials available on YouTube that cover the book’s content. Whilst both resources are fantastic, you will most likely not find it necessary to complete them in their entirety. However, I would recommend you complete the Rustlings exercise 19_smart_pointers to understand concepts such as Box and Cow, as these are used heavily throughout Conure-Oxide’s codebase.
Understanding the Codebase
Once you have enough of an understanding to read Rust code you should start reading through Conjure-Oxide’s codebase. This is a large complex codebase, and it is likely that it will not all make sense initially. A good method of understanding the codebase is to follow the control flow of the program and try to understand why each step occurs. There will be areas of the code you do not need to understand the inner-workings of as a new user, and so gaining a full holistic understanding from the outset is not necessary. Instead focus on getting a good general understanding of Conjure-Oxide as a whole, including what each step in process does and where in the codebase it is located.
This is a fundamentally cooperative project, and so do not be afraid to ask for help from a more experienced member of the team if you are struggling to understand an important part of the code. Feel free to reach out through our GitHub Discussions page for help whenever you need it.
This stage will take a while, but understanding the core of the program will be tremendously helpful when you start implementing it.
Selecting a Project
Once you have spent time learning you will feel ready to select a project and begin contributing. There are lots that can be done in Conjure-Oxide, so if you have an idea of a project that is great, but also consider asking on our GitHub Discussions page for ideas, because there are many tasks new starts could reasonably achieve. Do not feel rushed into selecting a project. Having a good understanding of the system before you start writing code, will really facilitate your productivity later in the semester.
Selecting a Starter Project
Whilst you are familiarising yourself with the codebase, you may want to try tackling a couple smaller starter projects. There are always little issues in the codebase needing addressed and working on one of these, while you learn, can be a fantastic way to get a confidence boost from feeling productive. These issues are specifically marked with good first issue on GitHub. However, be aware that taking on a wide project with a lot of reach, even if small, can be very challenging for a new start, as it requires deeply understanding many different areas of the code.
Selecting a Project Early to Help Learn
If the scale of the codebase is feeling overwhelming, then consider talking to the project lead @ozgurakgun and selecting a project earlier on. The project would not need to be well defined at this point but even if you are not initially implementing features, having a project in mind can help focus your learning of the codebase. This narrows the scope of what you try to understand and helps make the codebase less overwhelming. However, you must ensure you still a good general understanding of Conjure-Oxide as a whole, or this will make expanding your project harder in the future.
The Most Important Things
You should realise that it is okay to spend time learning and not contributing, and you should not feel bad, it is expected. If you get a good understanding now it will help you in the future.
Also ensure to ask for help and talk to the rest of the team, using the GitHub Discussions. There will be people on the project who have done it for years now. Use their expertise.
Setting up your development environment
Conjure Oxide supports Linux and Mac.
Windows users should install WSL and follow the Linux (Ubuntu) instructions below:
Linux (Debian/Ubuntu)
The following software is required:
- The latest version of stable Rust, installed using rustup.
- A C/C++ compilation toolchain and libraries:
- Debian, Ubuntu and derivatives:
sudo apt install build-essential libclang-dev - Fedora:
sudo dnf group install c-developmentandsudo dnf install clang-devel
- Debian, Ubuntu and derivatives:
- Conjure.
- Ensure that Conjure is placed early in your PATH to avoid conflicts with ImageMagick’s
conjurecommand!
- Ensure that Conjure is placed early in your PATH to avoid conflicts with ImageMagick’s
- Z3, one of the solver backends, requires a separate install. Using a package installer (e.g.
apt), install Z3.
MacOS
The following software is required:
- the latest version of stable Rust, installed using rustup.
- an XCode Command Line Tools installation (installable using
xcode-select --install) - CMake:
brew install cmake(for SAT solving) - Conjure.
- Z3, one of the solver backends, requires a separate install. Using a package installer, install Z3 (e.g. for
Homebrewrunbrew install z3).
If you are having issues with Z3, you may need to update
~/.cargo/config.tomlto ensure theZ3_LIBRARY_PATH_OVERRIDEandZ3_SYS_Z3_HEADERenvironment variables are pointed to the right library path andz3.hfile that you installed.
St Andrews CS Linux Systems
-
Download and install the pre-built binaries for Conjure. Place these in
/cs/home/<username>/usr/binor elsewhere in your$PATH. -
Install
rustupand the latest version of Rust throughrustup. The school provided Rust version does not work.- By default,
rustupinstalls to your local home directory; therefore, you may need to re-installrustupand Rust after restarting a machine or when using a new lab PC.
- By default,
-
Install
z3, one of the solver backends. You may have to build it from source, and then add the binary to your path.
To add a binary to your PATH in a way that persists every time you log out, run:
mkdir -p /cs/home/$USER/.paths.d`
echo ~/Documents/... > /cs/home/$USER/.paths.d/z3
// where the "..." is the path to your compiled z3 binary
Improving Compilation Speed
Installing sccache improves compilation speeds of this project by caching crates and C/C++ dependencies system-wide.
- Install sccache and follow the setup instructions for Rust. Minion detects and uses sccache out of the box, so no C++ specific installation steps are required.
This section had been taken from the ‘Setting up your development environment’ page of the conjure-oxide wiki
How We Work
This is our Constitution, but in contrast to a real constitution of a company we intend this document to be a living document. Please feel free to suggest edits and improvements.
Principles
- Assume good faith.
- Take responsibility for your work.
- Look for opportunities to help others.
- Make it easy for others to help you.
Social contract
We agree to adhere to the following guidelines when engaging in group work.
- We communicate in English as a common, shared language.
- We include all group members in meetings, group chats, messages, and social events.
- We turn up on time to meetings.
- We pay attention and contribute to group discussions.
- We contribute to the group tasks.
- We listen to each other’s opinions.
- We share ideas and do not disregard other people’s thoughts or feelings.
- We are respectful towards one another and treat each other with care and courtesy.
- We complete tasks on time and to the best of our ability.
- We do not make assumptions about individual abilities.
Logistics
- GitHub: We use GitHub as our main platform for code collaboration and version control.
- Teams: We use Teams for day to day communications.
- Weekly report: We use a web form to provide an update to the supervisors every week. This is not assessed and doesn’t strictly follow the reflective writing methods. However, this resource on the Gibbs reflective cycle may still be helpful when approaching the weekly form and how to use the form effectively.
- Weekly meetings: The whole group meets once a week. Before this meeting everyone fills in the weekly report. We take minutes at these meetings.
Best Practices for Collaboration
1. Start with Early Pull Requests (PRs)
- Don’t wait until everything is perfect; submitting early PRs allows the team to provide feedback sooner. This helps catch potential issues early and encourages collaboration.
- Even if your code isn’t complete, opening a draft PR can be a good way to start discussions and ensure alignment.
2. Show, Don’t Tell
- Share your experiences and insights! Use GitHub or Microsoft Teams to share updates, challenges, and breakthroughs with the rest of the team.
- Showing real examples means other can more easily help you, it can help others understand your approach and may inspire new ideas.
- High-level explanations can inadvertently hide important details. Showing the actual artefact (whether it’s code, a design document or something else) together with your high-level commentary eliminates this risk.
3. Begin with Specifications
- Before you start coding, document your plan. Write out specifications or create a rough outline of what you’re working on, including examples where possible.
- Having a clear plan makes it easier to get feedback and helps others understand the purpose and scope of your work.
4. Share Failures as Much as Successes
- When something doesn’t work, share it! Learning from mistakes and discussing setbacks is invaluable.
- A failed attempt can often be as educational as a successful one, and it may prevent others from encountering the same issue.
5. Ask Good Questions
- Don’t hesitate to reach out when you’re stuck, but try to ask thoughtful, specific questions.
- Providing context and sharing what you’ve tried will help others give more helpful answers.
Final Thoughts
- Collaboration is key to our success, so feel free to communicate openly.
- Continuous improvement is encouraged—keep looking for ways to improve your code, processes, and knowledge.
This section had been taken from the ‘How we work’ page of the conjure-oxide wiki
Pull Requests
Tip
We Use Github Flow, so All Code Changes Happen Through Pull Requests
Our development process is as follows:
- Make a fork.
- Create a branch on your fork, do not develop on main.
- Create a pull request as soon as you want others to be able to see your progress, comment, and/or help:
- Err on the side of creating the pull request too early instead of too late. Having an active PR makes your work visible, allows others to help you and give feedback. Request reviews from people who have worked on similar parts of the project.
- Keep the PR in draft status until you think it’s ready to be merged.
- Assign PR to reviewer(s) when it’s ready to be merged.
- Only Oz (@ozgurakgun) can merge PRs, so add him as a reviewer when you want your PR to be merged.
- During reviewing, avoid force-pushing to the pull request, as this makes reviewing more difficult. Details on how to update a PR are given below.
- Once Oz has approved the PR:
- Update your PR to main by rebase or merge. This can be done through the Github UI or locally.
- Cleanup your git history (see below) or request your PR to be squash merged.
Style
- Run
cargo fmtin the project directory to automatically format code - Use
cargo clippyto lint the code and identify any common issues
See: [[Documentation Style]] and [[Rust Coding Style]] (TODO)
Commit and PR Titles
We use Semantic PR / Commit messages.
Format: <type>(<scope>): <subject>
(<scope> is optional)
Example
feat(parser): add letting statements
^--^ ^----^   ^--------------------^
|    |        |
|    |        +--> Summary in present tense.
|    |
|    +--> Area of the project affected by the change.
|
+-------> Type: chore, docs, feat, fix, refactor, style, or test.
Types
feat: new features for the end userchore: changes to build scripts, CI, dependency updates; does not affect production codefix: fixing bugs in production codestyle: purely stylistic changes to the code (e.g. indentation, semicolons, etc) that do not affect behaviourrefactor: changes of production code that do not add new features or fix specific bugstest: adding, updating, or refactoring test codedoc: adding or updating documentation
PR Messages
Your pull request should contain a brief description explaining:
- What changes you are making
- Why they are necessary
- Any significant changes that may break other people’s work
Additionally, you can link your PR to an issue. For example: closes issue #42.
Amending your PR and Force Pushes
You should avoid rebasing, amending, and force-pushing changes during PR review. This makes code review difficult by removing the context around code review comments and changes to a commit.
The recommended way to update PRs is to use git’s built-in support for fixups.
To make a change to a commit (e.g. addressing a code review comment):
git commit --fixup <commit>
git push
Once your PR is ready to merge, these fixup commits can be merged into their original commits like so:
git rebase --autosquash main
git push --force
We have CI checks to block accidental merging of fixup! commits.
See:
- https://rietta.com/blog/git-rebase-autosquash-code-reviews/
- https://git-scm.com/docs/git-commit#Documentation/git-commit.txt---fixupamendrewordltcommitgt
Before your PR is merged
When your PR is approved, you may need to rebase your branch onto main before it can be merged. Rebasing essentially adds all the latest commits from main to your branch if it has fallen behind main.
To do this:
-
Make sure that your
mainbranch is synced to the main repo -
Switch to the branch you’re making the PR from
-
Do:
git rebase main
git push --force
(Optional) Cleaning up your Git history
Additionally, if you are proficient with git, you can use interactive rebase to clean up your commit history. This allows you to reorder, drop, or amend commits arbitrarily.
See:
There are some GUI tools to help you do that, such as the GitHub Client, GitKraken, various VS Code extensions, etc.
Warning
Interactive rebase and force-pushing overwrites your git history, so it can be destructive. This is also not a requirement!
Squashing PRs
Alternatively, you can ask for the PR to be “squashed”. This combines all your commits into one merge commit. Squashing PRs helps keep the commit history on main clean and logical without requiring you to go back and manually edit your commits!
What we didn’t do
The intention of this page is to chronicle decisions made during the development of conjure-oxide. There have been many situations where we have thought of something interesting that ends up not being the best solution to a problem and we believe others may come up with the same ideas. This page should be read before contributing so that potential contributors do not go down rabbit holes that have already been thoroughly searched.
Nested expressions within the polymorphic metadata field
Background
As discussed in Issue 182, we wanted to create a polymorphic metadata field that would be contained within the expression struct and that could be changed on a case-by-case basis as metadata might only be needed for a single module for example.
What we thought of
One interesting idea that was suggested as a structure like this:
#![allow(unused)]
fn main() {
// Define a trait for metadata in each module.
pub trait Metadata {
    // Define methods specific to the metadata.
    fn print_metadata(&self);
    // Add other methods as needed.
}

// Module-specific metadata types.
pub mod module1 {
    pub struct Metadata1 {
        // Define fields specific to this metadata.
        pub clean: bool,
        // Add other fields as needed.
    }

    impl super::Metadata for Metadata1 {
        fn print_metadata(&self) {
            println!("Metadata1: Clean - {}", self.clean);
        }
    }
}

pub mod module2 {
    pub struct Metadata2 {
        // Define fields specific to this metadata.
        pub status: String,
        // Add other fields as needed.
    }

    impl super::Metadata for Metadata2 {
        fn print_metadata(&self) {
            println!("Metadata2: Status - {}", self.status);
        }
    }
}

// Modify the Expression enum to hold a trait object for metadata.
#[derive(Clone, Debug)]
pub enum Expression {
    // Existing enum variants here...
    WithMetadata(Box<Expression>, Option<Box<dyn Metadata>>),
}

impl Expression {
    // Create a new expression with metadata.
    pub fn with_metadata(expr: Expression, metadata: Option<Box<dyn Metadata>>) -> Expression {
        Expression::WithMetadata(Box::new(expr), metadata)
    }

    // Extract the expression and metadata.
    pub fn extract_metadata(self) -> (Expression, Option<Box<dyn Metadata>>) {
        match self {
            Expression::WithMetadata(expr, metadata) => (*expr, metadata),
            _ => (self, None),
        }
    }

    // Set metadata for an expression.
    pub fn set_metadata(&mut self, metadata: Option<Box<dyn Metadata>>) {
        if let Expression::WithMetadata(_, ref mut existing_metadata) = *self {
            *existing_metadata = metadata;
        }
    }

    // Get metadata for an expression.
    pub fn get_metadata(&self) -> Option<&dyn Metadata> {
        if let Expression::WithMetadata(_, Some(metadata)) = self {
            Some(metadata.as_ref())
        } else {
            None
        }
    }

    // Existing methods here...
}

}
Why we didn’t do it
This is nice in the sense that there is less “ugliness” when creating expressions as there is no need to have metadata in every enum variant. However, this severely effects the way that the rewriter traverses the AST as there is now WithMetadata objects sprinkled throughout the AST which would require some way to traverse up the tree while saving the context of nodes below the metadata object. This image shows the differences in a basic AST:
What we did do
Due to this issue we decided that a simpler implementation where metadata is explicitly required every time but could be set to some empty metadata object was more practical. More details on this implementation can found in Near Future PR
This section had been adapted from the ‘What we didn’t do’ page of the conjure-oxide wiki
Writing Documentation
Creating Documentation
As an organisation, we want Conjure Oxide to be thoroughly documented so that new members of our growing team can integrate smoothly. Whether you are currently on a project or not, contributing to our documentation is essential to achieving this goal.
To make creating and implementing documentation as smooth as possible, we ask that you follow the workflow as outlined below.
Documentation Work Flow
-
Identify the documentation you will write.
In many cases, documentation contributors will be writing about projects they are currently working on or have already completed. However, there are still plenty of opportunities to contribute to documentation, even if you are not actively involved in a project or are seeking a small side project. In such cases, please refer to issue #1334, which tracks all documentation writing tasks. All unassigned child issues are available for anyone to work on!
You may come across instances where important or useful documentation is missing from this book. If you notice such gaps and would like to address them as a side project, we encourage you to do so!
-
If the issue is not already present, open a child issue on our documentation tracking issue #1334.
Make the title of this issue the name of the documentation you will be writing.
-
Link your child issue to a pr request.
File type and naming convention
All documentation for the Conjure Oxide book should be written in markdown. If you’re unfamiliar with markdown or need a refresher on its syntax, we recommend reviewing this guide.
When naming your documentation file, match the file name as closely as possible to the heading of the documentation and use underscores (‘_’) to replace spaces. For example, if your documentation page is titled “Creating Documentation,” name the file
creating_documentation.md.Where to place documentation
Place all documentation files in an appropriate location within the
/docs/srcdirectory. Each markdown file should be stored in the directory that matches its section in the documentation structure. For example, this file is located at/docs/src/developers_guide/contributors_guide/.If you know where your documentation belongs in the book, please place it in the appropriate directory. However, it’s not required to know the exact location—moving files is quick and easy. If you’re unsure where your documentation should go, place the file in
/docs/src/miscso it can be relocated later to a more suitable section.Viewing documentation on the book
You must ensure that the documentation you write formats as expected in the book. To do so, follow these steps:
- Open
/docs/src/SUMMARY.md. - If you have a definite location for your documentation, link the documentation in the appropriate section using the following format:
[ Section title ](path/to/file). - If you are unsure where your documentation should reside, place the documentation at any location, but remember to delete this link once you’re happy with your document’s formatting.
- In your terminal, ensure that you are in the
/docsdirectory and type in the following commandmdbooks serve --open
Important
Be sure to assign yourself and any other contributors working on the documentation to your child issue and pull request. This helps us keep track of who is responsible for each piece of documentation and ensures proper assignment.
- Open
-
Once you are happy with your documentation, request a review from one or more other members of your team.
Important
Place any contributors to the documentation and the date where the documentation was last updated in a comment on the first and second lines of the file. For instance:
[//]: # (Author: Jamie Melton)[//]: # (Last Updated: 09/12/2025)has been placed at the top of this file.
-
When your team is happy with this documentation, request a review from the current book editors.
The current book editors are: JamieASM and HKhan-5.
-
Assuming no adjustments are required, the documentation will then be merged in, and the child issue will be closed.
What is Vale? How does Conjure-Oxide ensure that our documentation is high quality and consistent?
Vale is a prose linter. Think of it like clippy, but for documentation style, spelling, terminology, and consistency.
At a high level, Vale works by:
- Reading a configuration file (
.vale.ini). - Loading one or more styles/rules.
- Scanning matching files (Markdown in our case).
- Emitting alerts (
suggestion,warning,error).
In this repository, Vale is primarily used for documentation quality checks under docs/.
How this repository configures Vale
Our project config lives in /.vale.ini and currently contains:
StylesPath = tools/vale_stylesVocab = conjure_vocab[*.md]+BasedOnStyles = Conjure
What this means:
- StylesPath tells Vale where our local style definitions and vocabulary live.
- Vocab enables the project vocabulary at:
tools/vale_styles/config/vocabularies/conjure_vocab/accept.txt
- BasedOnStyles = Conjure enables the rules in our
Conjurestyle for Markdown files.
For vocabulary behavior and format details, see Vale’s vocabulary docs: Vocabularies.
Fixing PR lint failures by updating the dictionary
When Vale flags a term that is valid for this codebase (domain-specific term, acronym, tool name, etc.), add it to:
tools/vale_styles/config/vocabularies/conjure_vocab/accept.txt
File format rules
accept.txt supports one regex entry per line.
- Lines beginning with
#are comments. - Entries are regex patterns.
- Case sensitivity matters unless you explicitly make a pattern case-insensitive.
Examples:
- Case-insensitive whole term:
(?i)API - Character-class style:
[Jj]son - Optional suffix:
Biplates?
Practical workflow for a failing PR
- Read the Vale error in the PR checks.
- Decide whether the word should be:
- corrected in the doc text, or
- accepted as project vocabulary.
- If it should be accepted, add a new entry to
accept.txt. - Keep the entry as narrow/specific as possible to avoid false positives.
- Commit and push; CI will re-run automatically.
When not to add something to accept.txt
Do not add entries that are just typos or inconsistent wording.
The vocabulary should represent intentional project terminology, not bypass style checks globally.
Good candidates:
- Domain terms (
SATInt,Uniplate,Savile). - Tool names (
rustc,Valgrind). - Project-specific identifiers (
conjure_essence_parser). - Variable names from the code that you might need to refer to.
Bad candidates:
- Accidental misspellings.
- One-off casing mistakes that should be corrected in source text.
Still unsure?
If you have any questions or concerns, please post them on the documentation discussion board. A book editor will respond to you promptly. Likewise, if you have suggestions for improving or streamlining this process, feel free to share your ideas with the book editors! Your feedback is always welcome.
“Omit needless words”
(c) William Strunk
Key Points
Resources
See:
Do’s
Our documentation is inline with the code. The reader is likely to skim it while scrolling through the file and trying to understand what it does. So, our doc strings should:
- Be as brief and clear as possible
- Ideally, fit comfortably on a standard monitor without obscuring the code
- Contain key information about the method / structure, such as:
- A single sentence explaining its purpose
- A brief overview of arguments / return types
- Example snippets for non-trivial methods
- Explain any details that are not obvious from the method signature, such as:
- Details of the method’s “contract” that can’t be easily encoded in the type system
(E.g: “The input must be a sorted slice of positive integers”; “The given expression will be modified in-place”)
- Non-trivial situations where the method may
panic!or cause unintended behaviour(E.g: “Panics if the connection terminates while the stream is being read”)
- Any
unsafethings a method does(E.g: “We type-cast the given pointer with
mem::transmute. This is safe because…”) - Special cases
- Details of the method’s “contract” that can’t be easily encoded in the type system
Things to Avoid
Documentation generally should not:
- Repeat itself
- Use long, vague, or overly complex sentences
- Re-state things that are obvious from the types / signature of the method
- Explain implementation details
- Explain high-level architectural decisions (Consider making a wiki page or opening an RFC issue instead!)
And finally… Please, don’t ask ChatGPT to document your code for you! I know that writing documentation can be tedious, but you can always:
- Write a one-sentence doc string for now and come back to it later
- Ask others if you don’t quite understand what a method does
Types and Tests are Documentation
Documentation is great, but we should also use the type system and other rust features to our advantage!
-
A lot of things (e.g: error conditions, thread safety, state) can be encoded in the types of arguments / return values. This is usually better than just
panic!-ing and adding a doc string to explain why. -
Tests are also a great way to illustrate the behaviour of your code and any special cases - and they also help with catching bugs!
Example Snippets
For non-trivial methods and user-facing API’s, it may be useful to include an example. Examples should be minimal but complete snippets of code that illustrate a method’s behaviour.
If you wrap your example in a code block:
```rust ... ```
Our CI will even run it and complain if the example does not compile / contains an error!
However, don’t feel obliged to include an example for every method! For simple methods they may not be necessary.
Examples
⚠️ Good but a bit wordy:
#![allow(unused)]
fn main() {
/// Checks if the OPTIMIZATIONS environment variable is set to "1".
///
/// # Returns
/// - true if the environment variable is set to "1".
/// - false if the environment variable is not set or set to any other value.
fn optimizations_enabled() -> bool {
    match env::var("OPTIMIZATIONS") {
        Ok(val) => val == "1",
        Err(_) => false, // Assume optimizations are disabled if the environment variable is not set
    }
}
}
✅ Since everything else is obvious from the signature, we can just say:
#![allow(unused)]
fn main() {
/// Checks if the OPTIMIZATIONS environment variable is set to "1"
fn optimizations_enabled() -> bool { ... }
}
⚠️ Not bad, but sounds a bit robotic
# Side-Effects
- When the model is rewritten, related data structures such as the symbol table (which tracks variable names and types)
  or other top-level constraints may also be updated to reflect these changes. These updates are applied to the returned model,
  ensuring that all related components stay consistent and aligned with the changes made during the rewrite.
- The function collects statistics about the rewriting process, including the number of rule applications
  and the total runtime of the rewriter. These statistics are then stored in the model's context for
  performance monitoring and analysis.
✅ Same idea but shorter
# Side-Effects
- Rules can apply side-effects to the model (e.g. adding new constraints or variables).
  The original model is cloned and a modified copy is returned.
- Rule engine statistics (e.g. number of rule applications, run time) are collected and stored in the new model's context.
⚠️ A bit too detailed
# Parameters
- `expression`: A reference to the [`Expression`] that will be evaluated against the given rules. This is the main
   target for rule transformations and is expected to remain unchanged during the function execution.
- `model`: A reference to the [`Model`] that provides context for rule evaluation, such as constraints and symbols.
  Rules may depend on information in the model to determine if they can be applied.
- `rules`: A vector of references to [`Rule`]s that define the transformations to be applied to the expression.
  Each rule is applied independently, and all applicable rules are collected.
- `stats`: A mutable reference to [`RewriterStats`] used to track statistics about rule application, such as
  the number of attempts and successful applications.
✅ Just describing the meaning of arguments will do
(Details of the rewriting process belong on the wiki, and details of underlying types such as Model or Expression are already documented next to their implementations)
- `expression`: A reference to the [`Expression`] to evaluate.
- `model`: A reference to the [`Model`] for access to the symbol table and context.
- `rules`: A vector of references to [`Rule`]s to try.
- `stats`: A mutable reference to [`RewriterStats`] used to track the number of rule applications and other statistics.
CI/CD
Code Coverage
User Guide
-
Run coverage with
./tools/coverage.sh. -
Open this in a web-browser by opening
target/debug/coverage/index.html. -
An
lcovfile is generated attarget/debug/lcov.infofor in-editor coverage.- If you use VSCode, configuration for this should be provided when you clone the repo. Click the “watch” button in the status bar to view coverage for a file.
Implementation
See the code for full details: tools/coverage.sh.
A high level overview is:
- The project is built and tested using instrumentation based coverage.
- Grcov is used to aggregate these reports into
lcov.infoandhtmlformats. - The
lcov.infofile can be used with thelcovcommand to generate summaries and get coverage information. This is used to make the summaries in our PR coverage comments.
Reading:
- grcov README - how to generate coverage reports.
- rustc book - details on instrumentation based coverage.
Doc Coverage
Text: This prints a doc coverage table for all crates in the repo:
RUSTDOCFLAGS='-Z unstable-options --show-coverage' cargo +nightly doc --workspace --no-deps
JSON: Although we don’t use it yet, we can get doc coverage information as JSON. This will be useful for prettier and more useful output:
RUSTDOCFLAGS='-Z unstable-options --show-coverage --output-format json' cargo +nightly doc --workspace --no-deps
Reading
See the unstable options section of the rustdoc book. Link.
This section had been taken from the ‘Coverage’ page of the conjure-oxide wiki
Github Actions Cookbook
- This document lists common patterns and issues we’ve had in our Github actions, and practical solutions to them.
- The first point of reference should be the official documentation, but if that is ever unclear, here would be a good place to look!
Terminology used in this document:
- A workflow contains multiple independently ran tasks. Each task runs a series of steps. Steps can call predefined actions, or run shell commands.
I want to skip CI tests
Adding [skip ci] to a commit message prevents CI tests from being triggered for that commit.
This is useful when pushing unfinished work, for example, to document what isn’t working yet or to ask for help on a draft.
I want to have a step output multilined / complex text
- name: Calculate PR doc coverage
  id: prddoc
  run: |
    RUSTDOCFLAGS='-Z unstable-options --show-coverage' cargo +nightly doc --workspace --no-deps > coverage.md
    echo 'coverage<<EOFABC' >> $GITHUB_OUTPUT
    echo "$(cat coverage.md)" >> $GITHUB_OUTPUT
    echo 'EOFABC' >> $GITHUB_OUTPUT```
The entire output of cargo doc can be substituted into later jobs by using ${{ steps.prdoc.outputs.coverage }}
workflow_run: I want a workflow that runs on a PR and can write to the repo
PR branches and their workflows typically live in on a branch on an external fork. Therefore, they cannot write to the repository. The solution is to split things into two workflows - one that runs on the PR with read-only permissions, and one that runs on main and can write to the repository. This is called a workflow_run workflow. Read the docs.
The workflow_run workflow should not run any user provided code as it has secrets in scope.
I want to access the calling PR in a workflow_run workflow
workflow_run jobs do not get access to the calling workflows detail. While one can access some things via the Github API such as head_sha, head_repo, this may not give any PR information. Github recommends saving the PR number to an artifact, and using this number to fetch the PR info through the API:
Example from this github blog post - see this for more explanation and details!
name: Receive PR

# read-only repo token
# no access to secrets
on:
  pull_request:

jobs:
  build:
    runs-on: ubuntu-latest

    steps:
      - uses: actions/checkout@v2

      # imitation of a build process
      - name: Build
        run: /bin/bash ./build.sh

      - name: Save PR number
        run: |
          mkdir -p ./pr
          echo ${{ github.event.number }} > ./pr/NR
      - uses: actions/upload-artifact@v2
        with:
          name: pr
          path: pr/
name: Comment on the pull request

# read-write repo token
# access to secrets
on:
  workflow_run:
    workflows: ["Receive PR"]
    types:
      - completed

jobs:
  upload:
    runs-on: ubuntu-latest
    if: >
      github.event.workflow_run.event == 'pull_request' &&
      github.event.workflow_run.conclusion == 'success'
    steps:
      - name: 'Download artifact'
        uses: actions/github-script@v3.1.0
        with:
          script: |
            var artifacts = await github.actions.listWorkflowRunArtifacts({
               owner: context.repo.owner,
               repo: context.repo.repo,
               run_id: ${{github.event.workflow_run.id }},
            });
            var matchArtifact = artifacts.data.artifacts.filter((artifact) => {
              return artifact.name == "pr"
            })[0];
            var download = await github.actions.downloadArtifact({
               owner: context.repo.owner,
               repo: context.repo.repo,
               artifact_id: matchArtifact.id,
               archive_format: 'zip',
            });
            var fs = require('fs');
            fs.writeFileSync('${{github.workspace}}/pr.zip', Buffer.from(download.data));
      - run: unzip pr.zip

      - name: 'Comment on PR'
        uses: actions/github-script@v3
        with:
          github-token: ${{ secrets.GITHUB_TOKEN }}
          script: |
            var fs = require('fs');
            var issue_number = Number(fs.readFileSync('./NR'));
            await github.issues.createComment({
              owner: context.repo.owner,
              repo: context.repo.repo,
              issue_number: issue_number,
              body: 'Everything is OK. Thank you for the PR!'
            });
How do I get x commit inside a PR workflow? What do all the different github sha’s mean?
If you are running in a workflow_run workflow, you will need to get the calling PR first. See I want to access the calling PR in a workflow_run workflow instead.
The default github.sha is a temporary commit representing the state of the repo should the PR be merged now. You probably want github.event.pull_request.head.sha. Read The many SHAs of a github pull request.
This section had been taken from the ‘Github Actions’ page of the conjure-oxide wiki
Test GitHub Actions Locally With act
This guide shows how to run GitHub Actions workflows locally using act. It is useful for fast feedback on CI changes without waiting for a remote run.
For details on installation and advanced usage, see https://nektosact.com/.
Quick start
- Install
act(see the official site for the latest install steps). - From the repo root, run a workflow event, for example:
act --container-architecture linux/amd64
This repo works best with the catthehacker/ubuntu:act-latest image. It includes common CI tooling and matches GitHub-hosted Ubuntu runners more closely than the default image. The act default image can be configured at runtime; see https://nektosact.com/ for details.
Common usage patterns
- Run a specific workflow file:
act -W .github/workflows/ci.yml --container-architecture linux/amd64
- Run a specific job:
act -j test --container-architecture linux/amd64
- Provide secrets locally (example):
act --secret-file .secrets --container-architecture linux/amd64
- Run the Vale job for pull requests:
act pull_request --job vale --container-architecture linux/amd64
In this repo, the vale job is part of the pull request workflows, so this command runs that job locally against a simulated pull_request event. It uses the recommended catthehacker/ubuntu:act-latest image by default, and you can configure the image at runtime; see https://nektosact.com/usage/runners.html#alternative-runner-images/ for details.
Limitations to keep in mind
- Workflow triggers: some events (
workflow_run,pull_request_target, scheduled jobs) do not behave exactly like GitHub and may need extra inputs or manual flags. - GitHub API usage: steps that call the GitHub API (releases, issues, PR comments, status checks) require valid tokens and may still diverge from real GitHub behavior.
- Deployment workflows: jobs that deploy (cloud credentials, OIDC, environment protection rules) are hard to reproduce locally and are better validated in a real GitHub run.
- Hosted services and caches: actions depending on GitHub-hosted caches or services may be no-ops or behave differently.
- Matrix and concurrency: complex matrices, concurrency groups, and reusable workflows can be partially supported but may require extra configuration or run differently.
When in doubt, use act for fast iteration, then confirm changes with a real GitHub Actions run.
Flatten
Usage in Essence
With one argument, flatten(M) returns a one-dimensional matrix containing all the elements of the input matrix.
With two arguments, flatten(n,M) the first n+1 dimensions are flattened into one dimension.
Warning
flatten(n,M)has not yet been implemented.
Expression variant
The Flatten variant of Expression in the AST has structure defined as:
Flatten(Metadata, Option<Moo<Expression>>, Moo<Expression>)
The return type and domain of Flatten is a matrix of the innermost elements of the flattened matrix’s return type or domain. This has not yet been implemented in the case where the dimensions to flatten are provided.
flatten rule
The flatten rule in crates/conjure-cp-rules/src/matrix/flatten.rs turns flatten expressions containing atomic matrix expressions into a flat matrix literal.
Coding Resources and Conventions
Why benchmark?
Benchmarking is an essential part of any coding project, especially when it is performance-oriented. While it can be a little daunting when first getting started, this guide aims to show that benchmarking can be integrated into conjure-oxide and its workflows with a little work.
criterion
By far, the most popular benchmarking tool currently available for Rust is the criterion crate. Based off the Haskell library of the same name, it is a statistics-based tool which aims to measure wall-clock time for individual functions. To get started on criterion benching in a rust project my_project, you first need to make a directory called benches, which Rust will recognise as holding all benchmarking files. Let’s now make a benchmark called my_bench.rs inside of my_project/benches
We now add the following changes to the crate’s cargo.toml file
#![allow(unused)]
fn main() {
[dev-dependencies]
criterion = "0.3"

[[bench]]
name = "my_bench"
harness = false
}
Suppose that we now want to create function to benchmark the addition of two numbers (which, as expected should be very fast!). We add the following to my_bench.
#![allow(unused)]
fn main() {
use criterion::{Criterion, black_box, criterion_group, criterion_main};

pub fn add(x: u64, y: u64) -> u64 {
    x + y
}

pub fn criterion_benchmark(c: &mut Criterion) {
    c.bench_function("add 20 + 20", |b| {
        b.iter(|| add(black_box(20), black_box(20)))
    });
}

criterion_group!(benches, criterion_benchmark);
criterion_main!(benches);
}
The .bench_function method creates an instance of a benchmark. Then the .iter method tells Criterion to repeatedly execute the provided closure. Finally, black_box is used to prevent the compiler from optimising away the code being benchmarked. To run the benchmark simply run cargo bench. Among other things, your terminal should show something alone the lines of:
Which shows the average wall-clock time, as well as providing some information on outliers and performance against previous benchmarks. For the full details, see
\target\criterion. The .html reports are especially good.
criterion is usually the right tool for most benchmarks, although there are issues. Due to the statistics-driven ethos of criterion, there is currently no one-shot support, with 10 samples being the minimum number of samples for a benchmark. Wall-clock time also gives little insight into where things are slowing in your code, and will not catch things like poor memory locality. Even more crucially, however, is how criterion performs in CI pipelines. The developer’s themselves say the following:
”You probably shouldn’t (or, if you do, don’t rely on the results). The virtualization used by Cloud-CI providers like Travis-CI and Github Actions introduces a great deal of noise into the benchmarking process, and Criterion.rs’ statistical analysis can only do so much to mitigate that. This can result in the appearance of large changes in the measured performance even if the actual performance of the code is not changing.“
As such, we need some other metric apart from wall-clock time to use in order to still run benchmarks in a CI pipeline. This is where the iai-callgrind crate comes in.
iai-callgrind
Iai-Callgrind is a benchmarking framework which uses Valgrind’s Callgrind and other to provide extremely accurate and consistent measurements of Rust code. It does not provide information on wall-clock time, instead focussing on metrics like instruction count and memory hit rates. It is important to note that this will only run on linux, due to the valgrind dependency. Let us create a benchmark called iai-bench in the benches folder. We add the following to cargo.toml
#![allow(unused)]
fn main() {
[profile.bench]
debug = true

[dev-dependencies]
iai-callgrind = "0.14.0"
criterion = "0.3"

[[bench]]
name = "iai-bench"
harness = false
}
To get the benchmarking runner, we can quickly compile from source with cargo install --version 0.14.0 iai-callgrind-runner. To benchmark add using iai-callgrind we add the following to benches/iai-bench.rs.
#![allow(unused)]
fn main() {
use iai_callgrind::{main, library_benchmark_group, library_benchmark};
use std::hint::black_box;

fn add(x: u64, y:u64) -> u64 {
   x+y
}

#[library_benchmark]
#[bench::name(20,20)]
fn bench_add(x: u64,y:u64) -> u64 {
    black_box(add(x,y))
}

library_benchmark_group!(
    name = bench_fibonacci_group;
    benchmarks = bench_add
);

main!(library_benchmark_groups = bench_fibonacci_group);
}
And again run using cargo bench. To specify only running this benchmark we can instead do cargo bench --bench iai-bench. Upon running, you should see something like the following.
As you can see,
iai is lightweight, fast and can provide some really accurate statistics on instruction count and memory hits. This makes iai perfect for benching in CI workflows!
Workflows
Once benchmarking is established, workflows are not too difficult to add too. As discussed before, for CI workflows iai should be used, and not criterion. Take the following example from the tree-morph crate. I will put the code below and then briefly explain each portion. It should not be too difficult to adapt to other benchmarks.
name: "iai tree-morph Benchmarks"

on:
  push:
    branches:
      - main
      - auto-bench
    paths:
      - conjure_oxide/**
      - solvers/**
      - crates/**
      - Cargo.*
      - conjure_oxide/tests/**
      - .github/workflows/iai-tree-morph-benches.yml
  pull_request:
    paths:
      - conjure_oxide/**
      - solvers/**
      - crates/**
      - Cargo.*
      - conjure_oxide/tests/**
      - .github/workflows/iai-tree-morph-benches.yml
  workflow_dispatch:


jobs:
  benches:
    name: "Run iai tree-morph benchmarks"
    runs-on: ubuntu-latest
    timeout-minutes: 10

    strategy:
      # run all combinations of the matrix even if one combination fails.
      fail-fast: false
      matrix:
        rust_release:
          - stable
          - nightly
    steps:
      - uses: actions/checkout@v4

      - uses: dtolnay/rust-toolchain@stable
        with:
          toolchain: ${{ matrix.rust_release }}

      - name: "Cache Rust dependencies"
        uses: actions/cache@v4
        with:
            path: |
              ~/.cargo/registry
              ~/.cargo/git
              target
            key: ${{ runner.os }}-cargo-${{ matrix.rust_release }}-${{ hashFiles('**/Cargo.lock') }}
            restore-keys: |
              ${{ runner.os }}-cargo-${{ matrix.rust_release }}-
      - name: Install Valgrind
        run: sudo apt-get update && sudo apt-get install -y valgrind

      - name: Install iai-callgrind-runner
        run: cargo install --version 0.14.0 iai-callgrind-runner

      - name: Run tree-morph benchmarks with iai-callgrind
        run: cargo bench --manifest-path crates/tree_morph/Cargo.toml --bench iai-factorial --bench iai-identity --bench iai-modify_leafs > iai_callgrind_output.txt

      - name: Upload artefact
        uses: actions/upload-artifact@v4
        with:
          name: iai-callgrind-results-${{ matrix.rust_release }}
          path: iai_callgrind_output.txt
Some comments:
namejust tells GitHub what to call the workflowsontells GitHub when to run the workflowjobsis the core of the workflow:strategyspecifies that we want to run both nightly and stable rust- In
steps, we first check out the repository code and set up a specific stable Rust toolchain based on a matrix variable, and then cache Rust dependencies. Next we install the necessary things for valgrind to run, before running benchmarks. We tell the virtual machine to an.txtfile and upload it as an artefact.
Crate Structure
Overview
We follow a “monorepo” approach; That is, a number of related modules are developed in a single repository. This makes it easier to integrate them and test our entire project all at once.
Our repository can be broken down into four key components:
- The user-facing
conjure-oxidecommand line tool and library, and its integration tests. This is stored inconjure-oxide/conjure_oxide. - The AST type definitions, rewrite engine, and related implementation code.
These are broken up into separate crates and stored in
conjure-oxide/crates/. - Rust bindings for solvers; That is, wrapper code and build files that enable us to:
-
Compile solvers (which are developed outside of this project and written in other languages, such as C++) together with our project
-
“Hook into” solver methods and call them from inside our Rust code
These are stored in
conjure-oxide/solvers/on a per-solver basis.
-
- Various other scripts and tools that we use to build, document and test our project.
These are stored in
conjure-oxide/tools/.
CLI Tool
The command-line conjure-oxide tool is the final product we ship to users.
All logic related to the CLI, parsing user input, and displaying solutions is implemented in conjure-oxide/conjure_oxide/src.
This module (called a “crate” in Rust) also re-exports some type definitions and functions from conjure_core and other crates.
This is our public, user-facing API that could eventually be used by other people in their projects. At the moment, our project is under development and there is no stable API specification.
There are some examples/ illustrating how various parts of the project are used.
Finally, for historical reasons, this folder contains some utility code that may be refactored or moved elsewhere in the future.
Tests
Our suite of integration tests runs automatically on every commit to the main repository.
It tests conjure-oxide end-to-end: parsing an example Essence file, running the rewriter, calling the solver, and validating the solution.
The test files are stored in conjure_oxide/tests/integration/, sorted into sub-directories.
Code to run our project on these files is contained in integration_tests.rs.
Crates
Most of our implementation is contained in the crates/ directory. Here is an overview of what each crate does:
conjure_corecontains:- Our rule engine implementation (
conjure_core/src/rule_engine/) - The definition of our Abstract Syntax Tree (AST) for Essence; That is, the Rust representation of an Essence program (
conjure_core/src/ast) - The generic
SolverAdaptorinterface for interacting with solvers (conjure_core/src/solver) - Concrete implementations of
SolverAdaptorfor each solver we support, such as Minion or RustSAT (conjure_core/src/solver/adaptors) - Other miscellaneous types and utilities
- Our rule engine implementation (
conjure_rulesdefines rules and rule sets for our rewrite engine to use. Rules are grouped into files and directories based on their purpose: for example, all rules for normalising boolean expressions are inconjure_rules/src/normalisers/bool.rsconjure_rule_macrosimplements the#[register_rule(...)]and#[register_rule_set(...)]procedural macros. See also: Wiki - Rules and RuleSets.conjure_essence_parserimplements the native Rust parser for Essence. It uses our Tree-sitter grammar, which is defined separately intree-sitter-essenceconjure_essence_macrosimplements theessence_expr!procedural macro.enum_compatability_macrois a macro that allows us to indicate whether certain features of Essence are compatible with certain solvers, for documentation purposes.randicheckis a somewhat separate project developed by Ty (@TAswan) and others. It aims to use Conjure to automatically validate Haskell code and generate minimal failing tests. (TODO is this accurate?)tree_morphis a generic library for tree transformations. In the future, it will replace our current rule engine implementation.
Also:
- The
uniplatecrate, which we use to traverse the AST, used to be part of this repository. It is now maintained separately at https://github.com/conjure-cp/uniplate.
Dependencies
The dependencies between crates are shown bellow.
An arrow A -> B means that A imports from B. The diagram is made using Graphviz, and its source code is located TODO.
Functional Rust
Functional Rust
Consider the following oft-quoted statement about Rust:
Rust is blazingly fast and memory-efficient: with no runtime or garbage collector. Rust’s rich type system and ownership model guarantee memory-safety and thread-safety — enabling you to eliminate many classes of bugs at compile-time.
Taken specifically from the Rust Foundation’s1 page talking about why Rust is a good language to use.
But let us focus on the implications of this statement on Conjure Oxide specifically. The key details that one needs to know here are that, despite arguably being imperative, Rust adopts many functional programming concepts in its design2. This is significant because the Conjure Oxide codebase makes extensive use of these functional programming concepts.
Making use of them allows the codebase to leverage Rust’s type system to eliminate error cases through coding style, making the code more robust. It also makes the code easier to write, because Rust’s safety system enforces function return types.
Result
By using the Result type, functions can explicitly state success or failure. This also allows functions to call each other linearly in a safe manner3.
This enables the code to be written so that functions can do essentially whatever they need to do as side effects, as long as they record a success or failure result. The error type allows error propagation in a more sophisticated way than exit codes, while still being more efficient than exceptions. This structure is used in a lot of places in this codebase, because it allows for functions to be treated uniformly most anywhere4, meaning they can be called anywhere by any originator (or caller) function without having to resort to unsafe rust and sticking to the type safety scheme.
This also allows for the use of the ? operator5, which means that errors can be propagated up the call stack lazily.
Consider the following example, written imperatively in Java-like pseudocode:
public void fnReturnsError(a,b) {
    ...Some Code...
    // might throw error1
    int foo1 = maybeReturnsMyError1(a);
    ...Some More Code...
    // might throw error2
    int foo2 = maybeReturnsMyError2(b);
    ...Wow, when will this code end...
    // might throw error3
    int foo3 = maybeReturnsMyError3(a,b);
}
Alternatively, consider a lower-level language like C, which is far more comparable to Rust in its uses and applications, where there are no ‘error types’ and errors behave like either enums or just integral exit codes.
In a C-like language, a similar example would look like this:
int returnAnExitCode(int a, int b) {
    int exit_code = 0;
    ...Some Code Here Too...
    int exit_code = maybeReturnsMyExitCode1(a);
    ...Some More Code...
    int exit_code = maybeReturnsMyExitCode2(b);
    ...Why, if it isn't yet more code ...
    int exit_code = maybeReturnsMyExitCode3(a,b);

    return exit_code
}
This means that, like rust, an error is not an exception getting ‘thrown’, but a value that is being returned. However, unlike rust, they require these exit codes to be set and returned at the end.
This also means that the function calls must be done on some top-level data structure, and that global structure needs to be accessed at the end rather than being able to simply access the top-level data structure through the returned value.
In this type of application, Rust offers two advantages:
- The
Returntype, even though it records a success/failure, can be pattern-matched using thematchconstruct to access the data structure which the functions are performing side effects on. - The aforementioned
?operator can be used to force the code to return an error type as soon as it is ‘raised’ – that is, returned by one of the functions in the call stack.
This example would look like this in rust-like functional code:
#![allow(unused)]
fn main() {
fn returns_a_result(a: i32, b: i32) -> Result<i32, MyError> {
    // Some code here...

    // The ?  operator propagates errors immediately
    let foo1 = maybe_returns_my_error1(a)?;

    // Some more code...
    let foo2 = maybe_returns_my_error2(b)?;

    // Even more code...
    let foo3 = maybe_returns_my_error3(a, b)?;

    // If we get here, all operations succeeded
    Ok()
}
}
Side Effects
Throughout the above section, references are made to changing things through ‘function side effects’. Let us dive deeper into what this actually means.
Functions are fairly complex, but here is what Alonzo Church has to say about what they do, taken from his paper The Calculi of Lambda Conversion:
A function is a rule of correspondence by which when anything is given (as argument) another thing (the value of the function for that argument) may be obtained. That is, a function is an operation which may be applied on one thing (the argument) to yield another thing (the value of the function).
In quite an abstract sense, this passage establishes that a Function is simply a mapping from a set of inputs to a set of outputs.
Now, knowing this, the term side effect also begins to make sense – any persistent effects of a function which are not in the returned value are side effects. In a general sense, this is things like writing to files, printing and so on. More specifically in conjure oxide, almost all processing is done by way of side effects. While this makes sense even in an imperative context, imperative code can still have some functions chained together in ways that are only possible if the data structure being affected by them is actually returned by them. In rust, specifically when this side-effect-only style of programming is used, programs end up looking quite a bit more concise and readable.
Now, having all of this knowledge in the back of your head, you will understand why the following things must be kept in mind:
- Make the greatest effort to treat Rust as a functional language when programming in this (and indeed any) codebase. Not only does this lead to cleaner, more concise and (arguably) more readable code, it actually helps avoid errors and edge cases.
- Learn to leverage the Rust type and safety system instead of wrestling with by writing code that uses features in the language like
Result<T,E>andOption<T>. This may involve learning where to use these instead of doing things that one cannot do in imperative languages like C. - Rust code is only properly ‘safe’ if it uses the type system properly, meaning it is a good idea to avoid things like returning null, unwrapping
Resultinstances6.
-
Who are, of course, an entirely unbiased source ↩
-
Rust’s original implementation language was OCaml, which is functional ↩
-
Similar to calling functions in dynamically typed languages like Python, but with enforced types ↩
-
This is because, at their core, all functions are essentially of the type (..) -> ReturnType. Making the return type standard allows for all functions to be of similar types. ↩
-
Which immediately propagates the error up through the call stack in rust. ↩
-
This is what caused the infamous cloudflare outage. ↩
Representation Rules and Transformation Rules
Representation Rules and Transformation Rules
While developing rule-based transformations for conjure oxide, it is useful to understand the structure of the rulesets and the types of rules that can be used in conjure oxide. Let us first look at how rules actually function, not programmatically, but in an abstract sense. An understanding of (and some experience of) functional programming is incredibly helpful1. Also useful is an understanding of the idea behind graph machines2 and an understanding of the difference between function results and side effects3.
In conjure oxide, the rules are functions that take in the expression tree and the symbol table as arguments and return a function result4, meaning that the original expression tree and symbol table are only modified through side effects of rule functions5.
There are quite a few advantages to this system, including a few small quality-of-life things such as the ability to write more descriptive errors and to pattern match on function results. The most significant benefit, however, is the ability to express rules as functions that can do whatever they need to do as long as they return a failure or a success. This means that an application failure can be treated as a recoverable result rather than a crash.
Each function is self-contained6, meaning that the only things preserved are the initial symbol table and the expression, along with the result being passed along the call stack. The most significant benefit, however, is that this allows for code to be written in a way that enforces that errors are handled. This is quite useful in general because it means that the codebase can leverage Rust’s type system to eliminate edge cases everywhere.
The rule application is able to use this to avoid a situation where the rule engine fails unexpectedly and loses a large amount of work, or worse, a situation where a rule seems to have been applied and is visible in the trace but has not actually affected the tree because it failed7.
Now that we know how rules are called, we can move on to how the rules themselves are designed. Broadly, there are two categories that we can divide the rules into: Representation Rules and Transformation Rules. This is because, despite being applied in the same step in the process, they have different purposes from each other, but all rules of either type share a common goal.
Representation Rules
Essence (which is the input language of conjure oxide) defines domains that are not present in the type systems of the different solvers’ input languages, meaning they need to be encoded in some way into the input languages. The encoding is done using representation rules.
Representation rules implement shared behaviour using a trait8. The representation rules must change Essence variables into the target solver’s input language while preserving all of the relevant information. To actually do this, write a struct that implements the relevant trait. The rule engine can then use this to encode unsupported decision variable types.
Transformation Rules
After all of the variables in the symbol table have been encoded into the relevant types, the next thing to do is to convert all of the constraints in the conjure oxide AST into a form that has a one-to-one parallel with the input language of the target solver.
This done is using transformation rules, each of which is registered with a ‘priority’ and can then be used by the rule engine to convert the AST into a format that can be used by the solver adaptor.
-
Take a look at Graham Hutton’s Programming in Haskell (2nd Ed), and Miran Lipovača’s Learn You a Haskell for Great Good! for a lighter read ↩
-
https://amelia.how/posts/the-gmachine-in-detail.html ↩
-
Read the section of this text on ‘Functional Rust’ ↩
-
In Rust, this is
std::Result<T, E>↩ -
Particularly nice in Rust due to the way it does ownership and error handling ↩
-
Extra memory is freed when the function exits ↩
-
Unless
unwrapis used ↩ -
See project documentation ↩
Overview
The parser converts incoming Essence programs to Conjure Oxide to the Model Object that the rule engine takes in. The relevant parts of the Model object are the SymbolTable and Expression objects. The symbol table is essentially a list of the variables and their corresponding domains. The Expression object is a recursive object that hold all the constraints of the problem, nested into one object. The parser has two main parts. The first the tree-sitter-essence crate, which is a general Essence parser using the library tree-sitter. The second part is the conjure_essence_parser crate which is Rust code that uses the grammar to parse Essence programs and convert them into the above-mentioned Model object.
Tree Sitter Grammar
Tree-sitter is a parsing library that creates concrete syntax trees from programs in various languages. It contains many languages already, but Essence is unfortunately not one of them. Therefore, this crate contains a JavaScript grammar for Essence, which tree-sitter uses to create a parser. The parser is not specific to Conjure Oxide as the grammar merely describes the general Essence language, but it is used in Conjure Oxide and currently covers only parts of the Essence language that Conjure Oxide deals with and has tests written for. Therefore, it is not extensive and relatively simple in structure.
General Structure
At the top level, there can be either find statements, letting statements, and constraint statements. Find statements consist of the keyword find, one or more variables, and then a domain of either type boolean or integer. Letting statements have the keyword letting, one or more variables, and an expression or domain to assign to those variables. Constraints contain the keyword such that and one or more logical or numerical expressions which include variables and constants.
Expression Hierarchy
Expressions in the grammar are broken down into boolean expressions, comparison expressions, and arithmetic expressions. This separation helps enforce semantic constraints inherent to the language. For example, expressions like x + 3 = y are allowed because an arithmetic expression is permitted on either side of a comparison, but chained comparisons like x = y = 3 are disallowed, since a comparison expression cannot itself contain another comparison expression as an operand. This also helps ensure the top-most expression in a constraint evaluates to a boolean (so such that x + 3 wouldn’t be valid). There are also atom expressions such as constants, identifiers, and structured values (tuples, matrices, or slices), which are allowed as operands to most expressions since they might be booleans. This does mean, however, that a constraint like such that y would be valid even though y might be an integer. Quantifier expressions are also separated into boolean and arithmetic quantifiers for this reason (so such that allDif{[a, b]} is valid but such that min{[a,b]} isn’t).
The precedence levels throughout the grammar are based on the Essence prime operator precedence table found in Appendix B of the Savile Row Manual. This is important to ensure that nested or complicated expressions such as (2*x) + (3*y) = 12 are parsed in the correct order, as this will determine the structure of the Expression object in the Model.
Generated Tree-sitter files in git
The files generated by tree-sitter generate (parser.c, node-types.json, and parser.json) are in crates/tree-sitter-essence/src directory and are intentionally committed to the repository each time they are updated (any time a change is made to the grammar).
The generated src/ directory is kept because:
- It matches the standard
tree-sitterrepository layout and ecosystem expectations. - Generating these files when building Conjure Oxide would:
- make Conjure Oxide dependent on node.js.
- make the parser incompatible with the
tree-sitter CLIandneovim.
These files may cause merge conflicts but they are easily resolved by simply running tree-sitter generate again and committing that result. The only file that ever has to be manually changed or reviewed is grammar.js. grammar.js changes should never be committed without also running tree-sitter generate and committing the generated files.
Rust Parser
This is the second part of the parser and is contained in the conjure_essence_parser crate. The primary function is parse_essence_file_native, shown below, which takes in the path to the input and the context and returns the Model or an error.
pub fn parse_essence_file_native(
    path: &str,
    context: Arc<RwLock<Context<'static>>>,
) -> Result<Model, EssenceParseError> {...}
Within that function, the source code is read from the input and the tree-sitter grammar is used to parse that code and produce a parse tree. From there, a Model object is created and the SymbolTable and Expression fields are populated by traversing and extracting information from the parse tree.
General Structure and utils
The top level nodes (children of the root node), are either extras (comments or language labels), find statements, letting statements, or constraints. Find and letting statements provide info that is added to the SymbolTable while constraints are added to the Expression.
In general, kind() is used to determine which rule a node represents and the corresponding function or logic is then applied to that node. Child nodes are found using their field names or indexes and the named_children() function is used to iterate over the named child nodes of a node. The function child_expr returns the Expression parsed from the first named child of the given node.
Extracting from the source code (identifiers and constants)
The tree-sitter nodes have a start and end byte indicating where the node corresponds to in the source code. For variable identifiers, constants, and operators, these bytes are necessary to extract the actual values from the source code.
For example, the following code appears in the parse_find_statement function and is used to extract the specific variable name from the source code, which is represented simply by a tree-sitter node (named variable in this case).
let variable_name = &source_code[variable.start_byte()..variable.end_byte()];
Another example is when parsing expressions, the node representing the operator is not always ‘named’, meaning it is not its own rule in the grammar and rather specified directly in the rule (ex. exponent: $ => seq($.arithmetic_expr, "**", $.arithmetic_expr) (simplified)), or the operator one of multiple choices in a rule (ex. mulitcative_op: $ => choice("*", "/", "%")). In this situation, the same method as for the variable identifiers is used:
let op = constraint.child_by_field_name("operator").ok_or(format!(
        "Missing operator in expression {}",
        constraint.kind()
    ))?;
let op_type = &source_code[op.start_byte()..op.end_byte()];
Find and Letting Statements
Find and letting statements are parsed relatively intuitively. For find statements, the list of variables is iterated over and each is added to a hash map as the key. Then, the domain is parsed and added as the value for each variable it applies to. Once all variables and domains are parsed, the hash map is returned and the caller function iterates over it and adds each pair to the SymbolTable. For letting statements, a new SymbolTable is created. The variables are again iterated over and added to the table. Letting statements can either specify a domain or an expression for the variables so the type of node is checked and either parsed as an expression or domain before being added to the table. The SymbolTable is returned and the caller function adds it to the existing SymbolTable of the Model.
Constraints
Adding constraints to the overall constraints Expression requires nesting Expression objects in a consistent and clear manner. Each constraint is parsed using the parse_expression function, which returns an Expression object, and is then added to the model using the add_constraints function. The parse_expression function takes a node as a parameter and is recursive. It matches the node to its ‘kind’, recursively parses the children of the node, then returns an Expression object that correctly packages up the expressions returned from the parsing of the children nodes.
This structure allows for easy addition of more complex constraints as the grammar evolves. As more rules are added to the grammar, the corresponding code block must be added to the match statement in the parse_expression function.
Example
The constraint x = 3 would be represented by a comparison_expr node, which is defined in the grammar as:
comparison_expr: $ => prec(0, prec.left(seq(
      field("left", choice($.boolean_expr, $.arithmetic_expr)),
      field("operator", $.comparative_op),
      field("right", choice($.boolean_expr, $.arithmetic_expr))
    ))),
In the parse_expression function, the left expression is parsed using the child_expr function. The returned Expression would represent the variable x and be saved as expr1. The operator is extracted from the source code and saved as op_type. The right expression node is then found using its field name ‘right’ and parsed. The returned Expression would represent the integer 3 and be saved as expr2.
let expr1 = child_expr(constraint, source_code, root)?;
            let op = constraint.child_by_field_name("operator").ok_or(format!(
                "Missing operator in expression {}",
                constraint.kind()
            ))?;
            let op_type = &source_code[op.start_byte()..op.end_byte()];
            let expr2_node = constraint.child_by_field_name("right").ok_or(format!(
                "Missing second operand in expression {}",
                constraint.kind()
            ))?;
            let expr2 = parse_expression(expr2_node, source_code, root)?;

            match op_type {...}
Depending on the operator type (in this case =), the left and right expressions are added to an Expression of the relevant type (in this case Eq), which is returned.
"=" => Ok(Expression::Eq(
                    Metadata::new(),
                    Box::new(expr1),
                    Box::new(expr2),
                )),
Overview
ProTrace is a tracing module created to trace rule applications on expressions when an Essence file is parsed and rewritten by Conjure Oxide. The purpose of the module is to visualise the rules applied on the expressions, and simplify the identification of errors for debugging. The module supports multiple output formats such as JSON or human readable, along with different verbosity levels to show only what the user would like to see.
Verbosity Level
The different verbosity levels include:
High: All rule applications.Medium(default): Successful rule applications.Low: Only errors are shown (to be implemented).
Outputs of the trace can be saved in a JSON or text file (depending on the format of trace) when specified by the user, and if the file path is not given, the output will be stored in the location of the input Essence file by default.
The module also provides filtering functionalities for displaying specific rule or rule set applications.
Trace type
The module is capable of tracing two types of objects: rule and model. A trace can be created using capture_trace, which takes a consumer and a trace type (RuleTrace or ModelTrace).
#![allow(unused)]
fn main() {
pub fn capture_trace(consumer: &Consumer, trace: TraceType)
}
#![allow(unused)]
fn main() {
pub enum TraceType<'a> {
RuleTrace(RuleTrace),
ModelTrace(&'a ModelTrace),
}
}Rule Trace
Rules are applied to a given expression to rewrite it into the syntax that Conjure understands. These rule applications can be traced by the module to show users what rules have been tried and successfully applied during parsing. A rule trace consists of:
- An initial expression
- The name of the rule being applied
- The priority of the rule being applied
- The rule set that the rule belongs to
- A transformed expression as a result of rule application
- An optional new variable created during the rule application
- An optional new constraint added to the top of the expression tree created during the rule application
#![allow(unused)]
fn main() {
pub struct RuleTrace {
    pub initial_expression: Expression,
    pub rule_name: String,
    pub rule_priority: u16,
    pub rule_set_name: String,
    pub transformed_expression: Option<Expression>,
    pub new_variables_str: Option<String>,
    pub top_level_str: Option<String>,
}
}
Model Trace
Models of the problem contain expressions along with some constraints. A model trace consists of:
- An initial model
- A rewritten model after rule application
#![allow(unused)]
fn main() {
pub struct ModelTrace {
    pub initial_model: Model,
    pub rewritten_model: Option<Model>,
}
}
Formatter
Formatters are responsible for converting trace information into a human-readable or JSON string format before it is output by a consumer.
At the core of this system is the MessageFormatter trait, which defines a common interface for all formatters. There are two built-in formatter implementations provided: HumanFormatter and JsonFormatter.
Message Formatter Trait
#![allow(unused)]
fn main() {
pub trait MessageFormatter: Any + Send + Sync {
    fn format(&self, trace: TraceType) -> String;
}
}
Human Formatter
#![allow(unused)]
fn main() {
pub struct HumanFormatter
}
The HumanFormatter implements the MessageFormatter trait by matching on TraceType and returning a formatted String.
All TraceType variants implement the Display trait, which allows for easy string conversion.
Behaviour:
-
Successful Rule Applications
- A message “Successful Transformation” followed by the full formatted RuleTrace, displaying all of its fields.
-
Unsuccessful Rule Applications
-
A message like “Unsuccessful Transformation” followed by a partial display showing only:
- initial expression
- rule name
- rule priority
- rule set name
-
Only shown if the VerbosityLevel is set to
High.
-
-
Model Traces
- For ModelTrace, it simply displays the initial and rewritten model using its Display implementation.
Filtering:
Before formatting, the HumanFormatter checks if a rule name filter or rule set name filter has been applied.
JSON Formatter
#![allow(unused)]
fn main() {
pub struct JsonFormatter
}
The JsonFormatter implements the MessageFormatter trait by matching on TraceType and returning a JSON-formatted String.
It uses the serde_json library to serialize data into a pretty-printed JSON structure.
Behaviour:
-
Rule Transformations
-
For RuleTrace, it serializes the entire RuleTrace object into a pretty-printed JSON string using
serde_json::to_string_pretty. -
Similar to HumanFormatter displays both successful and unsuccessful rule applications when the verbosity is high.
-
-
Model Traces
- For ModelTrace, no JSON output is generated. No need since the parsed and rewritten models are produced in JSON already.
Filtering:
Before formatting, the JsonFormatter checks if a rule name filter or rule set name filter has been applied.
Consumer
The Consumer enum represents different types of endpoints that receive, format, and output TraceType data.
Consumers control where the trace data goes to and which format.
- StdoutConsumer prints out the trace to the console
- FileConsumer writes the trace data to a file in one of three ways: as human-readable text, as JSON-formatted text, or to both file types simultaneously.
- BothConsumer writes to both stdout and file(s).
#![allow(unused)]
fn main() {
pub enum Consumer {
    StdoutConsumer(StdoutConsumer),
    FileConsumer(FileConsumer),
    BothConsumer(BothConsumer),
}
}
Trace Trait
Each variant implements the Trace trait, meaning it can capture traces and send them to the appropriate destination.
#![allow(unused)]
fn main() {
pub trait Trace {
    fn capture(&self, trace: TraceType);
}
}
Stdout Consumer
A StdoutConsumer outputs the formatted trace data to standard output.
Holds:
- A reference-counted (Arc) formatter that implements the MessageFormatter trait.
Arc(Atomic Reference Counted pointer) allows safe shared ownership across multiple consumers.- Multiple Consumers might want to share the same formatter without each owning and duplicating it.
- A verbosity VerbosityLevel that can influence what gets printed.
#![allow(unused)]
fn main() {
pub struct StdoutConsumer {
    pub formatter: Arc<dyn MessageFormatter>,
    pub verbosity: VerbosityLevel,
}
}
dyn = dynamic dispatch. At runtime, it calls the correct format method for the actual formatter.
When capturing a trace:
It formats the trace using its assigned formatter.
File Consumer
A FileConsumer writes the formatted trace data to one or more files.
Holds:
- A reference-counted (Arc) formatter.
- A formatter type to determine whether to write in Human, JSON, or both formats.
- verbosity
- Path to the file for the JSON trace. (Optional)
- Path to the file for the human-readable trace. (Optional)
- is first flag used for managing JSON array formatting when appending traces.
#![allow(unused)]
fn main() {
pub struct FileConsumer {
    pub formatter: Arc<dyn MessageFormatter>,
    pub formatter_type: FormatterType,
    pub verbosity: VerbosityLevel,
    pub json_file_path: Option<String>,
    pub human_file_path: Option<String>,
    pub is_first: std::cell::Cell<bool>,
}

}
When capturing a trace:
Based on the selected FormatterType:
Human: Writes human-readable output to the human file.
Json: Writes JSON output to the JSON file.
Both: Writes to both files using respective formatters (HumanFormatter and JsonFormatter directly).
Both Consumer
A BothConsumersends the formatted trace data to both:
- Standard output (via an internal StdoutConsumer)
- Files (via an internal FileConsumer)
#![allow(unused)]
fn main() {
pub struct BothConsumer {
    stdout_consumer: StdoutConsumer,
    file_consumer: FileConsumer,
}

}
It combines the behaviours of StdoutConsumer and FileConsumer by calling method capture on both its fields.
Rule Filters
If users would like to only see specific rules or rule sets during rule application tracing, rule filters can be applied using the command-line argument --filter-rule-name or --filter-rule-set followed by comma-separated rule names or sets. The output will only show rules that is in the rule filters, otherwise the rule application will be completely skipped. This feature was added for the abstraction of unimportant rule applications during tracing, allowing users to only see the rules they require.
When both rule name and rule set filters are used in tandem, any rules that pass either the rule name or the rule set filter will be displayed. For example, if the rule name filter is normalise_associative_commutative and the rule set filter is Minion, any rule that has the rule name normalise_associative_commutative or is in the rule set Minion will be displayed.
Rule filters will be applied to both FileConsumer and StdoutConsumer.
Rule filters can also be hard-coded into the program or accessed using the following functions:
#![allow(unused)]
fn main() {
pub fn set_rule_filter(rule_name: Option<Vec<String>>)

pub fn get_rule_filter() -> Option<Vec<String>>

pub fn set_rule_set_filter(rule_set: Option<Vec<String>>)

pub fn get_rule_set_filter() -> Option<Vec<String>>
}
Capturing general messages (independent of the main tracing functionality set by)
This feature was motivated by the need for a unified interface that allows developers to capture messages—whether to stdout or a file—with the flexibility of a typical debug print statement, but with added control.
Default messages are always printed out and additional message types can be filtered and viewed using the command-line argument --get-info-about, followed by the desired message Kind.
For example, running --get-info-about rules will display all the enabled rule sets, individual rules, their assigned priorities, and the sets they belong to. To improve readability, output is color-coded: error messages appear in red, while all other information is shown in green.
#![allow(unused)]
fn main() {
pub enum Kind {
    Parser,
    Rules,
    Error,
    Solver,
    Model,
    Default,
}
fn display_message(message: String, file_path: Option<String>, kind: Kind)


}
Tracing in integration tests
Similar to how a Consumer is created in solve.rs for cargo run solve, a combined_consumer is manually constructed for each integration test, with its fields explicitly set rather than being derived from command-line arguments. This consumer is configured to log successful rule applications to two separate files—one in a human-readable format and the other in JSON. It is then passed to the rewrite_naive function. By establishing a uniform internal interface for tracing in both cargo run and cargo test, we were able to significantly reduce code duplication and streamline the overall tracing logic.
#![allow(unused)]
fn main() {
   let combined_consumer = create_consumer(
            "file",
            VerbosityLevel::Medium,
            "both",
            Some(format!("{path}/{essence_base}.generated-rule-trace.json")),
            Some(format!("{path}/{essence_base}.generated-rule-trace.txt")),
        );
}
The rule traces is verified using the functions read_default_rule_trace and read_json_rule_trace defined in testing.rs which compare the generated trace output to the expected one. read_json_rule_trace ignores the id fields since they can change from one run to another.
Command line arguments and flags
Enable rule tracing
-T, --tracing
Select output location for trace result: stdout or file [default: stdout]
-L, --trace-output <TRACE_OUTPUT>
Select verbosity level for trace [default: medium] [possible values: low, medium, high]
--verbosity <VERBOSITY>
Select the format of the trace output: human or json [default: human]
-F, --formatter <FORMATTER>
Optionally save traces to specific files: first for JSON, second for human format
-f, --trace-file [<JSON_TRACE> <HUMAN_TRACE>]
Filter messages by given kind [possible values: parser, rules, error, solver, model, default]
--get-info-about <KIND_FILTER>
Filter rule trace to only show given rule names (comma separated)
--filter-rule-name <RULE_NAME_FILTER>
Filter rule trace to only show given rule set names (comma separated)
--filter-rule-set <RULE_SET_FILTER>
Tree-morph is a library that helps you perform boilerplate-free generic tree transformations. In its current state, tree-morph is able to perform transformations in a large number of test cases, and work is now being done to try to implement Essence with tree-morph. When completed, tree-morph will be a very powerful stand-alone crate, as well as sitting at the core of conjure-oxide. Despite its current power, there is a still a lot of work to be done on the tree-morph crate. It is currently in a completely unoptimised state, and will be very slow when performing on large trees with a rich rule set and rule hierarchy. In order to assess progress on new optimisations, it is essential to have a diverse list of benchmarks. All benchmarking has been done using the criterion crate. The following section outlines some of the most important benchmarks.
Benchmarks
identity
The identity benchmark is a test designed to capture how long one tree traversal takes. There is no metadata, and the only rule is do_nothing which is never evaluated. The helper function construct_tree creates a simple tree of variable depth. This is an important benchmark to make sure that new proposed changes do not negatively effect tree-morph traversal speed.
Filename: conjure-oxide/crates/tree_morph/benches/identity.rs
#![allow(unused)]
fn main() {
use criterion::{black_box, criterion_group, criterion_main, Criterion};
use tree_morph::prelude::*;
use uniplate::derive::Uniplate;

#[derive(Debug, Clone, PartialEq, Eq, Uniplate)]
#[uniplate()]
enum Expr {
    Branch(Box<Expr>, Box<Expr>),
    Val(i32),
}
struct Meta {}
fn do_nothing(cmds: &mut Commands<Expr, Meta>, subtree: &Expr, meta: &Meta) -> Option<Expr> {
    None
}

fn construct_tree(n: i32) -> Box<Expr> {
    if n == 1 {
        Box::new(Expr::Val(0))
    } else {
        Box::new(Expr::Branch(Box::new(Expr::Val(0)), construct_tree(n - 1)))
    }
}

pub fn criterion_benchmark(c: &mut Criterion) {
    let base: i32 = 2;
    let expr = *construct_tree(base.pow(5));
    let rules = vec![vec![do_nothing]];

    c.bench_function("Identity", |b| {
        b.iter(|| {
            morph(
                black_box(rules.clone()),
                select_first,
                black_box(expr.clone()),
                Meta {},
            )
        })
    });
}

criterion_group!(benches, criterion_benchmark);
criterion_main!(benches);
}
modify_leafs
The modify_leafs benchmark is designed to capture how long it takes for a simple modification rule to be applied to all of the leaf nodes. The function construct_tree creates a tree of variable depth with all leaf nodes initialised to 0. There is no metadata and the only function zero_to_one changes a leaf node of 0 to a leaf node of 1. It should be expected that this will take a lot longer than the identity benchmark, as when a node is changed in tree-morph, an entirely new tree is created.
Filename: conjure-oxide/crates/tree_morph/benches/modify_leafs.rs
#![allow(unused)]
fn main() {
use criterion::{black_box, criterion_group, criterion_main, Criterion};
use tree_morph::prelude::*;
use uniplate::derive::Uniplate;

#[derive(Debug, Clone, PartialEq, Eq, Uniplate)]
#[uniplate()]
enum Expr {
    Branch(Box<Expr>, Box<Expr>),
    Val(i32),
}

struct Meta {} // not relevant for this benchmark

fn zero_to_one(cmds: &mut Commands<Expr, Meta>, subtree: &Expr, meta: &Meta) -> Option<Expr> {
    if let Expr::Val(a) = subtree {
        if let 0 = *a {
            return Some(Expr::Val(1));
        }
    }
    None
}

fn construct_tree(n: i32) -> Box<Expr> {
    if n == 1 {
        Box::new(Expr::Val(0))
    } else {
        Box::new(Expr::Branch(Box::new(Expr::Val(0)), construct_tree(n - 1)))
    }
}

pub fn criterion_benchmark(c: &mut Criterion) {
    let base: i32 = 2;
    let expr = *construct_tree(base.pow(5));
    let rules = vec![vec![zero_to_one]];

    c.bench_function("Modify_leafs", |b| {
        b.iter(|| {
            morph(
                black_box(rules.clone()),
                select_first,
                black_box(expr.clone()),
                Meta {},
            )
        })
    });
}

criterion_group!(benches, criterion_benchmark);
criterion_main!(benches);
}
factorial
The factorial benchmark is the most difficult benchmark currently made, and an improved score on factorial will be indicative of serious gains in optimisations. As the name suggests, factorial is centred around the mathematical factorial operation (5! = 5*4*3*2*1), which will grow the tree depth, providing a rich set of transformations for tree-morph to calculate. The tree generating function random_exp_tree here takes as input a random seed and a max depth, and generates a tree of an arithmetic expression involving values, additions, multiplications and factorials. An example of such an expression with a random seed of 41 and a max depth of 5 is shown below.
(((8 + 1!) + (1 * 3)!) + (1!! * ((2 + 1) * (1 * 1))))!
It is worth mentioning that this expression is extremely large due to the nested factorials, and as such we need a way of making sure that calculations are bounded. This is achieved by modding the results of any additions and multiplications in the rule_eval_add and rule_eval_mul functions by 10, which will bound all factorial expressions by 10!. The benchmark counts the number of addition and multiplication rule applications, and also has a high priority dummy rule do_nothing, in order to increase the benchmark difficulty.
Filename: conjure-oxide/crates/tree_morph/benches/factorial.rs
#![allow(unused)]
fn main() {
use criterion::{black_box, criterion_group, criterion_main, Criterion};
use rand::rngs::StdRng;
use rand::{Rng, SeedableRng};
use tree_morph::prelude::*;
use uniplate::derive::Uniplate;

#[derive(Debug, Clone, PartialEq, Eq, Uniplate)]
#[uniplate()]
enum Expr {
    Add(Box<Expr>, Box<Expr>),
    Mul(Box<Expr>, Box<Expr>),
    Val(i32),
    Factorial(Box<Expr>),
}

fn random_exp_tree(rng: &mut StdRng, count: &mut usize, depth: usize) -> Expr {
    if depth == 0 {
        *count += 1;
        return Expr::Val(rng.random_range(1..=3));
    }

    match rng.random_range(1..=13) {
        x if (1..=4).contains(&x) => Expr::Add(
            Box::new(random_exp_tree(rng, count, depth - 1)),
            Box::new(random_exp_tree(rng, count, depth - 1)),
        ),
        x if (5..=8).contains(&x) => Expr::Mul(
            Box::new(random_exp_tree(rng, count, depth - 1)),
            Box::new(random_exp_tree(rng, count, depth - 1)),
        ),
        x if (8..=11).contains(&x) => {
            Expr::Factorial(Box::new(random_exp_tree(rng, count, depth - 1)))
        }
        _ => Expr::Val(rng.random_range(1..=10)),
    }
}
fn do_nothing(cmds: &mut Commands<Expr, Meta>, subtree: &Expr, meta: &Meta) -> Option<Expr> {
    None
}

fn factorial_eval(cmds: &mut Commands<Expr, Meta>, subtree: &Expr, meta: &Meta) -> Option<Expr> {
    if let Expr::Factorial(a) = subtree {
        if let Expr::Val(n) = *a.as_ref() {
            if n == 0 {
                return Some(Expr::Val(1));
            }
            return Some(Expr::Mul(
                Box::new(Expr::Val(n)),
                Box::new(Expr::Factorial(Box::new(Expr::Val(n - 1)))),
            ));
        }
    }
    None
}

fn rule_eval_add(cmds: &mut Commands<Expr, Meta>, subtree: &Expr, meta: &Meta) -> Option<Expr> {
    if let Expr::Add(a, b) = subtree {
        if let (Expr::Val(a_v), Expr::Val(b_v)) = (a.as_ref(), b.as_ref()) {
            cmds.mut_meta(|m| m.num_applications_addition += 1);
            return Some(Expr::Val((a_v + b_v) % 10));
        }
    }
    None
}

fn rule_eval_mul(cmds: &mut Commands<Expr, Meta>, subtree: &Expr, meta: &Meta) -> Option<Expr> {
    if let Expr::Mul(a, b) = subtree {
        if let (Expr::Val(a_v), Expr::Val(b_v)) = (a.as_ref(), b.as_ref()) {
            cmds.mut_meta(|m| m.num_applications_multiplication += 1);
            return Some(Expr::Val((a_v * b_v) % 10));
        }
    }
    None
}

#[derive(Debug)]
struct Meta {
    num_applications_addition: i32,
    num_applications_multiplication: i32,
}

pub fn criterion_benchmark(c: &mut Criterion) {
    let seed = [41; 32];
    let mut rng = StdRng::from_seed(seed);
    let mut count = 0;

    let my_expression = random_exp_tree(&mut rng, &mut count, 10);
    let rules = vec![
        rule_fns![do_nothing],
        rule_fns![rule_eval_add, rule_eval_mul, factorial_eval],
    ];

    c.bench_function("factorial", |b| {
        b.iter(|| {
            let meta = Meta {
                num_applications_addition: 0,
                num_applications_multiplication: 0,
            };
            morph(
                black_box(rules.clone()),
                select_first,
                black_box(my_expression.clone()),
                black_box(meta),
            )
        })
    });
}

criterion_group!(benches, criterion_benchmark);
criterion_main!(benches);
}
left_add/left_add_hard
The benchmarks left_add and left_add_hard are two benchmarks that evaluate a very simple nested addition expression (1+(1+(1+...))) of variable depth. In its unoptimised state, all but he final two instances of a 1 node will undergo several superfluous rule checks. The benchmark left_add_hard also is identical to left_add, except there are also four additional dummy rules, all assigned with a higher priority than the rule_eval_add. As expected, this will reduce code performance by about 400% (shown later). The code for left_add_hard is shown below, with left_add being very similar.
Filename: conjure-oxide/crates/tree_morph/benches/left_add_hard.rs
#![allow(unused)]
fn main() {
use criterion::{black_box, criterion_group, criterion_main, Criterion};
use tree_morph::prelude::*;
use uniplate::derive::Uniplate;

#[derive(Debug, Clone, PartialEq, Eq, Uniplate)]
#[uniplate()]
enum Expr {
    Add(Box<Expr>, Box<Expr>),
    Val(i32),
}

fn rule_eval_add(_: &mut Commands<Expr, Meta>, expr: &Expr, _: &Meta) -> Option<Expr> {
    match expr {
        Expr::Add(a, b) => match (a.as_ref(), b.as_ref()) {
            (Expr::Val(x), Expr::Val(y)) => Some(Expr::Val(x + y)),
            _ => None,
        },
        _ => None,
    }
}

#[derive(Clone)]
enum MyRule {
    EvalAdd,
    Fee,
    Fi,
    Fo,
    Fum,
}

impl Rule<Expr, Meta> for MyRule {
    fn apply(&self, cmd: &mut Commands<Expr, Meta>, expr: &Expr, meta: &Meta) -> Option<Expr> {
        cmd.mut_meta(|m| m.num_applications += 1); // Only applied if successful
        match self {
            MyRule::EvalAdd => rule_eval_add(cmd, expr, meta),
            MyRule::Fee => None,
            MyRule::Fi => None,
            MyRule::Fo => None,
            MyRule::Fum => None,
        }
    }
}

#[derive(Clone)]
struct Meta {
    num_applications: u32,
}

fn val(n: i32) -> Box<Expr> {
    Box::new(Expr::Val(n))
}

fn add(lhs: Box<Expr>, rhs: Box<Expr>) -> Box<Expr> {
    Box::new(Expr::Add(lhs, rhs))
}

fn nested_addition(n: i32) -> Box<Expr> {
    if n == 1 {
        val(1)
    } else {
        add(val(1), nested_addition(n - 1))
    }
}

pub fn criterion_benchmark(c: &mut Criterion) {
    let base: i32 = 2;
    let expr = *nested_addition(base.pow(5));
    let rules = vec![
        vec![MyRule::Fi],
        vec![MyRule::Fee],
        vec![MyRule::Fo],
        vec![MyRule::Fum],
        vec![MyRule::EvalAdd],
    ];

    c.bench_function("left_add_hard", |b| {
        b.iter(|| {
            let meta = Meta {
                num_applications: 0,
            };
            morph(rules.clone(), select_first, black_box(expr.clone()), meta)
        })
    });
}

criterion_group!(benches, criterion_benchmark);
criterion_main!(benches);
}
right_add
The benchmark right_add is identical to left_add, except there now we are evaluating ((...+1)+1) instead. This is designed to show the inherent left bias used in tree-morph. Performance is a little better than left_add. Due to the similarity with left_add, the code is omitted.
results
The most helpful feature that criterion produces is its automatic graphing software. Upon a run of cargo bench, criterion automatically produces html reports of all benchmarks, accessible in conjure-oxide/target/criterion. An example report is shown below.
The left graph is a probability density function for the run time. It says that on average it takes
854.26 µs for identity to run at a fixed depth (in this case 2^5 was used). The right graph is a cumulative time plot. The fact that the line is almost straight indicates that the run times are all very comparable in time. The additional stats provided are all standard statistics measurements, with MAD standing for the mean absolute deviation.
identity vs modify_leafs
The probability density functions for identity and modify_leafs are shown below, both evaluated a tree depth of 2^5.
As you can see, modify_leafs takes significantly longer (2300%) than identity on average, showing how costly even simple tree transformations take. This is most likely due to the fact that tree-morph does not edit in-place, but rather constructs a new tree after applying a transformation.
factorial
The following is the probability density function for factorial, ran at a max depth of 10 and a seed of [41; 32].
As you can see, even for a relatively small max depth compute is large. Also note that factorial still has a very small amount of rule groupings, and performance would likely be orders of magnitude worse if a number of rules comparable to a conjure problem was presented. This shows a significant need for optimisations, and an improved score on factorial would indicate a lot of good progress.
left_add vs left_add_hard
A comparison between left_add and left_add_hard is a clear demonstration of how detrimental duplicate rule checks can be for performance.
Ignoring the differences between the shapes of the graphs (I am unsure why this is the case), we can immediately notice how the extra 4 dummy rules in left_add_hard lead to almost exactly a 400% increase in performance!
Further work
Benchmarks are still in an early stage, and there is lots more to do. Some ideas for future work include:
- Set up some automated infrastructure for running benchmarks automatically on GitHub
- Find out scaling laws for increasing tree depth for current benchmarks
- Set up some head to head tests between two functions
- Set up counters that can measure things like node counts, maximum tree depths and other useful information
- Benchmark individual functions (such as a rule application) in order to better understand how trees grow and shrink during transformations
- Benchmark meta applications
Overview
The Language Server Protocol (LSP) for Essence is designed to provide error detection and syntax highlighting for the Essence language. It consists of a server component and a diagnostics API. When fully implemented, the server will receive document change events from clients (e.g., VS Code), call the diagnostics API to detect syntactic and semantic errors, and publish these diagnostics back to the client for. The diagnostics API provides error detection and document symbol information for syntax highlighting. Its main purpose is to improve the user experience when formulating the problems in Essence.
Structure
The LSP architecture follows a client-server model where the client (editor extension) and server (language server) communicate asynchronously via JSON-RPC 2.0 protocol. The server runs as a separate process, and exchanges messages over standard I/O streams. More on that in LSP structure docs.
When the client requests diagnostics (on open, one edit, on hover… etc.), the LSP forwards this request to the Diagnostics API (for more details see Diagnostics API), which responds with a list of diagnostics which the server converts to tower-lsp-compatible types and publishes to the client.

Demo
https://github.com/user-attachments/assets/302b75e3-f1be-4103-8050-5a5af5d10a0e
Diagnostics API for LSP Server
Overview
The Diagnostics API provides tree-sitter and parser–based diagnostics for Essence source files (for error underlining, syntax highlighting, and hover info). It also exposes general LSP-compatible data structures for consumption by editors and tools. Currently, the main functionality of the Diagnostics API is to parse Essence source code and report syntactic errors found by walking the CST (using tree-sitter) and report semantic errors by attempting a semantic parse and reporting parser errors. It serialises diagnostics exposing a get_diagnostics() function, which returns both semantic and syntactic errors as a Vec of Diagnostics.
Structure
crates/conjure-cp-essence-parser/src/diagnostics/
├─ mod.rs
├─ diagnostics_api.rs             # public LSP-facing structs and `get_diagnostics(source)` aggregator
└─ error_detection/
  ├─ mod.rs
  ├─ semantic_errors.rs         # AST-based semantic detection: maps parse errors to Diagnostics
  └─ syntactic_errors.rs        # tree-sitter traversal: maps erronous parse tree patterns to Diagnostics
Key Functions
-
get_diagnostics(source: &str) -> Vec<Diagnostic)serves as the main entrypoint. It aggregatesdetect_semantic_errors(source)anddetect_syntactic_errors(source)into a single diagnostics vector, returning a combined, deduplicated-by-call vector ofDiagnostics. That’s the function you would call for error detection and underlining. -
detect_syntactic_errors(source: &str) -> Vec<Diagnostic)Parses with tree-sitter and walks the CST using DFS with early retract on error/missing/zero-length nodes to avoid duplicates. More information on that in error detection docs. -
detect_semantic_errors(source: &str) -> Vec<Diagnostic)Runsparse_essence_with_contextand, onErr(EssenceParseError), maps the error into aDiagnosticusingerror_to_diagnostic. More information on that in error detection docs. -
Helpers (for debugging and/or testing):
print_all_error_nodes(source: &str): prints all tree-sitter error/missing nodes with spans.print_diagnostics(diags: &[Diagnostic]): pretty-prints diagnostics.check_diagnostic(...): asserts diagnostic fields in tests.
Key Data Structures
PositionandRange: 0-based positions used to locate where in the source code the diagnostic originates fromSeverity: indicates the type of diagnostic, i.e., Error, Warn, Info, Hint (numeric alignment with LSPDiagnosticSeverity)Diagnostic:range:Rangeseverity:Severitymessage: human-readable description / error messagesource: static string identifying which part of the API the diagnostic comes from (e.g.,syntactic-error-detector)
Example of serialized diagnostic:
{
 "range": {"start": {"line": 0, "character": 0}, "end": {"line": 0, "character": 5}},
 "severity": 1,
 "message": "some error message.",
 "source": "syntactic-error-detector"
}
SymbolKindandDocumentSymbol:- Intended for document highlighting; currently enumerates a few kinds (e.g.,
Integer,Decimal,Function,Letting,Find). To be extended in the near future. DocumentSymbol { name, detail?, kind, range, children? }DocumentSymbolandSymbolKindexist to support semantic highlighting; As of now, these are scaffolded and will be extended across the Essence grammar later on.
- Intended for document highlighting; currently enumerates a few kinds (e.g.,
Direction for Use
The API can be imported via use conjure_cp_essence_parser::diagnostics::diagnostics_api::get_diagnostics or use conjure_cp_essence_parser::diagnostics::diagnostics_api::*, depending on use.
Testing
API-specific tests are located in crates/conjure-cp-essence-parser/tests and can be run via
# to run all tests
cargo test -p conjure-cp-essence-parser --test

# to run with a specific test target
cargo test -p conjure-cp-essence-parser --test semantic_test
cargo test -p conjure-cp-essence-parser --test keywords_as_ident
cargo test -p conjure-cp-essence-parser --test missing_token
cargo test -p conjure-cp-essence-parser --test unexpected_token
Syntax Errors
(Will produce an invalid CST)
1. Missing Token (e.g variable, Domain, Expression)
Description: expected token is absent Detection: Empty node or a missing child node. (MISSING node is inserted) Example: missing variable name
find : bool
Example: missing Expression
letting x be
2. Missing Keyword
Description: a token appears where a different token/keyword is expected Detection: ERROR node containing all the tokens where that failed to match the grammar
Example: missing colon, int is unexpected (here x and int will be children of the ERROR node)
find x int
3. Unexpected Token
Description: a token appearing after a valid construct is complete
Detection: ERROR node containing the extra token (ERROR node will likely be the last child of a valid construct)
Example: second ) is extra
find x : int(1..2))
4. Invalid Token
Description: token is malformed or not part of the grammar
Detection: look for an ERROR node with the invalid token
Example: @int is not a valid token (ERROR node with @)
find x : @int
Conjure does not identify int at all, just says “Skipped token”, “Missing Domain”
Tree-Sitter in conjure-oxide sees int as a valid token but has an ERROR node with @ before.
So in Conjure the same error as Missing Token but might make sense to separate due to different CST structures.
5. Unclosed Delimiter
Description: unmatched or missing closing bracket, parenthesis, brace
Detection: MISSING node “)”
Example: missing )
find x : int(1..2
Conjure allows it but since out grammar enforces it Tree-Sitter produces an error.
6. Unsupported Statements
Description: statement not recognised by Essence grammar Detection: ERROR node with the unrecognised statement Example:
find x : int(1..5)
print x
Conjure doesn’t recognise print x as a separate invalid statement.
7. General Syntax Error
All the other cases that cause an ERROR node in the CST tree.
Semantic Errors
(Will produce a valid CST and AST, now can only detected at runtime, e.g type checking)
1. Keywords as Identifiers
Description: token’s name is not allowed
Detection: compare the variable names against the set of keywords
Example: Keyword “bool” used as a variable name
find bool : bool
find x : letting
Conjure doesn’t allow it but Tree-Sitter does so we will have to check as part of semantic checks.
2. Omitted Declaration
Description: variable not declared Detection: save the declared variables and check if the ones used in expressions are in the declared set Example: x was not declared before
find y : int (1..4)
such that x = 5
3. Invalid Domain
Description: logically or mathematically invalid bounds/domain + infinite domain
Example: a bigger value before smaller
find x : int(10..5)
Conjure doesn’t flag as error just says no solutions found.
Example: infinite domain
find x : int(1..)
Might want to restrict infinite domain with the grammar so it could be a syntax error.
4. Type Mismatch
Description: attempt to do an operation on illegal types
Example: cannot add integer and boolean
letting y be true
find x : int (5..10)
such that 5 + y = 6
5. Unsafe division
Description: cannot divide/modulo by zero
Example: cannot divide by zero
find x : int(5..10)
such that x/0 = 3
Conjure allows, proceeds to run the solver but just outputs no solutions. We should disallow.
6. Invalid indexing in tuples and matrices
Description: Tuples and matrices are indexed from . Negative, zero or index out of bounds is invalid
Example: s tuple index of out bounds
letting s be tuple(0,1,1,0)
letting t be tuple(0,0,0,1)
find a : bool such that a = (s[5] = t[1]) $ true
Possible semantic errors per statement type
(All syntactic errors are relevant for each)
Declarations
Find Statement
(Declaring decision variables)
Format: “find” Name “:” Domain
Semantic Errors: Keyword as Token, Invalid Domain
Letting Statement
(Declaring aliases)
Formats: “letting” Name “be” Expression | “letting” Name “be” “domain” Domain
Semantic Errors: All except Omitted Declaration
Constraints
Format: “such that” list(Expression, “,”)
Semantic Errors: All except for Invalid Domain
Semantic Highlighting for the LSP Server
Overview
Semantic highlighting is an LSP feature that provides context-aware token styling. Unlike syntax highlighting, which relies solely on TextMate grammar patterns, semantic highlighting understands the meaning and usage of tokens within the program.
This implementation extends the existing TextMate-based syntax highlighting and falls back to syntax highlighting whenever a semantic style is not defined by the active theme. Semantic tokens are generated based on prior declarations, allowing variables to be styled differently depending on how they were declared and used throughout the source file.
Key Functions
Token Encoding
During parsing, the semantic meaning of each token is stored in the HoverInfo of the SourceMap as a SymbolKind (see list below). Specifically when parsing variables, they are assigned a DeclarationKind during the initial declaration of the variable, which is stored in the symbol table. When used in expressions, the DeclarationKind is then mapped to either a FindVar, LettingVar, or GivenVar and stored in the SourceMap, which allows different styling of the variable based on its declaration type.
List of available SymbolKinds in diagnostics_api.rs:
- Integer
- Decimal
- Function
- Letting
- Find
- Variable
- Constant
- Domain
- FindVar
- LettingVar
- Given
- GivenVar
Semantic tokens are encoded using the encode_semantic_tokens() function in semantic_tokens.rs. The function processes each token in the SourceMap and converts it into a semantic token by calling token_encoding(). This helper maps each SymbolKind to a corresponding TokenEncoding.
Most editor themes do not provide dedicated styles for Essence variables. To visually distinguish variables by declaration type, Essence declarations are mapped onto standard semantic token classifications commonly used in other languages but otherwise unused in Essence.
The current mappings are shown below:
| Declaration kind(s) | Symbol kind | Semantic token classifier | Fallback TextMate grammar |
|---|---|---|---|
| Find | FindVar | property | variable.other.property.findVar |
| ValueLetting TemporaryValueLetting DomainLetting | LettingVar | variable | variable.other.constant.lettingVar |
| Given | GivenVar | string | string.other.givenVar |
Additionally, find variables are visually emphasised because they represent the variables the solver is attempting to solve for. An underline style is therefore hard-coded in package.json for tokens classified as FindVar.
LSP Semantic Highlighting Handler
The semantic highlighting handler retrieves the SourceMap from cache and passes it to encode_semantic_tokens() to generate semantic tokens. These encoded tokens are then returned to the LSP server, which forwards them to the client. The client uses the semantic token classifications together with the active theme to determine how each token should be rendered.
Expanding Semantic Highlighting
To expand on the current semantic highlighting available, the files that will need to be changed are: crates/conjure-cp-essence-parser/src/diagnostics/diagnostics_api.rs, crates/conjure-cp-essence-parser/src/diagnostics/semantic-tokens.rs, crates/conjure-cp-lsp/src/server.rs, and package.json
- In
diagnostics_api.rs, add the new symbol kind to theSymbolKindenum. - In
semantic_token.rs, add a new constant variable for the new symbol kind and create a mapping from the symbol kind to a token in thetoken_encoding()function. - In
server.rs, add the new symbol kind to the server’ssemantic_token_provider. - In
package.json, add the new symbol kind to the semantic token scopes to specify its styling in TextMate, and if it is a custom token, add a new field for it in the semantic token types
Semantic Highlighting Customisation (VSCode)
To customise semantic highlighting styles, open up settings.json in VSCode, and add the following code snippet if it does not exist in the file:
"editor.semanticTokenColorCustomizations": {
  "rules": {
    "{token_name}": "{styles}",
  }
}
CST - Concrete Syntax Tree. Generated by the tree-sitter parser when parsing an essence file.
AST - Abstract Syntax Tree. Generated when the CST is parsed and Model struct is created.
Syntax Errors
Surface level mistakes in the Essence format.
Lead to an invalid CST. They are caught by the tree-sitter when an Essence expression does not match any rules in the current grammar and cause the CST to have ERROR nodes.
Detected by inspecting and contextualising the CST.
1. Missing Token
Description
Expected token is absent.
Detection
MISSING node inserted or zero range node in the CST.
Example 1: Missing identifier(s)
find : bool
Example 2: Missing right operand
find x: int
such that x /
Example 3: Missing domain in tuple
find x: tuple()
2. Unexpected Token
Description
Symbol(s) that are not supposed to be there according to the grammar rule tree-sitter is matching. Can be tokens belonging to the grammar or any foreign symbols.
Detection
ERROR node wrapping the unexpected symbol(s).
Example 1: Extra ) at the end
find x: int(1..2))
Example 2: Unexpected % in implication
find x: int(1..3)
such that x -> %9
Example 3: Unexpected & inside matrix domain
find x: matrix indexed by [int, &] of int
3. Malformed Top Level Statement
Description
A line that cannot be parsed by the tree-sitter using any of the grammar rules.
Detection
ERROR node that is a direct child of the root node program and precedes the nodes if the parsed line.
Example 1: Invalid print x
find x: int(1..5)
print x
Example 2: Malformed find statement
More of an edge case. Even though the keyword find is present, tree-sitter does not parse the line using the find_statement rule since the first symbol after find cannot be parsed an identifier.
find +,a,b: int(1..3)
4. General Syntax Error
Cases that cause an error in the CST but did not fall into any of the previous categories.
Semantic Errors
These errors concern the logical context of an expression rather than its surface-level formatting. As a result, the expression may conform to the grammar and produce a valid CST, but still fail to parse into a valid AST. Such errors are detected during the phase that converts the CST into a Model struct.
1. Keywords as Identifiers
Description
Using grammar keywords (e.g find, bool) as a variable name.
Detection
Compare the variable names against the set of keywords that should not be allowed.
Example 1: Keyword bool as an identifier
find bool: bool
Example 2: Keyword letting used as an identifier
find letting,b,c: int(1..3)
2. Omitted Declaration
Description
Variable used but not declared.
Detection
Checking that the identifier used in a constraint was previously declared in a find or letting_statement.
Example: x was not declared before
find y: int (1..4)
such that x = 5
3. Invalid Domain
(not yet supported)
Description
Logically or mathematically invalid bounds.
Example: a bigger value before smaller
find x: int(10..5)
4. Type Mismatch
Description
Attempt to do an operation on illegal types.
Detection
Enforcing types on operations and catching a mismatch between expected types and node kind that is being parsed.
Example: Adding an integer and boolean
letting y be true
find x: int (5..10)
such that 5 + y = 6
5. Unsafe division
(not yet implemented)
Description
Attempt to divide/modulo by zero.
Example: Divide by zero
find x: int(5..10)
such that x/0 = 3
At the moment says no solutions found. Would want to explicitly disallow it.
6. Invalid indexing
Description
Tuples and matrices are indexed from 1. Negative, zero or index out of bounds is invalid.
Example: s tuple index of out bounds
letting s be tuple(0,1,1,0)
letting t be tuple(0,0,0,1)
find a : bool such that a = (s[5] = t[1]) $ true
Semantic Errors Detection
Overview
Semantic errors are not picked up by the tree-sitter parser and result in a valid CST but an invalid AST. They are detected at the stage of parsing the CST into a Rust Model object representing the Essence problem. The errors generated from the Essence parser are extracted and reported via Diagnostics API.
The semantic errors detected include type errors, omitted declarations, invalid indexing and using keywords as identifiers.
Implementation
pub fn detect_semantic_errors(source: &str) -> Vec<Diagnostic>
Calls parse_essence_with_context from parse_model.rs which parses Essence into a Model using the CST generated by the tree-sitter parser, converts the returned errors (EssenceParseError) into Diagnostics if they exist and accumulates them in a Vec<Diagnostic>.
fn error_to_diagnostic(err: &crate::errors::EssenceParseError) -> Diagnostic
The function converts an EssenceParseError into a Diagnostic by pattern-matching on the error variant. When an error includes an associated source range and message, the optional tree_sitter::Range is converted into two Position structures using range_to_position(range), and a Diagnostic is created with this range, an error severity, semantic error detection as the source, and an appropriate error message. For all other error variants, a fallback Diagnostic is produced.
fn range_to_position(range: &Option<tree_sitter::Range>)
Maps an Option<tree_sitter::Range> to (Position, Position). If the range is None it returns (0,0)-(0,0).
Keywords as Identifiers Check
Tree-sitter does not report an error when an Essence keyword (e.g. find, bool) is used as an identifier, because such keywords are valid character sequences according to the grammar’s identifier token. As a result, the generated CST is valid, and this cannot be detected during syntactic error checking. To address this, an additional check is implemented during the CST-to-Model parsing stage.
#![allow(unused)]
fn main() {
const KEYWORDS: [&str; 21] = [
    "forall", "exists", "such", "that", "letting", "find", "minimise", "maximise", "subject", "to",
    "where", "and", "or", "not", "if", "then", "else", "in", "sum", "product", "bool",
]
}
fn keyword_as_identifier(root: tree_sitter::Node, src: &str) -> Result<(), EssenceParseError>
Called at the end of parse_model_with_context. Performs this validation by traversing the CST using DFS. Starting from the root node, it iterates over all child nodes and inspects nodes of kind variable, identifier, or parameter. For each such node, the corresponding source text is extracted and compared against a predefined list of reserved Essence keywords. If a match is found, the function reports an EssenceParseError with a source range derived from the CST node and an error message.
How To Test
cargo test -p conjure-cp-essence-parser --test semantic_test
cargo test -p conjure-cp-essence-parser --test keyword_as_ident
Examples
Example: Keyword find as an identifier
Input
find find,b,c: int(1..3)
Diagnostic
Range: (0:5 - 0:9)
Severity: Error
Message: Semantic Error: Keyword 'find' used as identifier
Source: "semantic error detection"
Example: Keyword bool as an identifier
Input
find bool: bool
Diagnostic
Range: (0:5 - 0:9)
Severity: Error
Message: Semantic Error: Keyword 'bool' used as identifier
Source: "semantic error detection"
Example: Omitted Declaration
Input
find x: int(1..10)
such that x = y
Diagnostic
Range: (1:14 - 1:15)
Severity: Error
Message: Semantic Error: Undefined variable: 'y'
Source: "semantic error detection"
Syntactic Errors Detection
Overview
Syntactic errors result in an invalid Concrete Syntax Tree (CST) generated by the tree-sitter parser (Tree-sitter) when parsing Essence code. An invalid CST may contain:
-
ERRORnodes
Inserted when the parser fails to interpret a portion of the code according to the grammar. -
MISSINGnodes
Inserted when the parser expects a token that is not present in the source.
These errors are detected by traversing the CST, classified into specific subtypes, and reported via the Diagnostics API (Diagnostics API documentation).
Implementation
pub fn detect_syntactic_errors(source: &str) -> Vec<Diagnostic)
Tree-sitter is used to parse the Essence source code and generate a CST. If parsing fails entirely, a corresponding Diagnostic is returned immediately. Otherwise, the CST is traversed using a WalkDFS::with_retract iterator. It consists of Tree-sitter’s TreeCursor and an optional retract. Tree-sitter nests errors in the CST. When a node is marked as erroneous, its descendant nodes may also be marked as errors which can lead to duplicate diagnostics. Enabling retract avoids this by skipping the children of ERROR or MISSING nodes and collecting only top-level errors, thereby improving the clarity of the reported diagnostics.
When a node is identified as an ERROR node or contains missing content, the syntax error is classified and a specific Diagnostic is generated and pushed to a Vec<Diagnostic>. Each Diagnostic contains the Range of the error (start and end positions in the source code) and a tailored error message.
In some cases, tree-sitter fails to insert an explicit MISSING node. To handle this, missing tokens are additionally detected by checking whether the source range of a CST node has zero length.
Missing Token Diagnostics
fn classify_missing_token(node: Node) -> Diagnostic
Generates diagnostics for missing tokens.
To improve error reporting, the function pattern-matches on the parent node
of the missing token and produces a more context-aware error message. Source
ranges are calculated using Tree-sitter’s Node.start_position() and
Node.end_position() APIs.
Unexpected Token and Malformed Top Level Lines Diagnostics
fn classify_unexpected_token_error(node: Node, source_code: &str) -> Diagnostic
This function is called when an ERROR node is encountered in the CST.
Unexpected tokens occur when tree-sitter fails to recognise input according to the grammar rule it is currently applying. These tokens may either be valid grammar elements that are unexpected in the current context, or completely foreign symbols.
When no rule can be applied to an entire line (often when unexpected tokens appear at the start of the line) the line is considered malformed.
The different cases are distinguished based on the position of the ERROR node in the CST:
-
Parent is the root node (
program):- Starting column 0: the entire line is malformed.
- Has a previous sibling: unexpected tokens appear at the end of a line, meaning a grammar rule was successfully applied but extra tokens remain.
-
Parent is another token node: unexpected tokens occur inside a construct, indicating that the rule was only partially matched.
How To Test
cargo test -p conjure-cp-essence-parser --test malformed_top_level
cargo test -p conjure-cp-essence-parser --test missing_token
cargo test -p conjure-cp-essence-parser --test unexpected_token
Examples
Example: Missing Right-Hand Operand
Input
find x: int
such that 5 =
Diagnostic
Range: (1:13) - (1:13)
Severity: Error
Message: Missing right operand in 'comparison' expression
Source: syntactic-error-detector
Example: Missing Parenthesis and Expression/Domain
Input
find x: int(1..3
letting x be
Diagnostics
Diagnostic 1:
Range: (0:16) - (0:16)
Severity: Error
Message: Missing ')'
Source: syntactic-error-detector

Diagnostic 2:
Range: (1:12) - (1:12)
Severity: Error
Message: Missing 'expression or domain'
Source: syntactic-error-detector
Example: Unexpected token inside a construct
Input
find x: int(1..3)
such that x -> %9
Diagnostic
Range: (1:15) - (1:16)
Severity: Error
Message: Unexpected '%' inside 'implication'
Source: syntactic-error-detector
Example: Unexpected tokens at the end of a line
Input
find x, a, b: int(1..3)+x
Diagnostic
Range: (0:23) - (0:25)
Severity: Error
Message: Unexpected '+x' at the end of 'find'
Source: syntactic-error-detector
Example: Malformed line
Input
find x: int(1..3)
find x
Diagnostic
Range: (1:0) - (1:6)
Severity: Error
Message: Malformed line 2: 'find x'
Source: syntactic-error-detector
LSP Documentation
Overview
This is the overview documentation for the Language Server which is developed for use by Conjure Oxide. This is developed following the Language Server Protocol developed by Microsoft Visual Studio Code, and implemented following VSCode guidelines. This means that functionality cannot be guaranteed on other IDE, though this does not mean it will/cannot work. The Language Server and Client provide the basis through which a fully functional Essence extension will be produced. The server and client run as separate processes primarily because this minimises performance cost.
At present this addresses the client and server, with abstraction over lower level functions called by the server.
Current Functionality Goals
Where implemented or actively in progress, the details of each goal shall be expanded upon. Achieving these goals would be considered a completed implementation.
- Syntax Highlighting
- This is highlighting based on grammar structure.
- Semantic Highlighting
- This is highlighting based on meaning rather than grammar.
- Error Underlining
- Underlining errors of varying severity, providing informative messaging.
- Hover Tooltips
- When hovering over a word, produces information relating to the hovered word.
- Code Autocomplete
- Produce completion options while user types.
Files
# the server (excluding diagnostics)
crates/conjure-cp-lsp
├─ src/
├── lib.rs
├── server.rs
├── handlers/
├─── cache.rs
├─── hovering.rs
├─── mod.rs
├─── sync_event.rs
├─ Cargo.toml

# the client
tools/vscode-ext
├─ node_modules/ #contains installed node_modules
├─ out/ #contains files produced by npm compile
├─ src/
├── extension.ts
├─ syntaxes/
├── essence.tmLanguage.json
├─ language-configuration.json
├─ package-lock.json
package.json
package-lock.json
tsconfig.json
Client-Server Communication
The client and server communicate asynchronously through I/O streams. Communication occurs through requests and responses, which use well-defined JSON objects to communicate. This communication is triggered on events (such as on-open, on-save, on-change), where the client will prompt the server.
A client and server declare their capabilities during the initialisation handshake. These capabilities reflect what the server and client actually support, and so when new features are added these capabilities must be updated. Capabilities essentially allow for server and client to inform the other whether or not they support specific types of requests, ensuring that requests are not made needlessly. For example, text_document_sync indicates that the server supports syncing, meaning that the client will communicate on sync events (such as on-change and on-save); and hover_provider indicates that the server supports some hovering, meaning that the client will communicate when hovering is occurring.
Client
The Client is a VSCode extension, in TypeScript. As such, the client represents the installed extension which is actively being used by a user. Broadly, we consider the client to be the VSCode IDE in any instance where a .essence file is open.
Key Structure
The Client itself is programmed within a TypeScript file, called extension.ts. This simply launches the client, which then launches the server using ServerOptions to call conjure-oxide server-lsp.
Additionally, there is a syntaxes/essence.tmLanguage.json file, which lays out the syntactic grammar of Essence in a TextMate file. This file is what allows for Syntax Highlighting. The reason that this file exists, alongside the highlighting which will be performed by the server, is that this is extremely lightweight to implement. There are often performance costs associated with an LSP, as they can be large and require a lot of computation. As such, TextMate grammars allow for simple highlighting to occur before the LSP loads/while it is performing computation. language-configuration.json provides autoclosing of brackets, speech marks, etc.
The client also requires a number of package[-lock].json files. The functionality of these files is to declare to the VSCode IDE what the extension is called, where it is sourced within the codebase, and what it’s functionality is. These files also establish the dependencies which are required for the client to function.
Syntax Highlighting
As addressed above, syntax highlighting is implemented through a TextMate grammar. The basis of this grammar is that outlined by Conjure’s VSCode extension1
Server
The server is a Rust server, created using tower-lsp. This library was used as it abstracts over the low-level implementation details. The implementation also abstracts over the implementation of the Diagnostic API and the parser, both of which are implemented and manipulated further downstream (if we consider the client and server to be the frontmost end of the project). This allows for the server to implement new functionality freely, so long as the information is capable of being provided by the Diagnostic API. Essentially, the implementation of the Language Server here is a higher level construct which makes requests to other levels (e.g. Diagnostics) when required. This allows for the code of the server to be fairly simple and easy to follow.
Key Structure
Backend
Backend is the custom struct which represents the state and functionality of the Language Server. In this, it must implement tower-lsp’s LanguageServer trait. This struct is named Backend simply because it represents the basis of the Language Server, and because this is common naming convention.
The LanguageServer trait defined by tower-lsp is the interface through which our language server is capable of adhering to the Language Server Protocol. In this, the capabilities of our server, and the implementation of these capabilities on given events, are specified. The current capabilities of the server are limited to syncing (as is required for error underlining).
As established above, during the initialise handshake, the capabilities of the server are laid out. At present, the server only has it’s default capabilities and syncing capabilities (as required for error underlining), as it currently is in an in-development state. As more functionality is added to the server, more capabilities will be communicated across this handshake. It is worth noting that in the capabilities, the text_document_sync is set to INCREMENTAL to ensure that each trigger event causes the client to pass only the modified content of the file, and the range (except for the first call, where the file is passed in its entirety). This is not the default case.
There are currently six events handled, of which one is after the initialize handshake (simply communicates for log purposes) and one is shutdown. The four additional events implemented at current are did_open, did_save, did_change, the functionality of which is handled by handlers/sync_events; and hover, which is managed by handlers/hover.rs.
Cache
This LSP uses a library called Moka in order to implement caching. The reason that caching has been added is to reduce the time required to load longer files, especially if they are being reused, as this means that they can simply be recovered from the cache. The cache is also used alongside the incremental updates. Modifying the cache occurs within sync_events, but the cache is defined and instantiated using a method from within caching. The cache itself is made up of a series of CacheConts, which store a given files sourcemap, AST, CST, errors, contents, and versioned index. The cache automatically evicts after reaching a size of 10,000B, and has a time to live of 30 minutes (time something exists in the cache while actively in use before being evicted) and a time to idle of 5 minutes (time something exists and is not being used before eviction). The cache uses the uri (uniform resource identifier) of a file as its key, as this is unique to a file. This means that if a file changes location in the file tree (and therefore its URI changes), it will have to be re-entered into the cache, and the previous copy will time out of TTL/TTI and will be evicted.
sync_events
These are split from the main server.rs primarily for readability, and to prevent the main body of the server from becoming bloated. Rust allows a struct to have it’s impl split over multiple files, so this file also simply implements functionality to the Backend struct.
handle_did_open
This is the handler for the did_open event. On open, the cache is queried by the uri of the opened file to see whether it currently exists in the cache. If not, the file is used to generate the CST, AST, sourcemap, etc., which populate the CacheConts. Diagnostics (handle_diagnostics) are then ran to produce the error underlining.
handle_did_save
If saving a file, it is not currently being changed (this is triggered by a different event). As such, when saving a file, simply fetch the correct entry from the cache and get its diagnostics using handle_diagnostics.
handle_did_change
When changing a file, due to the INCREMENTAL change setting, passes only the change and the range. As such, the handler must use replace_range to update the cache store of the text document, and then update the CST. has a function called treesitter::edit which allows only modified subtrees to be regenerated, therefore not requiring the whole tree to be regenerated. This is another speed advantage of the method of caching. Once the CST is generated, it can be parsed, and the cache contents can be updated. The diagnostics can then be generated.
Backend has a custom function, handle_diagnostics which takes in a uri (uniform resource identifier: uniquely identifies a file) and the text of a file. This file is then passed to the background Diagnostic API, transformed from a vector of parserDianostic to a vector of lspDiagnostic (our name for tower-lsp’s Diagnostic type), and published to the client. When a diagnostic is published to a client, it replaces any previous published diagnostics.
convert_diagnostics, parser_to_lsp_range, parser_to_lsp_position
These are helper functions which allow for the transformation of a vector of parseDiagnostics to lspDiagnostics. This is done through iterating through the vector, and setting values according to parseDiagnostics. This is because the JSON communication between the Server and it’s Diagnostic API is not defined the same as the communication between the Server and the Client, though all of the correct information is communicated.
position_to_byte, position_to_treesitter_point, calculate_new_end_position
These are helper functions to allow for the functionality of INCREMENTAL synchronising. position_to_byte converts from an LSP Position into a byte index, to allow for replace_range to function, and calculate_new_end_position is used to calculate the new end of the range. position_to_treesitter_point operates to allow for the incremental editing to function.
Main
Main is responsible for launching the server using the tokio library, as this is the async library tower-lsp is designed to be used with. This is the function which is called from outwith the conjure-cp-lsp crate. For example, main is called to run the server, from conjure-oxide’s subcommand server-lsp. This also instantiates the cache, using create_cache.
Error Underlining
The core functionality of this is expanded upon within the Diagnostic API Documentation. Most implementation details of Error Underlining are covered above. Error underlining is done through publishing diagnostics, which contain a range, warning level, and associated error text. The client receives these diagnostics, and then displays the underlining as directed. The IDE will contain the error message on hover. Error underlining is demonstrated and documented in Error Underlining Video.
Hovering
Hovering is implemented by handle_hovering. The contents of the file are gathered from the cache using the uri, and then the sourcemap (from cache) is gathered. The LSP Position is converted into a byte, and then the helper method hover_info_at_byte is used to gather the information from the sourcemap for this byte. This is then posted to the client, allowing for the information to be seen on hover.
It is of note that the hovering does not currently work if there is an error anywhere in the tree. If there is an underlined error, then there is no access to hovering, as the AST and sourcemap cannot be generated when there is an error in the CST. This is currently one of the priorities for modification.
Development
How to use (for development)
At the current stage of development, the extension is not released into the VSCode Marketplace. This means that functionality must be tested using VSCode’s Extension Development Environment. In order to ensure that this works as intended, compile extension.ts using npm run compile (or ctrl-shift-b and select this). Then launch the Extension Development Environment. This can be launched either by pressing F5 from within extension.ts, or by pressing on ‘Run’ within the ‘Run and Debug’ VSCode tab. Running the Extension Development Environment will cause the client to run. Due to the structure of the client-server, the server will then run and link to the client, and the LSP can then be tested. Please ensure that npm install has been run in advance/all required node modules are installed, otherwise the client will not be able to launch. The client can be seen running when opening a .essence file. In the VSCode panel (bar at bottom)’s output, it is possible to select Conjure-Oxide Language Server as the channel to listen to. This will display the logs communicated to the client.
It is worth noting that a copy of conjure-oxide MUST be installed in order for the client to work. Testing the server requires for an updated install.
If wishing to just run the server (though without a client it will be incapable of connecting to anything, and will time out), the user can run conjure-oxide server-lsp, which is a custom subcommand specifically to call the server. This does not run any other aspects of conjure-oxide.
Development Directions
When developing, ensure that whatever functionality is being added has it’s respective capability communicated to the client during the initialisation handshake, otherwise the triggering events will not be communicated by the client.
Furthermore, it is of note that the server and client communicate over standard input and output. As such, nothing which will be called by the server, including the server itself, should ever write onto or read from the stdin and stdout streams. This should always be handled by the tower-lsp library, to ensure that the communication occurring is JSONrpc as expected by the client. Any incorrectly formed writing to the stream will cause the client to close the server and disconnect.
References
conjure-cp (2025). conjure-vs-code/syntaxes/essence.tmLanguage.json at main · conjure-cp/conjure-vs-code. [online] GitHub. Available at: https://github.com/conjure-cp/conjure-vs-code/blob/main/syntaxes/essence.tmLanguage.json
LSP Error Testing
Introduction
Conjure Oxide includes a server that uses a Language Server Protocol (LSP) to check Essence files for errors before the file is parsed. The LSP server communicates with the Diagnostics API to check for errors, and it will return the error message along with the range of where the error occurred in the given Essence file. The server will then use the diagnosis to perform error underlining, and syntax and semantic highlighting (more details in LSP Documentation and Diagnostics API documentation).
There are two types of error when trying to diagnose a given Essence file, which are syntactic and semantic errors:
- Syntactic errors are errors that stem from the tokens in the Essence file not being in the correct syntax when given into the parser.
- Semantic errors are errors that may pass the syntactic error checking (i.e. the file lines have the correct syntax), but ultimately is unable to be parsed due to errors relating to the entire context of the file.
To be able to accurately diagnose the Essence files for errors, tests cases have been written for situations that Diagnostics API and Native parser might encounter during diagnosing and parsing, referencing the Essence Error Classification).
Testing
Parser
Test cases that test the coverage of the Native parser use Roundtrip testing. The syntax-error and semantic-error test directories exist in the test-integration crate as child directories of roundtrip\native-errors. Furthermore, config.toml sets only the Native parser to be used when testing test cases.
These test cases will run alongside all the integration tests in the tests-integration crate, which can be done by using:
cargo test
Alternatively, to run only the Roundtrip tests, use the command:
cargo test tests_roundtrip
Diagnostics API
For testing the Diagnostics API, test cases are written in the tests directory of the conjure-cp-essence-parser crate, which uses normal Rust unit testing. To run these tests, use the command:
cargo test -p conjure-cp-essence-parser
Or, to run the test files individually, use the command:
cargo test -p conjure-cp-essence-parser --test {file_name}
The sections below will categorise all test cases into one of the categories based on the error classification, with an explanation of the purpose of each test case.
Native parser error tests
| Test name | Error category | Input essence | Purpose |
|---|---|---|---|
missing-token-01 | Syntax error: Missing token | find x: | To detect missing domains |
missing-token-02 | Syntax error: Missing token | find: bool | To detect missing identifiers |
missing-token-03 | Syntax error: Missing token | letting x be | To detect missing values |
missing-token-04 | Syntax error: Missing token | find x,y,z: int(1..3) such that x = y = such that z = 3 | To detect missing operators in comparison statements |
missing-token-05 | Syntax error: Missing token | find x: int(1..3 | To make sure that a domain is properly closed |
missing-token-06 | Syntax error: Missing token | find x bool | To detect missing colons |
unexpected-token-01 | Syntax error: Unexpected token | find x: int(1..3x) | To detect unexpected variables in a domain’s range |
unexpected-token-02 | Syntax error: Unexpected token | find x: int(1..3)) | To detect unexpected closing parentheses |
malformed-top-level-01 | Syntax error: Malformed top level statement | find a,b,c: int(1..3) print a | To make sure unknown commands will not be parsed |
invalid-domain-01 | Semantic error: Invalid domain | find x: int(10..1) | To make sure that the start of a domain cannot be greater than the end of the domain |
invalid-index | Semantic error: Invalid index | letting s be (0,1,1,0) letting t be (0,0,0,1) find a : bool such that a = (s[5] = t[1]) | To make sure that indexes that are out of range will raise an error |
keyword-as-identifiers-01 | Keyword as identifier | find bool: bool | To make sure that the keyword ‘bool’ cannot be used as an identifier |
keyword-as-identifiers-02 | Semantic error: Keyword as identifier | find letting,b,c: int(1..3) | To make sure that the keyword ‘letting’ cannot be used as an identifier |
type-mismatch | Semantic error: Type Mismatch | letting y be false find x: int(5..10) such that 5 + y = 6 | To make sure that if the type of a variable is incorrect for an expression, it will raise an error |
unsafe-division | Semantic error: Unsafe division | find x: int(5..10) such that x/0 = 3 | To make sure that expressions with division over zero will raise an error |
Note: tests that have not been implemented will have an input file with a .disabled extension, these will be removed once the features are implemented.
Diagnostics API error tests
| Test name | Error category | Input essence | Purpose |
|---|---|---|---|
detects_keyword_as_identifier_find | Syntax error: Keyword as identifiers | find find,b,c: int(1..3) | To make sure that the keyword ‘find’ cannot be used as an identifier |
detects_keyword_as_identifier_letting | Syntax error: Keyword as identifiers | find letting,b,c: int(1..3) | To make sure that the keyword ‘letting’ cannot be used as an identifier |
detects_keyword_as_identifier_bool | Syntax error: Keyword as identifiers | find bool: bool | To make sure that the keyword ‘bool’ cannot be used as an identifier |
invalid_top_level_statement_expression | Syntax error: Malformed top level statements | a,a,b: int(1..3) | To make sure that a missing ‘find’ keyword will cause a top level error |
malformed_find_2 | Syntax error: Malformed top level statements | find >=lex,b,c: int(1..3) | To make sure that complex operators cannot be used as an identifier |
malformed_find_3 | Syntax error: Malformed top level statements | find +,b,c: int(1..3) | To make sure that operators cannot be used as an identifier |
unexpected_colon_used_as_identifier | Syntax error: Malformed top level statements | find :,b,c: int(1..3) | To make sure that colons cannot be used as an identifier |
missing_colon_domain_in_find_statement_1st_line | Syntax error: Malformed top level statements | find x | To make sure that missing the colon and domain in a ‘find’ statement will cause a top level error |
missing_colon_domain_in_find_statement_2nd_line | Syntax error: Malformed top level statements | find x: int(1..3) find y | To make sure that malformed top level checks work not only for the first line |
unexpected_print_2nd_line | Syntax error: Malformed statements Syntax error: Unexpected token | find a,b,c: int(1..3) print a | To make sure that unknown commands will not be parsed |
missing_identifier | Syntax error: Missing token | find: bool | To detect missing identifiers |
missing_colon | Syntax error: Missing token | find x bool | To detect missing colons |
missing_domain | Syntax error: Missing token | find x: bool find y: | To detect missing domains |
missing_constraint | Syntax error: Missing token | find x: bool such that | To detect missing constraints |
multiple_missing_tokens | Syntax error: Missing token | find x: int(1..3 letting x be | To detect multiple missing tokens |
missing_domain_in_tuple_domain | Syntax error: Missing token | find x: tuple() | To detect missing domains in tuple domains |
missing_operator_in_comparison | Syntax error: Missing token | find x: int such that 5 = | To detect missing operators in comparison statements |
missing_right_operand_in_and_expr | Syntax error: Missing token | find x: int such that x /\ | To detect missing right operand in an ‘and’ expression |
missing_period_in_domain | Syntax error: Missing token | find a: int(1.3) | To detect if a domain is missing a period |
unexpected_closing_paren | Syntax error: Unexpected token | find x: int(1..3)) | To detect unexpected closing parentheses |
unexpected_identifier_in_range | Syntax error: Unexpected token | find x: int(1..3x) | To detect unexpected variables in a domain’s range |
unexpected_semicolon | Syntax error: Unexpected token | find x: int(1..3) such that x = 6; | To detect unexpected semicolons at the end of an expression |
unexpected_extra_comma_in_find | Syntax error: Unexpected token | find x,, y: int(1..3) | To detect extra commas in the variable list of a ‘find’ statement |
unexpected_token_in_implication | Syntax error: Unexpected token | find x: int(1..3) such that x -> %9 | To detect unexpected token in an implication expression |
unexpected_token_in_matrix_domain | Syntax error: Unexpected token | find x: matrix indexed by [int, &] of int | To detect unexpected token in a matrix domain |
unexpected_token_in_set_literal | Syntax error: Unexpected token | find x: set of int such that x = {1, 2, @} | To detect unexpected token in a set literal |
multiple_unexpected_tokens | Syntax error: Unexpected token | find x: set of int; such that x = {1, 2, @} | To make sure that the syntactic checker can detect multiple unexpected tokens |
unexpected_x_in_all_diff | Syntax error: Unexpected token | find a : bool such that a = allDiff([1,2,4,1]x) | To detect unexpected tokens in all diffs |
unexpected_int_at_the_end | Syntax error: Unexpected token | find a : bool such that a = allDiff([1,2,4,1])8 | To detect unexpected tokens at the end of a line |
unexpected_token_in_identifier | Syntax error: Unexpected token | find v@lue: int(1..3) | To detect unexpected tokens in a variable name |
detects_undefined_variable | Semantic error: Undefined variable | find x: int(1..10) such that x = y | To make sure that undefined variables will raise an error |
no_errors_for_valid_code | None | find x, y: int(1..10) such that x + y = 10 | To make sure that the semantic checker will not give an error when there is none |
range_points_to_error_location | None | find x: int(1..10) `such that x = undefined_var | To make sure that the range given by the semantic checker is the range of the error |
domain_start_greater_than_end | Semantic error: Invalid domain | find x: int(10..1) | To make sure that the start of a domain cannot be greater than the end of the domain |
incorrect_type_for_equation | Semantic error: Type mismatch | letting y be false find x: int(5..10) such that 5 + y = 6 | To make sure that if the type of a variable is incorrect for an expression, it will raise an error |
dividing_over_zero | Semantic error: Unsafe division | find x: int(5..10) such that x/0 = 3 | To make sure that expressions with division over zero will raise an error |
invalid_index | Semantic error: Invalid index | letting s be (0,1,1,0) letting t be (0,0,0,1) find a : bool such that a = (s[5] = t[1]) | To make sure that indexes that are out of range will raise an error |
duplicate_declaration_of_variable | Semantic error: Redefined variable | find x: int(1..10) find x: int(2..3) | To make sure that redefining a variable will raise an error |
extra_comma_in_variable_list | Semantic error: Unexpected token | find x,: int(1..10) | To make sure that having an extra comma in the variable list is not allowed |
Note: currently all semantic tests are set to be ignored, as they have not been implemented yet. Once they have been implemented, the #[ignore] will be removed.
Solver Adaptors
What is an adaptor?
If you attended one of the VIP conferences and looked at our poster, you likely saw this architectural diagram:
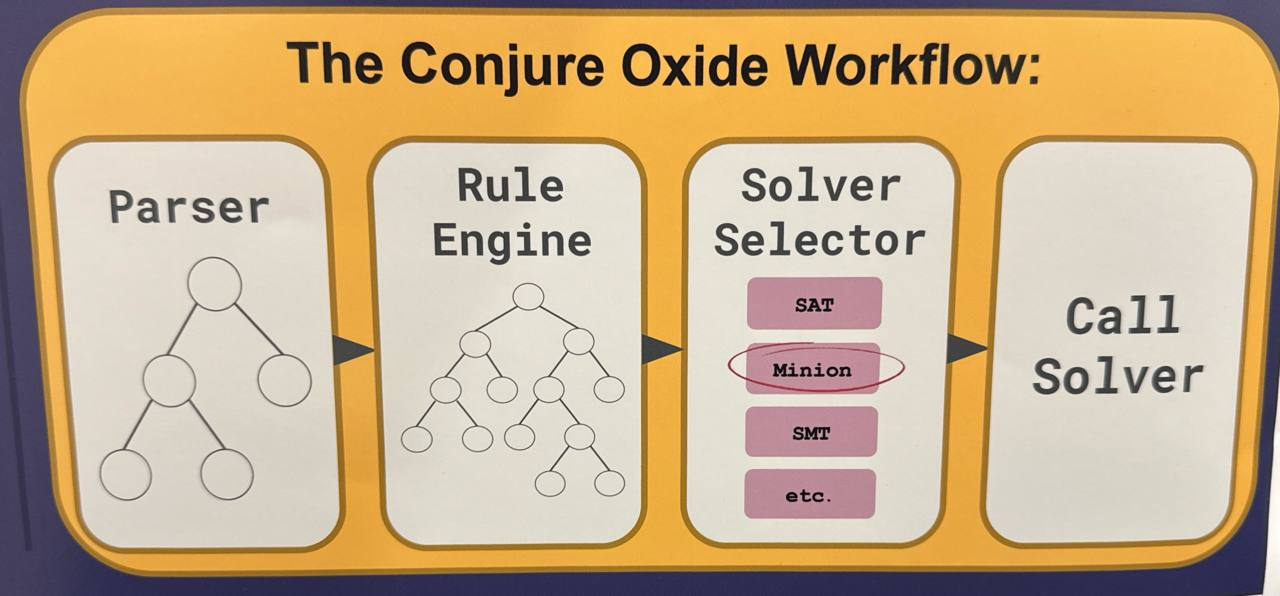
In conjure-oxide, an adaptor is the component on the right (occasionally referred to as a “solver selector”). Its primary role is to bridge the gap between the high-level Essence model and a specific backend solver (such as CaDiCaL, Minion, or Z3).
Workflow
The adaptor manages the following lifecycle:
- Rule Injection: It provides a specific set of transformation rules to the Rule Engine. These rules define how high-level constructs should be lowered (e.g., SAT-specific encodings for the SAT adaptor).
- Reduction: It triggers the rule engine to process the parsed
Model. The engine iteratively applies the provided rules until the expression tree is reduced to a solver-ready state. - Solver Execution: Once reduced, the adaptor feeds the resulting low-level constraints into the underlying solver and orchestrates the search for a solution.
By using different adaptors, conjure-oxide can target entirely different solving paradigms (CP, SAT, SMT) while sharing the same front-end parser and core rule-engine logic.
Min/Max
Min/Max Constraints for Direct and Order Encoding
The Min and Max constraints are implemented in Savile Row’s Style:
“For min(V ) = z we have V [1] = z ∨ V [2] = z . . . and z ≤ V [1] ∧ z ≤ V [2] . . .. Max is similar to min with ≤ replaced by ≥. The constraint element(V, x) = z becomes ∀i : (x ̸= i ∨ V [i] = z).” [Cite]
In slightly more human language, To say that z is the minimum of some vector ‘v’ is really just saying that z is both:
- less than or equal each value in the vector
- a member of v - that is, it must be equal to one or more elements in v.
This works nicely because both of these conditions map nicely into disjunctions, and they can be put inside a conjunction. These characteristics of the encoding ensure that all solvers that support Integers. Since support has been established for integer representations and inequality relations is SAT, it can also be solved using SAT solvers.
Maximum can be decomposed into a very similar format: the maximum element of some vector v must be :
- A member of v
- greater than or equal to all elements in v
SAT
SAT Encoding
This book chapter explains how the SAT adapter is built, the generic patterns that SAT rules follow, and the concrete SAT rule implementations, including references to the code files where you can find each rule.
Important note: The concrete SAT rule implementation part of this chapter will change frequently, as the rules are still in the process of implementation and optimization. The general principles of how the adapter and the SAT rules are built, on the other hand, are more likely to stay the same. Please keep this in mind when reading this chapter.
SAT Adaptor
The SAT Adaptor:
- Lowers IR to CNF: Converts boolean and integer constraints (via SAT encodings) into Conjunctive Normal Form.
- Interfaces with RustSAT: Utilizes the
rustsatlibrary to communicate with SAT solvers like CaDiCaL. - Maps Literals: Maintains the mapping between high-level variable names and low-level SAT literals to decode solutions back into Essence values.
Encoding Types
Types of SAT Encodings
Conjure-oxide represents three SAT encoding styles in the AST. The three types are:
- Direct Encodings
- Logarithmic Encodings
- Order Encodings
Each type of encoding has pros and cons, and a different one may be selected based on the type of constraint problem.
SATInt Expression
All encodings are represented by the SATInt expression. This is represented by a 4-tuple variant with the following shape:
Metadata: standard AST metadata (source location, typing info, etc.).SATIntEncoding: an enum selecting the encoding (Direct,Log,Order).bits: a (possibly nested) list/matrix of boolean expressions (literals, variables or composed expressions) encoded asMoo<Expression>.range: the inclusive (min, max) bounds for the integer, expressed as a pair ofi32.
Logarithmic Encoding
The base principle is quite simple: encode an integer as a bitvector. This allows us to represent integers as a series of boolean constraints – one for each bit.
For example, the integer 6 can be represented in binary as 0110. We can then represent this as P = 0 ∨ 1, Q = 0 ∨ 1, R = 0 ∨ 1, S = 0 ∨ 1. The connection that is missing, however, is that this isn’t actually a representation of a constraint problem, but of a solution to a problem.
Direct Encoding
Direct encodings are the most straightforward type of encoding - it involves creating a vector of boolean variables, one corresponding to each member of the domain. Only one of these variables can be true at a time, and it is the one corresponding to the value of the integer.
Order Encoding
Order follows the same principle as direct encoding, but instead of each boolean variable ‘specifying’ a value in the way that direct encodings do, each bit specifies whether the integer corresponding to it is less than or equal to the integer variable’s value.
Why have multiple types of encoding?
Only logarithmic encodings are currently implemented in conjure-oxide. We’re planning to include other encodings such as direct and order encodings. This is motivated by their potential advantages over the log encoding in some cases.
Direct encodings should perform well for equality-heavy constraints but may scale poorly with larger domains or inequalities. Logarithmic encodings are expected to handle inequalities more efficiently. Order encodings are often viewed as a compromise, potentially balancing these trade-offs.
Performance Comparison
The choice of encoding significantly impacts performance depending on the constraint types used.
Direct Encoding: Better for Equality and Disequality
Direct encoding excels in models dominated by = and != constraints, such as graph coloring. It enables immediate unit propagation in the SAT solver, pruning values faster than bitwise reasoning.
Example: Graph Coloring
find c1, c2, c3, c4, c5 : int(1..3)
such that
    c1 != c2, c1 != c3, c2 != c3, c2 != c4,
    c3 != c4, c3 != c5, c4 != c5
- Direct:
~0.55sRewriting /0.001sSolving - Log:
~1.61sRewriting /0.002sSolving
Logarithmic Encoding: Better for Inequalities
Logarithmic encoding is superior for arithmetic and inequalities (<, >, <=, >=) over large or sparse domains. Binary bit-vectors result in a more compact representation and reduced overhead.
Example: Sparse Domain with Inequalities
find x : int(1, 10, 20, 30, 40, 50)
such that x > 10
- Direct:
~1.24sRewriting /0.005sSolving - Log:
~0.07sRewriting /0.000sSolving
Order Encoding: Middle ground for range/inequality-heavy models
Order encoding often sits between Direct and Log encodings in terms of performance and representation size. Order encodings are a pragmatic choice for models with many range/threshold constraints over moderate domains: they can outperform Log encodings on some inequality-heavy problems while avoiding the quadratic blow-up of very large Direct encodings.
TODO: Add benchmark here.
Current Encoding Support Status
Currently, logarithmic encoding is mostly implemented; Direct and Order encodings have partial support in the SAT rules.
As of 27 April 2026 the Logarithmic encoding is the most feature-complete and is used for the bulk of SAT arithmetic and comparison rules. The Direct and Order encodings are partially implemented: both support core comparison functionality, while Direct has additional support for some arithmetic helpers and Order provides a foundation for inequalities. Several non-core features and edge-case helpers remain in development or unimplemented across the three encodings.
Creating SAT Transformation Rules
Overview
Most SAT rules in conjure-oxide follow the same small set of implementation patterns. The details change from rule to rule, but the structure is usually the same: validate the input, normalise the operands, build a compact Boolean construction, convert it to CNF with Tseytin helpers, and propagate the output domain if the result is an integer.
General Workflow
Regardless of which encoding type is being used, a SAT transformation rule should follow these steps:
- Input validation - Standard for any rule; check that the input expression is the target for this rule and that sub-components are valid.
- Extract raw data - Extract operand bit vectors and ranges (especially for integer operations).
- Normalise operands - Most integer rules should pad bit-vectors to a shared range so later zips or index lookups are safe.
- Create the new expression with CNF clauses - Use dedicated
tseytin_...functions to construct boolean expressions. These functions directly generate CNF clauses and manage auxiliary variables, significantly reducing the rule applications needed for solver-ready input. For the logic behind boolean-to-CNF conversion, refer to the next chapter: Booleans. - Domain propagation (Integers only) - Update the range of the returned
SATIntto reflect the new interval. The bit-width of theSATIntshould also be updated for the new range. - Return the result - Use
Reduction::cnf(..)to return the created expression along with the new CNF clauses and symbol table.
Example - negation of log integers
#![allow(unused)]
fn main() {
/// Converts negation of a SATInt to a SATInt
///
/// ```text
/// -SATInt(a) ~> SATInt(b)
///
/// ```
#[register_rule("SAT_Log", 4100, [Neg])]
fn cnf_int_neg(expr: &Expr, symbols: &SymbolTable) -> ApplicationResult {
    let Expr::Neg(_, expr) = expr else {
        return Err(RuleNotApplicable);
    };

    let Expr::SATInt(_, _, _, (min, max)) = expr.as_ref() else {
        return Err(RuleNotApplicable);
    };

    let binding = validate_log_int_operands(vec![expr.as_ref().clone()], None)?;
    let [bits] = binding.as_slice() else {
        return Err(RuleNotApplicable);
    };

    let mut new_clauses = vec![];
    let mut new_symbols = symbols.clone();

    let result = tseytin_negate(bits, bits.len(), &mut new_clauses, &mut new_symbols);

    Ok(Reduction::cnf(
        Expr::SATInt(
            Metadata::new(),
            SATIntEncoding::Log,
            Moo::new(into_matrix_expr!(result)),
            (-max, -min),
        ),
        new_clauses,
        new_symbols,
    ))
}
}
Assigning Rule Priorities
Following the general conventions for rule priorities, SAT specific rules should have priorities at the 4000 level. As rules are applied in priority order (high to low), the following convention has been developed that roughly follows the expected order of rule application.
| Rule Type | Priority | Description |
|---|---|---|
| Integer Decision Variable -> SATInt | 4800 | These are the rules that create the SATInt expressions that the other rules can understand. |
| SATInt -> SATInt | 4700 | These are rules that represent standard integer-to-integer operations; summation, abs, pow, etc. |
| SATInt -> Boolean | 4600 | These are rules that produce a boolean from integer inputs; equality, comparison, all-different, etc. |
| Literal -> SATInt | 4500 | These are the rules that convert literals integer to SATInts, they should be applied last to allow for other rules to perform optimisations, for example multiplying by a known constant requires significantly less clauses and auxillary variables then treating the literal as an unkown integer. |
| Boolean -> Boolean | 4400 | These are the rules for boolean-to-boolean operations; and, or, not, xor, etc. |
| Boolean -> Nothing | 4300 | These are rules that take booleans and fully remove them from the constraints, this occurs when an expression if fully represented in the clauses. |
Booleans
SAT Booleans
The most basic form of a constraint is a boolean expression. SAT solvers work with boolean variables, but require input in Conjunctive Normal Form (which will be referred to as CNF). This means that any boolean expression must be converted to a series of clauses composed entirely of atoms (true/false values or variables). Here’s an example:
Original Expression:
$$((A \land B) \to (C \lor \lnot D)) \land E$$
In CNF:
$$(\lnot A \lor \lnot B \lor C \lor \lnot D) \land (E)$$
The simplest approach to this conversion is by repeatedly applying rules (De Morgan’s, double negation, distributivity, etc) until the expression is in CNF. This works well for smaller expressions but slows down massively when dealing with larger expressions (like the ones generated when dealing with integers). To solve this, we use Tseytin transformations (see https://en.wikipedia.org/wiki/Tseytin_transformation).
Boolean expressions are encoded via Tseytin transformations.
Tseytin Transfomations
These transformations allow us to convert an operation straight into CNF by introducing new auxiliary variables. This method makes rule applications significantly faster but with the downside of producing longer CNF with more variables to give to the solver. Modern SAT solvers, however, are very efficient and this extra performance cost is negligible compared to the time saved in conversion.
The idea is that for a given boolean expression, an auxillary variable is created for each subexpression which is then substituted back into the main expression.
Example
Takes the following expression $\phi$:
\phi := ((p\lor q) \land r) \rightarrow (\neg s)
Only subexpressions of literals can be encoded so we must look at the inner-most subexpressions, $((p\lor q)$ and $(\neg s))$, first:
$$ \begin{align} x_1 \iff (p\lor q) \ x_2 \iff (\neg s) \ \end{align} $$
$$ (((p\lor q) \land r) \rightarrow (\neg s)) \leadsto ((x_1 \land r) \rightarrow x_2) $$
No we can transform $(x_1 \land r)$:
$$ x_3 \iff (x_1 \land r) $$
$$ ((x_1 \land r) \rightarrow x_2) \leadsto (x_3 \rightarrow x_2) $$
And finally $(x_3 \rightarrow x_2)$:
$$ x_4 \iff (x_3 \rightarrow x_2) $$
$$ (x_3 \rightarrow x_2) \leadsto x_4 $$
So we have:
$$ \begin{align} x_1 \iff (p\lor q) \ x_2 \iff (\neg s) \ x_3 \iff (x_1 \land r) \ x_4 \iff (x_3 \rightarrow x_2) \ \phi \iff x_4 \end{align} $$
And now to find solutions to $\phi$ we need to solve for $p,q,s, x_1, x_2, x_3, x_4$ under these constraints and the under additional constraint that $x_4$ is true.
Tricks for SAT
This page documents the clever implementation patterns and “tricks” used across different SAT rules in conjure-oxide. You might reuse them in other rules.
Reusing Inequality Logic via Operand Swapping
Instead of implementing separate logic for <, >, <=, and >=, we can implement a single core rule (like, in direct-encoding we use less-than rule) and reuse it for all others by swapping operands or negating the final result.
- Logic:
A > BbecomesB < AA <= BbecomesNOT (B < A)A >= BbecomesNOT (A < B)
The “Bucket” Method for Domains
Currently, in direct encoding, we use the bucket method for operations that map multiple input values to the same output (e.g., absolute value or squaring).
- Logic: For each output value $k$ in the new domain, we identify all input values $v$ where $f(v) = k$. We then create an output bit $B_k$ by calculating the disjunction (OR) of all input indicator bits $I_v$ that fall into that “bucket”.
- Example: For
abs(x), the output bit for value5is the result ofinput_bit(-5) OR input_bit(5).
Static Outcome Construction (Order-Encoded Division)
This thing is in an upcoming division rule PR for order encoding is…
Instead of dynamically scanning for the boundary, the code uses adjacent bits to construct a negated condition for every exact pair $(i, j)$ and directly appends the statically computed outcome ($Q \ge m$ or $\neg(Q \ge m)$) to enforce the entire order-encoded quotient array simultaneously via De Morgan’s clauses.
Pairwise DNF-style Accumulation
For operations involving multiple operands like sum(...), implementing a single massive circuit is difficult.
- Logic: Accumulate the result pairwise. Start with the first operand as the “accumulator,” then for each subsequent operand, perform a pairwise “addition” where every possible sum $k = i + j$ is represented as an OR of ANDs.
Common-Range Normalisation (Zero/Sign Padding)
To simplify rule logic (especially zips and index lookups), we normalize all operands to a shared range before processing.
- Logic: Calculate a global min/max across all operands. Pad Direct-encoded integers with
falsebits and Order-encoded integers withtrue(prefix) orfalse(postfix) bits to ensure all bit-vectors have the same length and align to the same values.
Direct Encoding Absolute Value
Overview
|SATInt(a)| ~> SATInt(b)
What this rule does
- Groups the one-hot input bits into buckets by
|value|. - Produces one output bit per bucket.
- Returns the bucket contents directly when there is only one possible contributor, which avoids unnecessary Tseytin clauses.
- Uses
falsefor empty buckets.
Bucketing by absolute value
Instead of explicitly computing absolute value through arithmetic, this rule uses a bucketing strategy:
- Create one bucket for each possible output value.
- Place every input bit into the bucket for its absolute value.
- Emit one output bit per bucket, using OR only when a bucket has multiple contributors.
Because direct encoding is one-hot, exactly one input bit is true, which means exactly one bucket wins.
The code is the best place to check the exact bucket construction and the special-case handling for single-element buckets.
Direct Encoding Division
Overview
SafeDiv(SATInt(a), SATInt(b)) ~> SATInt(c)
What this rule does
- Calculates the exact minimum and maximum possible quotient values to tightly bound the output domain.
- Generates a new direct-encoded integer for the quotient with one boolean variable per possible value.
- Builds a 2D lookup table of clauses mapping
numerator_i AND denominator_jto the correspondingquotient_k. - Enforces that the output is a valid direct encoding by adding at-most-one constraints across all output bits.
Lookup table strategy
Instead of mimicking a hardware division circuit, this rule relies on a lookup table strategy leveraging the one-hot property of direct encoding:
- Calculate domain bounds - compute the smallest and largest possible quotient (
quot_min,quot_max) across all combinations of the numerator and denominator bounds. - Allocate output bits - create one new boolean variable for every value in
[quot_min, quot_max]. - Map inputs to outputs - for every possible numerator value
iand denominator valuej, calculatek = floor_div(i, j)(or0ifj == 0). Then, add a CNF clause stating that ifnumerator = ianddenominator = j, thenquotient = k. This is encoded directly asNOT n_i OR NOT d_j OR q_k. - Constrain output - ensure the output quotient does not take more than one value simultaneously by adding pairwise exclusion clauses (at-most-one constraints) across all
q_kbits.
This exploits the fact that exactly one numerator bit and exactly one denominator bit will be true, driving exactly one quotient bit to be true.
Direct Encoding SAT Summation
Overview
Sum(SATInt(a), SATInt(b), ...) ~> SATInt(c)
What this rule does
- Normalises all operands to a shared value range.
- Builds the sum pairwise, using
tseytin_andfor each value pair andtseytin_orto accumulate matching terms. - Propagates the resulting range after every addition step.
- Handles the empty-input case by returning the constant zero.
Direct Encoding toInt
Overview
toInt(bool) ~> SATInt
Method
- Given a Boolean condition P, we want to set
r0true when the condition does not hold: $r_0 \leftrightarrow ¬P$; and setr1true when condition P does hold: $r_1 \leftrightarrow P$. - Each of these biconditionals are encoded as two clauses: one for each direction of the biconditional.
- We return a new CNF reduction with the vector
[r_0, r_1]encoded as a direct SATInt.
Example
Consider the following problem -
find x, y : int(0..3)
such that x = toInt(y=2)
The solutions produced are:
| x | y |
|---|---|
| 0 | 0 |
| 0 | 1 |
| 1 | 2 |
| 0 | 3 |
x=1 only when the condition y=2 holds, and x=0 otherwise.
Log Encoding Absolute Value
Overview
|SATInt(a)| -> SATInt(b)
Rule Method
- Create a negated copy of the input
- Select between the original and negated input using the input’s sign bit to select
Log Encoding Comparison inequalities
Overview
SATInt(a) < SATInt(b) ~> Bool
SATInt(a) <= SATInt(b) ~> Bool
SATInt(a) > SATInt(b) ~> Bool
SATInt(a) >= SATInt(b) ~> Bool
Rule Method
- Convert both operands to a canonical form by making both operands the same bit-wdith (using zero padding)
- Apply the comparison logic
Comparison Logic
For two bitvectors that have been made the same length:
$$ \begin{align} A = [a_1, a_2, \dots, a_{n}],\ B = [b_1, b_2, \dots, b_{n}] \end{align} $$
$A < B$ is equivalent to $B > A$ so we only need to encode $>$ and $\geq$, and the equivalent expression for $<$ and $\leq$ can be generated by swapping the order of the operands. There is only a slight difference between the expressions for $>$ (strict) and $\geq$ (not strict) and that is also factored in:
Shorthands
$$ \begin{align} (x > y) \equiv x \land \neg y \ (x \geq y) \equiv y \Rightarrow x \end{align} $$
Initial Case
$$ \begin{align} T_1 &= \begin{cases} a_1 > b_1 & \text{(strict)} \ a_1 \geq b_1 & \text{(non-strict)} \end{cases} \ \end{align} $$
Iteration
$$ \begin{align} T_2 &= (a_2 > b_2) \lor ((a_2 \Leftrightarrow b_2) \land T_1) \ T_3 &= (a_3 > b_3) \lor ((a_3 \Leftrightarrow b_3) \land T_2) \ \vdots \ T_{n-1} &= (a_{n-1} > b_{n-1}) \lor ((a_{n-1} \Leftrightarrow b_{n-1}) \land T_{n-2}) \ \end{align} $$
Final expression
$$ \begin{align} (A > B),\ (A \geq B) \quad \equiv \quad \boldsymbol{(b_{n} > a_{n}) \lor ((a_{n} \Leftrightarrow b_{n}) \land T_{n})} \end{align} $$
Note that in the final expression, $(a_i > b_i)$ is swapped for $(b_i > a_i)$ - this is because the sign bit should be treated inversely.
Log Encoding Division & Modulo
Overview
SafeDiv(SATInt(a), SATInt(b)) ~> SATInt(c)
SafeMod(SATInt(a), SATInt(b)) ~> SATInt(c)
Division and modulo are strongly linked, for log encodings the Restoring Division Algorithm (https://en.wikipedia.org/wiki/Division_algorithm#Restoring_division) is used, performing this algorithm gives you the quotient and remainder which can be used for division and modulo respectively. One very important thing to bear in mind is that there are multiple competing standards for how negatives should be handled. So when implementing these rules, it is important to ensure that you implement the correct standard for conjure:
Summary
$$ \begin{align} 3 &/\, 2 &= 1 \ -3 &/\, 2 &= -2 \ 3 &/\, -2 &= -2 \ -3 &/\, -2 &= 1 \ \end{align} $$
$$ \begin{align} 3 \,&\%\, 2 &= 1 \ 3 \,&\%\, -2 &= -1 \ -3 \,&\%\, 2 &= 1\ -3 \,&\%\, -2 &= -1 \end{align} $$
Log Encoding Equality and Inequality
Overview
SATInt(a) = SATInt(b) ~> Bool
SATInt(a) != SATInt(b) ~> Bool
Rule Method
- Convert both operands to a canonical form by making both operands the same bit-wdith (using zero padding)
- Form a boolean expression by iterating over both bitvectors
Comparison Logic
For two bitvectors that have been made the same length:
$$ \begin{align} A = [a_1, a_2, \dots, a_{n}],\ B = [b_1, b_2, \dots, b_{n}] \end{align} $$
We can use the following expressions to encode equality/inequality:
Equality
$$ \begin{align} (A = B) \quad \equiv \quad \boxed{(a_1 \Leftrightarrow b_1) \land (a_2 \Leftrightarrow b_2) \land \dots \land (a_n \Leftrightarrow b_n)} \\ \end{align} $$
Inequality
$$ \begin{align} (A \neq B) \quad \equiv \quad \boxed{(a_1 \oplus b_1) \lor (a_2 \oplus b_2) \lor \dots \lor (a_n \oplus b_n)} \end{align} $$
Log Encoding Multiplication
Overview
Poduct(SATInt(a), SATInt(b), ...) ~> SATInt(c)
Rule Method
- Determine the output range
- Pad all operands to match the output bitwidth to prevent overflow
- Split the expression into a series of 2-nary products
- Use shift-add binary multiplication for each product
Log Encoding Negation
Overview
-SATInt(a) ~> SATInt(b)
Negating a 2s complement integer is very simple by design, negative a log integer just means inverting all bits and adding 1.
Log Encoding Summation
Overview
Sum(SATInt(a), SATInt(b), ...) ~> SATInt(c)
Rule Method
- Determine the output range
- Pad all operands to match the output bitwidth to prevent overflow
- Split the expression into a series of 2-nary summations
- Use an binary adder circuit to perform each summation
2-nary Summation Logic
For two bitvectors that have been made the same length:
$$ \begin{align} A = [a_1, a_2, \dots, a_{n}],\ B = [b_1, b_2, \dots, b_{n}] \end{align} $$
Specifying the output
$$ S = A + B = [s_1, s_2, \dots, s_{n}] $$
Carry
$$ \begin{align} c_1 &= a_1 \land b_1 \ c_2 &= (a_2 \land b_2) \lor ((a_2 \oplus b_2) \land c_1) \ \vdots \ c_{n-1} &= (a_{n-1} \land b_{n-1}) \lor ((a_{n-1} \oplus b_{n-1}) \land c_{n-2}) \end{align} $$
Sum
$$ \begin{align} s_1 &\equiv \boxed{a_1 \oplus b_1} \ s_2 &\equiv \boxed{a_2 \oplus b_2 \oplus c_1} \ \vdots \ s_{n} &\equiv \boxed{a_{n} \oplus b_{n} \oplus c_{n-1}} \end{align} $$
Order Encoding Division
Overview
Ongoing work in #1775
SafeDiv(SATInt(a), SATInt(b)) ~> SATInt(c)
What’s new compared to Direct Encoding?
Because order encoding represents values using a cascade of true bits (N >= i), we cannot isolate a specific value simply by checking one bit. We must ensure the boundary between true and false happens exactly where the integer value would be.
This changes two main parts of the lookup table strategy:
-
Identifying exact input values: To identify if a numerator exactly equals
i, we must assert(N >= i) AND NOT (N >= i+1). When converted to CNF via De Morgan’s laws for the implication condition (i.e.NOT condition OR consequence), the base condition fornumerator = ianddenominator = jbecomes a chain ofORs:NOT (N_i) OR (N_{i+1}) OR NOT (D_j) OR (D_{j+1}). -
Building the output: When the division results in a quotient
k, we must create a valid order-encoded bit-vector fork. Instead of turning on just one bit, we add a rule for every bitmin the output:- Any bit
mup tokis forced totrue. - Any bit
mlarger thankis forced tofalse.
- Any bit
Order Encoding Equality and Inequality
Overview
SATInt(a) = SATInt(b) ~> Bool
SATInt(a) != SATInt(b) ~> Bool
Rule Method
- Ensure both operands are in order encoding and have the same number of bits.
- Form a boolean expression by iterating over both bitvectors and asserting that corresponding bits are equivalent.
- For inequality, calculate the equality and negate the result.
Comparison Logic
For two bitvectors $A$ and $B$ representing the order encoding of two integers:
$$ \begin{align} A = [a_1, a_2, \dots, a_{n}],\ B = [b_1, b_2, \dots, b_{n}] \end{align} $$
We can use the following expressions to encode equality/inequality:
Equality
$$ \begin{align} (A = B) \quad \equiv \quad \boxed{(a_1 \Leftrightarrow b_1) \land (a_2 \Leftrightarrow b_2) \land \dots \land (a_n \Leftrightarrow b_n)} \\ \end{align} $$
Inequality
$$ \begin{align} (A \neq B) \quad \equiv \quad \boxed{\neg(A = B)} \end{align} $$
Order Encoding Inequality
Overview
SATInt(a) < / > / <= / >= SATInt(b) ~> Bool
What this rule does
- Normalises both operands to a shared range before comparing them.
- Uses
<as the primitive comparison. - Rewrites
>,<=, and>=by swapping operands and optionally negating the result. - Builds the comparison with a prefix scan over
not lhs_i AND rhs_iterms.
Prefix comparison
Order encoding’s prefix-true property enables a comparison based on prefix logic. For x < y, we look for the first position where x becomes false and y is still true.
That idea becomes a small Tseytin chain: negate the left bit, AND it with the right bit, then OR the result into the accumulator.
Order Encoding Negation
Overview
-SATInt(a) ~> SATInt(b)
Rule Method
- Computes the new domain for the resultant value (the old min and old max both get negated).
- Creates a new output bitvector initially containing a single
truebit (add padding to the front). - Iterates backwards through the original bitvector, pushing the
tseytin_notof each bit to the output. - The above step reverses and negates at once.
Why add padding to the front?
- Because order uses $\geq$ thresholds, and negation flips $\geq$ to $\leq$, for $y = -x$, we say $(y \geq k) \leftrightarrow (x \leq -k)$.
- But order encoding wants $a \geq b$, so we convert the above to $(x \leq k) \leftrightarrow ¬(x \geq k+1)$.
- The $+1$ creates an out-of-range index, so we need to account for this by inserting a
false(which is then negated totrue).
Example
Consider the following example which illustrates what this rule does with a given input.
Say we have domain D = [-3..2], and x = 1, so we want to find y = -x = -1. We start with [1, 1, 1, 1, 1, 0].
We take the negation of the domain D to get the new domain D' = [-2..3], and our target bitvector for y is [1, 1, 0, 0, 0, 0].
- Reverse bits:
[0, 1, 1, 1, 1, 1]. - Insert
falseat the front:[0, 0, 1, 1, 1, 1]. NOTeach bit:[1, 1, 0, 0, 0, 0].
We now have an order representation for -1 as desired.
Order Encoding toInt
Overview
toInt(bool) ~> SATInt
Method
- This rule follows the same method as seen in the direct encoding version.
- However, because are using order encoding uses thresholds (where $r_i$ means $value \geq i$), we can say that for $r_0$, $value \geq 0$ will always be true, thus can set $r_0$ to true directly.
- We encode the biconditional $r_1 \leftrightarrow P$ as in the direct encoding version.
An example of this rule can also be found in the direct encoding page on this rule.
Constraint Dominance Programming (CDP)
What CDP Means in Conjure Oxide
In Conjure Oxide, Constraint Dominance Programming (CDP) is used to enumerate solutions while filtering out those that are dominated by other solutions under a user-defined dominance relation.
At a high level:
- Solve the model and obtain a solution.
- Add a new constraint that blocks any future solution dominated by that solution.
- Continue until no more solutions remain (or the user stops search).
This is how we obtain a set of non-dominated solutions (Pareto-optimal w.r.t. the chosen dominance relation).
Language Additions
dominance relation
The model can now include a top-level dominance section:
dominance relation
    ...
The parser stores this in Model.dominance.
fromSolution(...)
Inside a dominance relation, fromSolution(x) refers to the value of x in a previously found solution.
Example:
dominance relation
    (x <= fromSolution(x)) /\
    (x < fromSolution(x))
fromSolution(...) is only valid inside dominance relation.
pareto(...) syntax
To avoid writing dominance relations manually, the parser supports:
dominance relation
    pareto(minimising x, maximising y)
Here, the pareto(...) keyword refers to Pareto efficiency / Pareto optimality in multi-objective optimisation (not the “80/20 rule”).
Each item declares a component and direction:
minimising exprmaximising expr
How pareto(...) Is Lowered
pareto(...) is parsed as syntactic sugar and lowered into a standard dominance expression in the AST.
For each component, the parser builds:
- a non-worsening condition, and
- a strict improvement condition.
Then it combines all components as:
AND(all non-worsening) AND OR(any strict improvement)
For integer components:
minimising ebecomese <= fromSolution(e)and stricte < fromSolution(e)maximising ebecomese >= fromSolution(e)and stricte > fromSolution(e)
For boolean components:
minimising bbecomesb -> fromSolution(b)and strict(!b) /\ fromSolution(b)maximising bbecomesfromSolution(b) -> band strictb /\ !fromSolution(b)
Notes:
pareto(...)is only allowed insidedominance relation.- Components must have return type
intorbool. - Explicit
fromSolution(...)insidepareto(...)components is rejected.
Why Solver Adaptors Needed Changes
Supporting CDP required adaptors to evolve from “load once, solve once” behaviour into iterative solving with incremental constraint addition.
After each solution, adaptors construct:
NOT dominance(current_solution, future_solution)
where references in the dominance expression are rewritten as follows:
- current-solution references are substituted with concrete literals,
fromSolution(x)is rewritten to refer to the future candidate variablex,- the whole expression is negated to block dominated futures.
This rewritten expression is then fed back to the backend during the same solve run.
Backend-Specific CDP Implementation
SAT (rustsat / CaDiCaL)
- CaDiCaL is the underlying SAT solver used by the RustSAT-backed adaptor.
- Rewrites the dominance block into CNF through the normal rewrite pipeline.
- Adds resulting clauses incrementally to the SAT solver.
- Extends SAT variable mapping when dominance clauses introduce new references.
SMT (Z3)
- Rewrites the dominance block through the same model-rewrite pipeline.
- Asserts rewritten constraints into the active Z3 solver instance between solutions.
Minion
- Rewrites dominance to a temporary model and lowers it to Minion constraints.
- Adds auxiliary Minion variables mid-search as needed.
- Injects remapped Minion constraints mid-search.
This path required dedicated mid-search injection support and robust handling around Minion runtime constraints.
CLI and Tracing Notes
--rule-trace-cdpcontrols whether solver-time CDP rewrites are included in rule traces.- The CLI solution pipeline still applies a final dominance-pruning pass over collected solutions as a safety net.
Related Minion Follow-Ups
In addition to core CDP support, related Minion work included:
--minion-valorderto control Minion value ordering (ascend,descend,random) from the CLI.- adaptor robustness fixes in callback/solution handling.
- dedicated regression tests around mid-search variable/constraint injection behaviour.
Testing Coverage
CDP behaviour is exercised in integration tests under:
tests-integration/tests/integration/dominance/
These include both explicit dominance formulas and pareto(...) syntax, across integer and boolean cases, and across multiple solver families.
Vertical rules for Occurrence, which are applied once all possible horizontal rules have been applied at a given stage. Followed by an example of rewriting a model in Occurrence representation, using both horizontal and vertical rules.
- see Conjure Horizontal Set Rules for representation-independent horizontal set rules.
Vertical rules for Occurrence-representation of sets
- Occurrence representation creates a matrix that has the length of the maximum integer value contained in the sets. E.g. a set {1,5,11} will be represented by a matrix of length 11. Each entry in the matrix is a boolean, representing whether that integer is contained in the set. in the matrix for the set {1,5,11}, the first, fifth and eleventh entry will all be True, all others will be False.
Set-comprehension
Comprehension rule for Occurrence. Uses the “<-” expression projection (see Horizontal Rules - Notes).
- identifies a comprehension consisting of a “body” followed by “generators or conditions”
- matches the generator to an expression of the form “iPat <- s”, iPat, later called “i” is a quantified variable
- checks that s is a set, and that it has Occurrence representation
- retrieves matrix m representing this set, and its domain
- returns Comprehension with same body, original generator is replaced by a generator specifying the domain of the quantified variable, followed by a condition that the i-th entry of the Occurrence matrix is true.
- i.e. it loops over the given domain and checks that element “i” is present in the set.
Code:
    theRule (Comprehension body gensOrConds) = do
        (gocBefore, (pat, iPat, s), gocAfter) <- matchFirst gensOrConds $ \ goc -> case goc of
            Generator (GenInExpr pat@(Single iPat) s) -> return (pat, iPat, matchDefs [opToSet,opToMSet] s)
            _ -> na "rule_Comprehension"
        TypeSet{}            <- typeOf s
        Set_Occurrence       <- representationOf s
        [m]                  <- downX1 s
        DomainMatrix index _ <- domainOf m
        let i = Reference iPat Nothing
        return
            ( "Vertical rule for set-comprehension, Occurrence representation"
            , return $
                Comprehension body
                    $  gocBefore
                    ++ [ Generator (GenDomainNoRepr pat index)
                       , Condition [essence| &m[&i] |]
                       ]
                    ++ gocAfter
            )
    theRule _ = na "rule_Comprehension"
Example:
- here the quantified variable is q3, the set is A, the domain of the matrix is int(0..6). the GenInExpr “q3 <- A” is rewritten using the domain and the Occurrence matrix.
- the larger context is an and() comprehension representing the statement “for all q3 in A: q3 in B”, where “for all q3 in A” comes from the GenInExpr (see Horizontal Rules - Notes)
- this is rewritten as “for all q3 in the domain int(0..6), for which the q3th index of A_Occurrence is true: q3 in B”
Picking the first option: Question 1: [q3 in B | q3 <- A]
                              Context #1: and([q3 in B | q3 <- A])
    Answer 1: set-comprehension{Occurrence}: Vertical rule for set-comprehension, Occurrence representation
              [q3 in B | q3 <- A]
              ~~>
              [q3 in B | q3 : int(0..6), A_Occurrence[q3]]
Set-in
Set-in rule for Occurrence representation. In Occurrence representation, an element “i” is in a set if and only if the “i-th” entry of the Occurrence matrix is true.
- This rule is not necessary, “in” can be implemented using the comprehension rule above.
- identifies a pattern “x in s”
- checks s is a set of type Occurrence and retrieves its Occurrence representation matrix, m.
- returns the value of m at x.
Code:
    theRule p = do
        (x, s)         <- match opIn p
        TypeSet{}      <- typeOf s
        Set_Occurrence <- representationOf s
        [m]            <- downX1 s
        return
            ( "Vertical rule for set-in, Occurrence representation"
            , return $ make opIndexing m x
            )
Example:
- here we are checking for containment of a quantified variable q3 in a set B
- the statement “q3 in B” is replaced with the value of B_Occurrence at index q3.
Picking the first option: Question 1: q3 in B
                              Context #1: [q3 in B | q3 : int(0..6), A_Occurrence[q3]]
    Answer 1: set-in{Occurrence}: Vertical rule for set-in, Occurrence representation
              q3 in B ~~> B_Occurrence[q3]
General Example: Rewriting the generalised model “C = A intersect B”
Original Essence Model:
find A,B,C : set of int(0..6)
such that C = A intersect B
Conjure rewriting the problem, step by step:
- first set equals is converted to conjunction of subsetEq, applying horizontal Set-eq rule
    Answer 1: set-eq: Horizontal rule for set equality
              C = A intersect B
              ~~>
              C subsetEq A intersect B /\ A intersect B subsetEq C
- dealing with the left hand side first, subsetEq is converted into a comprehension, applying horizontal Set-subsetEq rule. The expression projection “<-” (see Horizontal Rules - Notes) means the body of the and() comprehension must apply to all members (q4) of C
Picking the first option: Question 1: C subsetEq A intersect B
                              Context #1: [C subsetEq A intersect B, A intersect B subsetEq C; int(1..2)]
    Answer 1: set-subsetEq: Horizontal rule for set subsetEq
              C subsetEq A intersect B ~~> and([q4 in A intersect B | q4 <- C])
- the inside of the comprehension is simplified, using the definition of the “<-” expression projection in Occurrence representation. (see previous section “Set-comprehension{Occurrence}”) “q4 <- C” is converted to: all q4 in the length of the matrix (0 to 6) for which the q4th entry in the Occurrence matrix is true.
Picking the first option: Question 1: [q4 in A intersect B | q4 <- C]
                              Context #1: and([q4 in A intersect B | q4 <- C])
                              Context #3: and([q4 in A intersect B | q4 <- C]) /\ A intersect B subsetEq C
    Answer 1: set-comprehension{Occurrence}: Vertical rule for set-comprehension, Occurrence representation
              [q4 in A intersect B | q4 <- C]
              ~~>
              [q4 in A intersect B | q4 : int(0..6), C_Occurrence[q4]]
- turning “q4 in A intersect B” into a comprehension, applying horizontal Set-in rule. again using the expression projection “<-”, to signify that the body of the or() comprehension must apply to at least one member (q5) of A intersect B
Picking the first option: Question 1: q4 in A intersect B
                              Context #1: [q4 in A intersect B | q4 : int(0..6), C_Occurrence[q4]]
                              Context #3: [and([q4 in A intersect B | q4 : int(0..6), C_Occurrence[q4]]), A intersect B subsetEq C; int(1..2)]
    Answer 1: set-in: Horizontal rule for set-in.
              q4 in A intersect B ~~> or([q5 = q4 | q5 <- A intersect B])
- replacing “q5 <- A intersect B” generator with “q5 <- A, q5 in B”, applying horizontal Set-intersect rule
Picking the first option: Question 1: [q5 = q4 | q5 <- A intersect B]
                              Context #1: or([q5 = q4 | q5 <- A intersect B])
                              Context #3: and([or([q5 = q4 | q5 <- A intersect B]) | q4 : int(0..6), C_Occurrence[q4]])
                              Context #5: and([or([q5 = q4 | q5 <- A intersect B]) | q4 : int(0..6), C_Occurrence[q4]]) /\ A intersect B subsetEq C
    Answer 1: set-intersect: Horizontal rule for set intersection
              [q5 = q4 | q5 <- A intersect B] ~~> [q5 = q4 | q5 <- A, q5 in B]
- as in step 3., “<-” is replaced with its definition in Occurrence representation. (see previous section “Set-comprehension{Occurrence}”)
Picking the first option: Question 1: [q5 = q4 | q5 <- A, q5 in B]
                              Context #1: or([q5 = q4 | q5 <- A, q5 in B])
                              Context #3: and([or([q5 = q4 | q5 <- A, q5 in B]) | q4 : int(0..6), C_Occurrence[q4]])
                              Context #5: and([or([q5 = q4 | q5 <- A, q5 in B]) | q4 : int(0..6), C_Occurrence[q4]]) /\ A intersect B subsetEq C
    Answer 1: set-comprehension{Occurrence}: Vertical rule for set-comprehension, Occurrence representation
              [q5 = q4 | q5 <- A, q5 in B]
              ~~>
              [q5 = q4 | q5 : int(0..6), A_Occurrence[q5], q5 in B]
- “q5 in B” is replaces with vertical, Occurrence-specific rule for set-in. simply checks the boolean value of the q5th entry in the occurrence matrix.
Picking the first option: Question 1: q5 in B
                              Context #1: [q5 = q4 | q5 : int(0..6), A_Occurrence[q5], q5 in B]
                              Context #3: [or([q5 = q4 | q5 : int(0..6), A_Occurrence[q5], q5 in B]) | q4 : int(0..6), C_Occurrence[q4]]
                              Context #5: [and([or([q5 = q4 | q5 : int(0..6), A_Occurrence[q5], q5 in B]) | q4 : int(0..6), C_Occurrence[q4]]),
                                           A intersect B subsetEq C;
                                               int(1..2)]
    Answer 1: set-in{Occurrence}: Vertical rule for set-in, Occurrence representation
              q5 in B ~~> B_Occurrence[q5]
- restructuring (“inlining conditions”) inside or and and statements in turn:
Picking the first option: Question 1: [q5 = q4 | q5 : int(0..6), A_Occurrence[q5], B_Occurrence[q5]]
                              Context #1: or([q5 = q4 | q5 : int(0..6), A_Occurrence[q5], B_Occurrence[q5]])
                              Context #3: and([or([q5 = q4 | q5 : int(0..6), A_Occurrence[q5], B_Occurrence[q5]]) | q4 : int(0..6), C_Occurrence[q4]])
                              Context #5: and([or([q5 = q4 | q5 : int(0..6), A_Occurrence[q5], B_Occurrence[q5]]) | q4 : int(0..6), C_Occurrence[q4]]) /\
                                          A intersect B subsetEq C
    Answer 1: inline-conditions: Inlining conditions, inside or
              [q5 = q4 | q5 : int(0..6), A_Occurrence[q5], B_Occurrence[q5]]
              ~~>
              [A_Occurrence[q5] /\ B_Occurrence[q5] /\ q5 = q4 | q5 : int(0..6)]

Picking the first option: Question 1: [or([A_Occurrence[q5] /\ B_Occurrence[q5] /\ q5 = q4 | q5 : int(0..6)])
                                           | q4 : int(0..6), C_Occurrence[q4]]
                              Context #1: and([or([A_Occurrence[q5] /\ B_Occurrence[q5] /\ q5 = q4 | q5 : int(0..6)]) | q4 : int(0..6), C_Occurrence[q4]])
                              Context #3: and([or([A_Occurrence[q5] /\ B_Occurrence[q5] /\ q5 = q4 | q5 : int(0..6)]) | q4 : int(0..6), C_Occurrence[q4]]) /\
                                          A intersect B subsetEq C
    Answer 1: inline-conditions: Inlining conditions, inside and
              [or([A_Occurrence[q5] /\ B_Occurrence[q5] /\ q5 = q4
                       | q5 : int(0..6)])
                   | q4 : int(0..6), C_Occurrence[q4]]
              ~~>
              [C_Occurrence[q4] ->
               or([A_Occurrence[q5] /\ B_Occurrence[q5] /\ q5 = q4
                       | q5 : int(0..6)])
                   | q4 : int(0..6)]
- the process is repeated for the right hand side of the conjunction in step 1, leading to a similar but simpler expression due to the order of operations.
Final Rewritten Model:
find A_Occurrence: matrix indexed by [int(0..6)] of bool
    find B_Occurrence: matrix indexed by [int(0..6)] of bool
    find C_Occurrence: matrix indexed by [int(0..6)] of bool
    branching on [A_Occurrence, B_Occurrence, C_Occurrence]
    such that
        and([C_Occurrence[q4] -> or([A_Occurrence[q5] /\ B_Occurrence[q5] /\ q5 = q4 | q5 : int(0..6)]) | q4 : int(0..6)]),
        and([A_Occurrence[q6] /\ B_Occurrence[q6] -> C_Occurrence[q6] | q6 : int(0..6)])
Introductory notes on the use of “<-” in generators, and the logic behind and() and or() comprehensions. Followed by horizontal set rules. These are representation-independent rules in conjure that are used to rewrite models.
Notes:
-
“<-” is called an expression projection
- it creates a generator called GenInExpr
- the left hand side has the type of a member of the right hand side
- It is used to loop over elements of a set, primarily within and() and or() comprehensions
- see Expression Projection for more information
-
and() - for-all quantifier
- essentially a series of conjunctions (a ∧ b ∧ .. ∧ z)
- states that the body of the contained comprehension must hold for all elements specified by the generators and conditions.
-
or() - existence quantifier
- essentially a series of disjunctions (a ∨ b ∨ .. ∨ z)
- states that the body of the contained comprehension must hold for at least one element specified by the generators and conditions.
-
example combining these three concepts:
- taken from the last section of this page (shown both before and after vertical rules are applied):
and([ or([ q5 = q4 | q5 <- A, or([ q6 = q5 | q6 <- B ]) ]) | q4 <- C ])
and([C_Occurrence[q4] -> or([A_Occurrence[q5] ∧ B_Occurrence[q5] ∧ q5 = q4 | q5 : int(0..6)]) | q4 : int(0..6)])
this translates to:
∀q4 ϵ C: ∃ q5 ϵ A∶(q5=q4) ∧ (∃ q6 ϵ B∶q6=q5 )
Horizontal Rules
Set-Comprehension-Literal
identifies set literal in model and converts to matrix literal containing the same elements of the same type as the set.
- takes in Comprehension containing a “body” and generators or conditions “gensOrConds”
- matches “gensOrConds” to a tuple containing the Generator “(pat,expr)”, between two generators or conditions, “gocBefore” and “gocAfter”
- identifies generator containing pattern and expression, attempts to match expression to a set or multiset
- stores elements of set literal in a list of relevant type “tau”
- creates matrix literal of type “tau” containing same elements as set literal
- returns original comprehension with same body, gocBefore, gocAfter, middle Generator with same pattern but matrix literal replaces set literal
Code:
     theRule (Comprehension body gensOrConds) = do
         (gocBefore, (pat, expr), gocAfter) <- matchFirst gensOrConds $ \ goc -> case goc of
             Generator (GenInExpr pat@Single{} expr) -> return (pat, matchDefs [opToSet, opToMSet] expr)
             Generator (GenInExpr pat@AbsPatSet{} expr) -> return (pat, matchDefs [opToSet, opToMSet] expr)
             _ -> na "rule_Comprehension_Literal"
         (TypeSet tau, elems) <- match setLiteral expr
         let outLiteral = make matrixLiteral
                             (TypeMatrix (TypeInt TagInt) tau)
                             (DomainInt TagInt [RangeBounded 1 (fromInt (genericLength elems))])
                             elems
         return
             ( "Comprehension on set literals"
             , return $ Comprehension body
                      $  gocBefore
                      ++ [Generator (GenInExpr pat outLiteral)]
                      ++ gocAfter
             )
Example:
- set-comprehension-literal rule appears within model: “letting A be {1,5,3}, find B : set of int(0..6), such that B subsetEq A”
- here the body of the comprehension is “q3 = q2”, the gensOrConds is the single Generator “q3 <- {1,3,5}”
- the set literal expression {1,3,5} is replaced with the matrix literal [1,3,5; int(1..3)], the pattern “q3 <-” and the body are left unaffected.
- context:
- q2 is a quantified variable in larger scope (Context #3) – using Occurrence representation here, used to iterate over elements in B
- q3 is the quantified variable used to check that each q2 is an element from A = {1,3,5}
Picking the first option: Question 1: [q3 = q2 | q3 <- {1, 3, 5}]
                               Context #1: or([q3 = q2 | q3 <- {1, 3, 5}])
                               Context #3: and([or([q3 = q2 | q3 <- {1, 3, 5}]) | q2 : int(0..6), B_Occurrence[q2]])
     Answer 1: set-comprehension-literal: Comprehension on set literals
               [q3 = q2 | q3 <- {1, 3, 5}]
               ~~>
               [q3 = q2 | q3 <- [1, 3, 5; int(1..3)]]
Set-eq (boolean)
rule for set equality, checks if two sets are equal, i.e. they contain the same elements
- identifies pattern: “x eq y”
- checks that x and y are sets
- translates equality into conjunction of two subset-equalities
- i.e. “x eq y” becomes “ “x subsetEq of y” AND “y subsetEq of x” “, using Set-subsetEq rule
Code:
     theRule p = do
         (x,y)     <- match opEq p
         TypeSet{} <- typeOf x
         TypeSet{} <- typeOf y
         return
             ( "Horizontal rule for set equality"
             , return $ make opAnd $ fromList
                 [ make opSubsetEq x y
                 , make opSubsetEq y x
                 ]
             )
Example:
Picking the first option: Question 1: A = B union C
     Answer 1: set-eq: Horizontal rule for set equality
               A = B union C ~~> A subsetEq B union C /\ B union C subsetEq A
Set-neq (boolean)
rule for set inequality
- identifies pattern: “x != y”
- checks that x and y are sets
- translates inequality to existence of an element that is either in x but not in y, or that is in y but not in x
- i.e. “x != y” becomes “there exists i such that i in x and i not in y, or i in y and i not in x”
Code:
     theRule [essence| &x != &y |] = do
         TypeSet{} <- typeOf x
         TypeSet{} <- typeOf y
         return
             ( "Horizontal rule for set dis-equality"
             , do
                  (iPat, i) <- quantifiedVar
                  return [essence|
                          (exists &iPat in &x . !(&i in &y))
                          \/
                          (exists &iPat in &y . !(&i in &x))
                      |]
             )
Example:
- checking that the set A is not equal to set B
- here q4 is the quantified variable, referred to as “i” above.
- “exists” statement is translated using the existence quantifier or(), quantifying over q4 members of A.
- The expression projection “<-” creates a generator, in which the lhs has the type of a member of the rhs. This means the body of the or() comprehension must apply to at least one member (q4) of A (see Notes).
Picking the first option: Question 1: A != B union C
     Answer 1: set-neq: Horizontal rule for set dis-equality
               A != B union C
               ~~>
               or([!(q4 in B union C) | q4 <- A]) \/
               or([!(q4 in A) | q4 <- B union C])
Set-subsetEq (boolean)
rule for subsetEq, checks if one set is contained in another, they may be equal
- identifies pattern: “x subsetEq y”
- checks that x and y are sets
- translates x is subsetEq of y to all elements in x are in y
- i.e. “x subsetEq y” becomes “for all i in x, i in y”
Code:
     theRule p = do
         (x,y)     <- match opSubsetEq p
         TypeSet{} <- typeOf x
         TypeSet{} <- typeOf y
         return
             ( "Horizontal rule for set subsetEq"
             , do
                  (iPat, i) <- quantifiedVar
                  return [essence| forAll &iPat in &x . &i in &y |]
             )
Example:
- here q3 is the quantified variable, referred to as “i” above.
- and() is the universal quantifier, quantifying over q3. and([q3 in B | q3 <- A]) translates to “for all q3 in A, q3 is in B”
- The expression projection “<-” creates a generator, in which the lhs has the type of a member of the rhs. This means the body of the and() comprehension must apply to all members (q3) of A. (see Notes).
Picking the first option: Question 1: A subsetEq B
     Answer 1: set-subsetEq: Horizontal rule for set subsetEq
               A subsetEq B ~~> and([q3 in B | q3 <- A])
Set-subset (boolean)
rule for subset, checks if one set is strictly contained in another, they cannot be equal
- identifies pattern: “a subset b”
- checks that a and b are sets
- translates a is subset of b to a is subsetEq of b, and a is not equal to b
- i.e. “a subset b” becomes “ “a subsetEq b” AND “a neq b” “, using rules Set-subsetEq and Set-neq
Code:
     theRule [essence| &a subset &b |] = do
         TypeSet{} <- typeOf a
         TypeSet{} <- typeOf b
         return
             ( "Horizontal rule for set subset"
             , return [essence| &a subsetEq &b /\ &a != &b |]
             )
     theRule _ = na "rule_Subset"
Example:
Picking the first option: Question 1: A subset B
     Answer 1: set-subset: Horizontal rule for set subset
               A subset B ~~> A subsetEq B /\ A != B
Set-supset (boolean)
rule for superset, checks if one set strictly contains another, they cannot be equal
- identifies pattern: “a supset b”
- checks that a and b are sets
- translates a is superset of b to b is subset of a, and applies subset rule.
Code:
     theRule [essence| &a supset &b |] = do
         TypeSet{} <- typeOf a
         TypeSet{} <- typeOf b
         return
             ( "Horizontal rule for set supset"
             , return [essence| &b subset &a |]
             )
     theRule _ = na "rule_Supset"
Example:
Picking the first option: Question 1: A supset B
     Answer 1: set-supset: Horizontal rule for set supset
               A supset B ~~> B subset A
Set-supsetEq (boolean)
rule for supsetEq, checks if one set contains another, they may be equal
- identifies pattern: “x supsetEq y”
- checks that x and y are sets
- translates x is supsetEq of y to y is subsetEq of x, and applies subsetEq rule.
Code:
     theRule [essence| &a supsetEq &b |] = do
         TypeSet{} <- typeOf a
         TypeSet{} <- typeOf b
         return
             ( "Horizontal rule for set supsetEq"
             , return [essence| &b subsetEq &a |]
             )
     theRule _ = na "rule_SupsetEq"
Example:
Picking the first option: Question 1: A supsetEq B
     Answer 1: set-subsetEq: Horizontal rule for set supsetEq
               A supsetEq B ~~> B subsetEq A
Set-intersect (describes a new set)
rule for set intersection. defines that an element is in the intersection of two sets when it is in both sets. similar structure as comprehension literal rule, only used within generators or conditions
- attempts to match generator to pattern and expression: pattern “quantified variable <-” and expression with a modifier operator (if present) applied to a set/multiset/relation “s”
- attempts to match s to “x intersect y”
- checks x is a set, multiset, function, or relation
- replaces generator with same pattern and modifier (if present) applied to x, and adds the condition that the relevant quantified variable must be in y.
- i.e. “i <- x intersect y” becomes “i <- x, i in y”
Code:
theRule (Comprehension body gensOrConds) = do
         (gocBefore, (pat, iPat, expr), gocAfter) <- matchFirst gensOrConds $ \ goc -> case goc of
             Generator (GenInExpr pat@(Single iPat) expr) ->
                 return (pat, iPat, matchDefs [opToSet,opToMSet,opToRelation] expr)
             _ -> na "rule_Intersect"
         (mkModifier, s)    <- match opModifier expr
         (x, y)             <- match opIntersect s
         tx                 <- typeOf x
         case tx of
             TypeSet{}      -> return ()
             TypeMSet{}     -> return ()
             TypeFunction{} -> return ()
             TypeRelation{} -> return ()
             _              -> failDoc "type incompatibility in intersect operator"
         let i = Reference iPat Nothing
         return
             ( "Horizontal rule for set intersection"
             , return $
                 Comprehension body
                     $  gocBefore
                     ++ [ Generator (GenInExpr pat (mkModifier x))
                        , Condition [essence| &i in &y |]
                        ]
                     ++ gocAfter
             )
Example:
- set-intersect rule appears within model C = A intersect B, after applying set-equals, set-subsetEq, set-in
- q4 is quantified in a former step, it is an element in C
- see Context #1, q5 is quantified by or() - existence quantifier, translates to “there exists a q5 in A intersect B such that q5 equals q4”
- translates “q5 <- A intersect B” to “q5 <- A, q5 in B”, i.e. body of or() comprehension must apply to at least one member (q5) of A, with the additional condition that q5 must be in B.
Picking the first option: Question 1: [q5 = q4 | q5 <- A intersect B]
                               Context #1: or([q5 = q4 | q5 <- A intersect B])
                               ...
     Answer 1: set-intersect: Horizontal rule for set intersection
               [q5 = q4 | q5 <- A intersect B] ~~> [q5 = q4 | q5 <- A, q5 in B]
Set-union (describes a new set)
rule for set union. defines that an element is in the union of two sets when it is in at least one of the sets. similar structure as comprehension literal rule, only used within generators or conditions
- attempts to match generator to pattern and expression: pattern “quantified variable <-” and expression with a modifier operator (if present) applied to a set/multiset/relation “s”
- attempts to match s to “x union y”
- checks x is a set, multiset, function, or relation
- creates abstract matrix containing two comprehensions:
- both comprehensions have body from original comprehension
- both comprehensions have a generator with same pattern on same quantified variable.
- expressions in generators consist of same modifier operator (if present) applied to only set x and only set y respectively
- for set y, the additional condition “i not in x” is added to prevent double counting (relevant for sums)
Code:
     theRule (Comprehension body gensOrConds) = do
         (gocBefore, (pat, iPat, expr), gocAfter) <- matchFirst gensOrConds $ \ goc -> case goc of
             Generator (GenInExpr pat@(Single iPat) expr) -> return (pat, iPat, matchDef opToSet expr)
             _ -> na "rule_Union"
         (mkModifier, s)    <- match opModifier expr
         (x, y)             <- match opUnion s
         tx                 <- typeOf x
         case tx of
             TypeSet{}      -> return ()
             TypeMSet{}     -> return ()
             TypeFunction{} -> return ()
             TypeRelation{} -> return ()
             _              -> failDoc "type incompatibility in union operator"
         let i = Reference iPat Nothing
         return
             ( "Horizontal rule for set union"
             , return $ make opFlatten $ AbstractLiteral $ AbsLitMatrix
                 (DomainInt TagInt [RangeBounded 1 2])
                 [ Comprehension body
                     $  gocBefore
                     ++ [ Generator (GenInExpr pat (mkModifier x)) ]
                     ++ gocAfter
                 , Comprehension body
                     $  gocBefore
                     ++ [ Generator (GenInExpr pat (mkModifier y))
                        , Condition [essence| !(&i in &x) |]
                        ]
                     ++ gocAfter
                 ]
             )
Example:
- set-union rule appears within model C = A union B, after applying set-equals, set-subsetEq, set-in
- q4 is quantified in a former step, it is an element in C (Context #3)
- see Context #1, q5 is quantified by or() - existence quantifier, translates to “there exists a q5 in A union B such that q5 equals q4”
- translates “[q5 = q4 | q5 <- A union B]” to return the matrix “flatten([[q5 = q4 | q5 <- A], [q5 = q4 | q5 <- B, !(q5 in A)]; int(1..2)])”
- “q5 = q4” is the body of the comprehension, the pattern “q5 <-” is applied to both A and B in the respective entries of the matrix
- additional condition “!(q5 in A)” for the second comprehension, to prevent double counting
- i.e. check that the body “q5 = q4”, applies to at least one member (q5) in A or in B.
Picking the first option: Question 1: [q5 = q4 | q5 <- A union B]
                               Context #1: or([q5 = q4 | q5 <- A union B])
                               Context #3: and([or([q5 = q4 | q5 <- A union B]) | q4 : int(0..6), C_Occurrence[q4]])
     Answer 1: set-union: Horizontal rule for set union
               [q5 = q4 | q5 <- A union B]
               ~~>
               flatten([[q5 = q4 | q5 <- A], [q5 = q4 | q5 <- B, !(q5 in A)];
                            int(1..2)])
Set-difference (describes a new set)
rule for set difference. defines that an element is in the difference of two sets when it is in the former but not in the latter. similar structure as comprehension literal rule, only used within generators or conditions
- attempts to match generator to pattern and expression: pattern “quantified variable <-” and expression with a modifier operator (if present) applied to a set/multiset/relation “s”
- attempts to match s to “x - y”
- checks x is a set, multiset, function, or relation
- returns comprehension with same body as original, same gocBefore, gocAfter. Generator is replaced by original generator applied only to x, with additional condition “i not in y”
Code:
     theRule (Comprehension body gensOrConds) = do
         (gocBefore, (pat, iPat, expr), gocAfter) <- matchFirst gensOrConds $ \ goc -> case goc of
             Generator (GenInExpr pat@(Single iPat) expr) -> return (pat, iPat, expr)
             _ -> na "rule_Difference"
         (mkModifier, s)    <- match opModifier expr
         (x, y)             <- match opMinus s
         tx                 <- typeOf x
         case tx of
             TypeSet{}      -> return ()
             TypeMSet{}     -> return ()
             TypeFunction{} -> return ()
             TypeRelation{} -> return ()
             _              -> failDoc "type incompatibility in difference operator"
         let i = Reference iPat Nothing
         return
             ( "Horizontal rule for set difference"
             , return $
                 Comprehension body
                     $  gocBefore
                     ++ [ Generator (GenInExpr pat (mkModifier x))
                        , Condition [essence| !(&i in &y) |]
                        ]
                     ++ gocAfter
             )
Example:
- set-difference rule appears within model C = A - B, after applying set-equals, set-subsetEq, set-in
- q4 is quantified in a former step, it is an element in C (Context #3)
- see Context #1, q5 is quantified by or() - existence quantifier, translates to “there exists a q5 in A - B such that q5 equals q4”
- translates “q5 <- A - B” to “q5 <- A, !(q5 in B)”
Picking the first option: Question 1: [q5 = q4 | q5 <- A - B]
                               Context #1: or([q5 = q4 | q5 <- A - B])
                               Context #3: and([or([q5 = q4 | q5 <- A - B]) | q4 : int(0..6), C_Occurrence[q4]])
     Answer 1: set-difference: Horizontal rule for set difference
               [q5 = q4 | q5 <- A - B] ~~> [q5 = q4 | q5 <- A, !(q5 in B)]
Set-max-min (int)
rule for finding maximum and minimum of a set of integers
- contains two sub-rules, one for max, one for min.
- if set is literal, converts to list and finds max.
- otherwise creates quantified variable and uses max() operation in Essence.
- minimum rule works analogously
Code:
     theRule [essence| max(&s) |] = do
         TypeSet (TypeInt _) <- typeOf s
         return
             ( "Horizontal rule for set max"
             , case () of
                 _ | Just (_, xs) <- match setLiteral s, length xs > 0 -> return $ make opMax $ fromList xs
                 _ -> do
                     (iPat, i) <- quantifiedVar
                     return [essence| max([&i | &iPat <- &s]) |]
             )
     theRule [essence| min(&s) |] = do
         TypeSet (TypeInt _) <- typeOf s
         return
             ( "Horizontal rule for set min"
             , case () of
                 _ | Just (_, xs) <- match setLiteral s, length xs > 0 -> return $ make opMin $ fromList xs
                 _ -> do
                     (iPat, i) <- quantifiedVar
                     return [essence| min([&i | &iPat <- &s]) |]
             )
     theRule _ = na "rule_MaxMin"
Example:
Picking the first option: Question 1: max(A)
                               Context #1: max(A) = max(B)
     Answer 1: set-max-min: Horizontal rule for set max
               max(A) ~~> max([q3 | q3 <- A])
Set-literal example:
        letting A be {5, 6, 3}
        find i: int(0..10)
        such that i = min(A)
        branching on [i]
        such that
        such that true(i)

Picking the first option: Question 1: min(A)
                               Context #1: i = min(A)
     Answer 1: full-evaluate: Full evaluator
               min(A) ~~> 3
Set-in (boolean)
rule for set membership, checks whether something is an element of a set
- identifies pattern: “x in s”
- checks s is a set
- introduces quantified variable to go through set s and check whether any of its elements equal x
- i.e. “x in s” becomes “there exists i in s such that i = x”
Code:
     theRule p = do
         (x,s)     <- match opIn p
         TypeSet{} <- typeOf s
         -- do not apply this rule to quantified variables
         -- or else we might miss the opportunity to apply a more specific vertical rule
         if referenceToComprehensionVar s
             then na "rule_In"
             else return ()
         return
             ( "Horizontal rule for set-in."
             , do
                  (iPat, i) <- quantifiedVar
                  return [essence| exists &iPat in &s . &i = &x |]
             )
Example:
- here we are checking for membership of q4 in B union C
- q4 is a quantified variable in larger context
- q5 is the quantified variable introduced by the set-in rule.
Picking the first option: Question 1: q4 in B union C
     Answer 1: set-in: Horizontal rule for set-in.
               q4 in B union C ~~> or([q5 = q4 | q5 <- B union C])
Set-card (int)
rule for set cardinality, counts number of elements in a set
- identifies pattern: |s|
- checks s is a set
- if it exists, returns the set’s domain’s size attribute
- otherwise introduces quantified variable “iPat” to iterate through set, incrementing the sum for each new element, returns sum.
Code:
rule_Card = "set-card" `namedRule` theRule where
     theRule p = do
         s         <- match opTwoBars p
         case s of
             Domain{} -> na "rule_Card"
             _        -> return ()
         TypeSet{} <- typeOf s
         return
             ( "Horizontal rule for set cardinality."
             , do
                 mdom <- runMaybeT $ domainOf s
                 case mdom of
                     Just (DomainSet _ (SetAttr (SizeAttr_Size n)) _) -> return n
                     _ -> do
                         (iPat, _) <- quantifiedVar
                         return [essence| sum &iPat in &s . 1 |]
             )
Example:
- set-card rule appears within model |A| = |B|
- here q3 is the quantified variable called “iPat” above
Picking the first option: Question 1: |A|
                               Context #1: |A| = |B|
     Answer 1: set-card: Horizontal rule for set cardinality.
               |A| ~~> sum([1 | q3 <- A])
NOTE: Once the rewrite engine API is finalized, we should possibly make a separate page for it
Expression rewriting, Rules and RuleSets
NOTE: Once the rewrite engine API is finalised, we should possibly make a separate page for it.
Overview
Conjure uses Essence, a high-level DSL for constraints modelling, and converts it into a solver-specific representation of the problem. To do that, we parse the Essence file into an AST, then use a rule engine to walk the expression tree and rewrite constraints into a format that is accepted by the solver before passing the AST to a solver adapter.
The high-level process is as follows:
- Start with a deterministically ordered list of rules
- For each node in the expression tree:
- Find all rules that can be applied to it
- If there are none, keep traversing the tree. Otherwise:
- Take the rules with the highest priority
- If there is only one, apply it
- If there are multiple, use some strategy to choose a rule (the rule selection logic is separate from the rewrite engine itself). For testing, we currently just choose the first rule
- When there are no more rules to apply, the rewrite is complete
We want the rewrite process to:
- be flexible - instead of hard coding the rules, we want an easy way to extend the list of rules and to decide which rules to use, both for ourselves and for any users who may wish to use conjure-oxide in their projects
- be deterministic (in a loose sense of the term) - for a given input, set of rules, and a given set of answers to all rule selection questions (see above), the rewriter must always produce the same output
- happen in a single step, instead of doing multiple passes over the model (like it is done in Savile Row currently)
Rules
Overview
Rules are the fundamental part of the rewrite engine. They consist of:
- A unique name
- An application function which takes an
Expressionand either rewrites it or errors if the rule is not applicable. (Checking applicability and applying the rule are not separated to avoid code duplication and inefficiency - their logic is the same)
We may also store other metadata in the Rule struct, for example the names of the RuleSets that it belongs to.
#![allow(unused)]
fn main() {
pub struct Rule<'a> {
    pub name: &'a str,
    pub application: fn(&Expression) -> Result<Expression, RuleApplicationError>,
    pub rule_sets: &'a [(&'a str, u8)], // (name, priority). At runtime, we add the rule to rulesets
}
}
Registering Rules
The main way to register rules is by defining their application function and decorating it with the #[register_rule()] macro.
When this macro is invoked, it creates a static Rule object and adds it to a global rule registry. Rules may be registered from the conjure_oxide crate, or any downstream crate (so, users may define their own rules).
Currently, the register_rule macro has the following syntax:
#[register_rule(("<RuleSet name>", <Rule priority within the ruleset>))]
Example
#![allow(unused)]
fn main() {
use conjure_core::ast::Expression;
use conjure_core::rule::RuleApplicationError;
use conjure_rules::register_rule;

#[register_rule(("RuleSetName", 10))]
fn identity(expr: &Expression) -> Result<Expression, RuleApplicationError> {
   Ok(expr.clone())
}
}
Getting Rules from the registry
Rules may be retrieved using the following functions:
#![allow(unused)]
fn main() {
pub fn get_rule_by_name(name: &str) -> Option<&'static Rule<'static>>
}
#![allow(unused)]
fn main() {
pub fn get_rules() -> Vec<&'static Rule<'static>>
}get_rules()returns a vector of static references toRulestructsget_rule_by_name()returns a static reference to a specific rule, if it exists
Rule Sets
Rule sets group some Rules together and map them to their priorities.
The rewrite function takes a set of RuleSets and uses it to resolve a final list of rules, ordered by their priority.
The RuleSet object contains the following fields:
nameThe name of the rule set.orderThe order of the rule set.rulesA map of rules to their priorities. This is evaluated lazily at runtime.solversThe solvers that thisRuleSetapplies for.solver_familiesThe solver families that thisRuleSetapplies for.
Note
A
RuleSetwould apply if EITHER of the following is true:
- The target solver belongs to its list of
solvers- The target solver belongs to a family that is listed in
solver_families, even if it is not explicitly named insolvers
It provides the following public methods:
get_dependencies() -> &HashSet<&'static RuleSet>Get the dependencyRuleSets of thisRuleSet(evaluating them lazily if necessary)get_rules() -> &HashMap<&'a Rule<'a>, u8>Get a map of rules to their priorities (performing lazy evaluation - “reversing the arrows” - if necessary)
Registering Rule Sets
Like Rules, RuleSets may be registered from anywhere within the conjure_oxide crate or any downstream crate.
They are registered using the register_rule_set! macro using the following syntax:
register_rule_set!("<Rule set name>", <order>, ("<name of dependency RuleSet>", ...), (<list of solver families>), (<list of solvers>));
If a bracketed list is omitted, the corresponding list would be empty. However, you must not break the order. For example:
#![allow(unused)]
fn main() {
register_rule_set!("MyRuleSet", 10) // This is legal (rule set will have no dependencies, solvers or solver families)
register_rule_set!("MyRuleSet", 10, ("DependencyRS")) // Also legal
register_rule_set!("MyRuleSet", 10, (SolverFamily::CNF)) // This is illegal because dependencies come before solver families
register_rule_set!("MyRuleSet", 10, (), (SolverFamily::CNF)) // But this is fine
}
Example
#![allow(unused)]
fn main() {
register_rule_set!("MyRuleSet", 10, ("DependencyRuleSet", "AnotherRuleSet"), (SolverFamily::CNF), (SolverName::Minion));
}
Adding Rules to RuleSets
Notice that we do not add any rules to the RuleSet when we register it.
Instead, the Rule contains the names of the RuleSets that it needs to be added to.
At runtime, when we first request the rules from a RuleSet, it retrieves a list of all the rules that reference it by name from the registry, and stores static references to the rules along with their priorities.
This is done to allow us to statically initialise Rules and RuleSets in a decentralised way across multiple files and store them in a single registry. Dynamic data structures (like Vec or HashMap) cannot be initialised at this stage (Rust has no “life before main()”), so we have to initialise them lazily at runtime.
Internally, we would sometimes refer to this lazy initialisation as “reversing the arrows”.
Getting RuleSets from the registry
Similarly to Rules, RuleSets may be retrieved using the following functions:
#![allow(unused)]
fn main() {
pub fn get_rule_set_by_name(name: &str) -> Option<&'static RuleSet<'static>>
}
#![allow(unused)]
fn main() {
pub fn get_rule_sets() -> Vec<&'static RuleSet<'static>>
}Resolving a final list of Rules
Our rewrite function takes an Expression along with a list of RuleSets to apply:
#![allow(unused)]
fn main() {
pub fn rewrite<'a>(
    expression: &Expression,
    rule_sets: &Vec<&'a RuleSet<'a>>,
) -> Result<Expression, RewriteError>
}
Before we start rewriting the AST, we must first resolve the final list of rules to apply.
This is done via the following steps:
-
Add all given
RuleSets to a set of rulesets -
Recursively look up all their dependencies by name and add them to the set as well
-
Once we have a final set of
RuleSets:-
Construct a
HashMap<&Rule, priority>). This will hold our final mapping of rules to priorities -
Loop over all the rules of every
RuleSet -
If a rule is not yet present in the final
HashMap, add it and its priority within theRuleSet -
If it is already present:
- Compare the order of the current
RuleSetand the one that the rule originally came from - If the new
RuleSethas a higher order, update theRule’s priority
- Compare the order of the current
-
-
Once all rules have been added to the
HashMap:- Take all its keys and put them in a vector
- Sort it by rule priority
- In the case that two rules have the same priority, sort them lexicographically by
name
In the end, we should have a final deterministically ordered list of rules and a HashMap that maps them to their priorities.
Now, we can proceed with rewriting.
Why all this weirdness?
Rule ordering
We want to always have a single deterministic ordering of Rules. This way, for a given set of rules, the select_rule strategy would always give the same result.
Think of it as a multiple choice quiz: if we want to know that the same numbers in the answer sheet actually correspond to the same set of answers, we must make sure that all students get the questions in the same order.
This is why we sort Rules by priority, and then use their name (which is guaranteed to be unique) as a tie breaker.
Normally, one would just construct a vector of Rules and use it as the final ordering, but we cannot do that, because rules are registered in a decentralised way across many files, and when we get them from the rule registry, they are not guaranteed to be in any specific order
RuleSet ordering
As part of resolving the list of rules to use, we need to take rules from multiple RuleSets and put these rules and their priorities in a HashMap. However, the RuleSets may overlap (i.e. contain the same rules but with different priorities), and we want to make sure that, for a given set of RuleSets, the final rule priorities will always be the same.
Normally, this would not be an issue - entries in the HashMap would be added and updated as needed as we loop over the RuleSets. However, since the RuleSets are stored in a decentralised registry and are not guaranteed to come in any particular order (i.e. this order may change every time we recompile the project), we need to ensure that the order in which the entries are added to the HashMap (and thus the final rule priorities) doesn’t change.
To achieve this, we use the following algorithm:
- Loop over all given
RuleSets - Loop over all the rules in a
RuleSet- If the rule is not present in the
HashMap, add it - If the rule is already there:
- If this
RuleSethas a higherorderthan the one that the rule came from, update its priority - Otherwise, don’t change anything
- If this
- If the rule is not present in the
Note
The
orderof aRuleSetshould not be thought of as a “priority” and does not affect the priorities of the rules in it. It only provides a consistent order of operations when resolving the final set of rules NOTE: Theorderof aRuleSetshould not be thought of as a “priority” and does not affect the priorities of the rules in it. It only provides a consistent order of operations when resolving the final set of rules
Concrete Example: SAT Backend Pipeline
To see how rules and rulesets work in practice, let’s walk through the SAT backend transformation of a simple Essence model.
Note: The actual RuleSet names and groupings in the codebase may differ from this simplified explanation, but the general priority ordering and transformation pipeline described here is accurate.
Input Model
find x : int(1..3)
find y : int(2..5)
such that x > y
Transformation Pipeline
The SAT backend applies rules in three priority groups:
1. Integer Representation Rules (Highest Priority)
RuleSet: integer_repr
These rules convert integer variables into SATInt representations (boolean vectors):
#![allow(unused)]
fn main() {
#[register_rule(("integer_repr", 100))]
fn integer_decision_representation(expr: &Expression) -> Result<Expression, RuleApplicationError> {
    // Converts:  find x : int(1..3)
    // Into: SATInt([bool_0, bool_1, ... ])
}
}
2. Operation Transformation Rules
RuleSet: integer_operations
These rules convert operations on SATInts into boolean expressions:
#![allow(unused)]
fn main() {
#[register_rule(("integer_operations", 50))]
fn cnf_int_ineq(expr: &Expression) -> Result<Expression, RuleApplicationError> {
    // Converts: SATInt(x) > SATInt(y)
    // Into: complex boolean expression
}
}
3. Tseytin Transformation Rules (Lowest Priority)
RuleSet: boolean
These rules convert the resulting boolean expressions into Conjunctive Normal Form:
#![allow(unused)]
fn main() {
#[register_rule(("boolean", 10))]
fn tseitin_and(expr: &Expression) -> Result<Expression, RuleApplicationError> {
    // Converts: A AND B
    // Into: auxiliary variable C with clauses enforcing C <-> A AND B
}
}
Viewing the Transformations
You can see this pipeline in action using logging:
RUST_LOG=TRACE cargo run -- solve --solver sat my_problem.essence --verbose
This section had been taken from the ‘Expression rewriting, Rules and RuleSets’ page of the conjure-oxide wiki
Creating Types Guide
Currently Conjure-Oxide does not have any support for Essence’s partitions. This guide outlines the process of creating support for those types to the AST. This does not currently cover rewriting rules or solving.
Creating the Type
- The domains of these types can contain pointers and so must be able to be both ground and unresolved. Hence you must add to the
GroundDomainandUnresolvedDomainEnums - Adding a new domain will require adding implementations for it, for a lot of related functions. To use the roundtrip tests the Display function
fmt()must be implemented to match the Essence of the type. - Next to complete some of these implementation you will need to add to the
ReturnTypeEnum. This is the returned value from a specific element of the abstract type. - Finally these functions will also require you to add to the
AbstractLiteralEnum. This defines the values of a literal of that type. This will be required for defining the type explicitly. You should also note that we implementUniplateforAbstractLiteral, and so this implementation will be required.
Adding to the Legacy Parser
Once the type can be stored in Conjure-Oxide’s AST, you will need to add parsing support.
- For the legacy parser this involves adding to
parse_model.rsto parse the JSON output of Conjure’s parser.
Domains
What are Domains and Types
A Domain is the discrete and finite set of values that a variable or expression can take. A Type is a more general description about some collection. The simplest domains are Concrete domains: empty, boolean, int(min..max). Abstract domains use some high-level types (such as a Set, Matrix, etc) to instantiate a domain where the objects of the domain contain more objects. These objects are called Literals; a literal is one specific value taken from a domain.
In the original language description, found in the Conjure Docs
Domain := "bool"
        | "int" list(Range, ",", "()")
        | "int" "(" Expression ")"
        | Name list(Range, ",", "()") # the Name refers to an enumerated type
        | Name                        # the Name refers to an unnamed type
        | "tuple" list(Domain, ",", "()")
        | "record" list(NameDomain, ",", "{}")
        | "variant" list(NameDomain, ",", "{}")
        | "matrix indexed by" list(Domain, ",", "[]") "of" Domain
        | "set" list(Attribute, ",", "()") "of" Domain
        | "mset" list(Attribute, ",", "()") "of" Domain
        | "function" list(Attribute, ",", "()") Domain "-->" Domain
        | "sequence" list(Attribute, ",", "()") "of" Domain
        | "relation" list(Attribute, ",", "()") "of" list(Domain, "*", "()")
        | "partition" list(Attribute, ",", "()") "from" Domain

Range := Expression
       | Expression ".."
       | ".." Expression
       | Expression ".." Expression

Attribute := Name
           | Name Expression

NameDomain := Name ":" Domain
Ground and Unresolved
Looking at conjure-cp-core::ast::domains, there is a Domain Enum, with variants Ground and Unresolved.
- An
Unresolveddomain is a domain whose bounds are tied to an expression that has not been evaluated. For examplex: int(1..(2+1))andx: int(1..n)are both unresolved. - A
Grounddomain is a domain entirely composed of literals. For example:int(2..5),set (maxSize 2) of int(1..3).
Attributes
Abstract domains tend to also have attributes defined on them, which often restricts the possible values of the domain.
When defining a Set type, it may have attributes and an inner domain. For example, the domain
set (size 2) of int(1..3)could have valid values like{1,2},{1,3},{2,3}. The ‘inner’ domain isint(1..3), from which the values that make up the set are pulled.
The most common attribute is cardinality (which restricts the range objects in an object), but they are type-specific and there is a large variety.
Functions
What Are Functions
A function is a binary relation on two sets, from elements of a domain to elements of a codomain.
Functions have attributes and two domains for the domain and codomain of its results. They are defined for both GroundDomain and UnresolvedDomain as Function(FuncAttr, Moo<GroundDomain>, Moo<GroundDomain>).
The result of a function is a list of tuples defined by the mappings. As such the AbstractLiteral for functions is defined Function(Vec<(T, T)>). This AbstractLiteral type means that functions can also be represented explicitly.
Attributes
Functions contain three types of attributes: size, partiality and jectivity.
Size attributes determine how many mappings the function is true for. Size attributes are converted to a Range<A> type in Conjure-Oxide. This size can be defined as:
- A single size
size x - A minimum size
minSize x - A maximum size
maxSize x - A range of sizes
minSize x maxSize x - Or unbounded by not specifying any attribute
Partiality determines whether the function is total or partial. A total function is one which is defined for every possible input in the domain set. A function will have partial partiality unless specified otherwise. Partiality is stored as an Enum inside Conjure-Oxide.
Jectivity refers to whether a function is injective, surjective, or bijective. These determine whether elements in the domain and codomain must have only one corresponding mapping. A function can also have no specified jectivity, which is the default. Jectivity is also stored as an Enum inside Conjure-Oxide.
Operators
There are eight special operators which are defined on functions. These are represented as Expressions in Conjure-Oxide.
Defined(f)- Returns the set of values in the domain for which a function f is defined.Image(f, x)- Returns the element of the codomain which is mapped to domain element x, in function f.ImageSet(f, x)- Returns the set of elements of the codomain which is mapped to domain element x, in function f.Inverse (f1, f2)- Returns a boolean representing if functions f1 and f2 are inverses of each other.PreImage(f, x)- Returns the set of elements of the domain which map to codomain element x, in function f.Range(f)- Returns the set of values in the domain for which a function f is defined.Restrict(f, D)- Returns a sub-function of f which has its mapping restricted to values in the domain D.ToRelation(f)- Returns a relation for the converted function f.
Note on Implementation
Currently functions are defined within the AST of Conjure-Oxide and can be parsed with the ‘legacy’ parser. However, there is no support as of Apr-2026 for rewriting rules or solving.
Multisets
What Are Multisets
A multiset is a datatype for storing a set of objects where objects can occur more than once, but the ordering of objects does not matter.
Multisets have attributes and a single domain. A multiset can be defined for both GroundDomain and UnresolvedDomain.
Attributes
- A cardinality attribute, as a range;
size,minSize,maxSize. - An occurrence attribute, as a range;
minOccur,maxOccur.
In the original conjure implementation, a multiset was infinite without size, maxSize, or maxOccur.
In the new conjure-oxide implementation, a variable’s domain is ground if it is fully-bounded (i.e. has a minSize and maxSize).
$ Valid
find foo: multiset (maxSize 5, minOccur 2) of int(1..10)
find bar: multiset (size 3) of int(1..4)


$ Invalid
find fizz: multiset of int(1..10)               $ there must be a upper-bounded size attribute
find buzz: multiset (minSize 3) of int(1..10)   $ this is a lower bound, there is no upper bound on the size attribute
Operators
There are four operators which are defined on functions. These are represented as Expressions in Conjure-Oxide.
hist(m)- histogram of multi-setmmax(m)- largest element in ordered multisetmmin(m)- largest element in ordered multisetmfreq(m,e)- counts occurrences of elementein multisetm
As of 29th April 2026,
MinandMaxhave been added as Expressions, butHistandFreqhave not. There is no support for rewriting rules or solving.
Relations
What Are Relations
A relation is effectively a set of tuples. The internal tuples can be of any arity and can have different internal domains, as long as every tuple in the relation has the same arity and domains. If a relation is binary we can also add additional attributes to define properties of the relation.
Relations have attributes and a list of domains for inside the tuples. They are defined for both GroundDomain and UnresolvedDomain as Relation(RelAttr, Vec<GroundDomain>).
The result of a relation is a list of tuples. As such the AbstractLiteral for relations is defined Relation(Vec<Vec<T>>). This AbstractLiteral type means that relations can also be represented explicitly.
Attributes
Relations contain two types of attributes: size and binary attributes.
Size attributes determine how many tuples are in the relation. Size attributes are converted to a Range<A> type in Conjure-Oxide. This size can be defined as:
- A single size
size x - A minimum size
minSize x - A maximum size
maxSize x - A range of sizes
minSize x maxSize x - Or unbounded by not specifying any attribute
Binary attributes determine properties of the relation when it is a binary relation. Binary attributes are stored as a list of attributes Vec<BinaryAttr> and any number of them can be provided. The available binary attributes are as follows:
reflexiveirreflexivecoreflexivesymmetricantiSymmetricaSymmetrictransitivetotalconnexEuclideanserialequivalencepartialOrder
Operators
There is one special operator which is defined on relations.
RelationProj(r, ps)- Returns a new relation after projecting projectors ps onto relation r.
The projectors ps are stored aVec<Option<Expression>>, and the projecting components (denoted_in Essence) are stored asNone
For example:r(_,1,_)converts r from a 3-component relation to a 2-component relation, by projecting the 1st and the 3rd columns. It chooses entries where the second column is 1. This is equivalent to the SQL select query:SELECT one, three FROM r WHERE two = 1
Note on Implementation
Currently relations are defined within the AST of Conjure-Oxide and can be parsed with the ‘legacy’ parser. However, there is no support as of Apr-2026 for rewriting rules or solving.
Partitions
What are Partitions
A partition is a datatype that splits some domain into parts. A good example of a partition in use is in the Social Golfers problem (CSPLib.org, problem #10).
Attributes
- Number of Parts (as a range):
numParts,minNumParts,maxNumParts - Cardinality of each Part (as a range):
partSize,minPartSize,maxPartSize - Regularity (i.e. every part has the same cardinality):
regular
For example:
find foo : partition (maxNumParts 3, partSize 1) from int(1..5)
$ ({1})                 i.e. 1 part of cardinality 1
$ ...
$ ({2}, {4}, {5})       i.e. 3 parts of cardinality 3
$ ({3}, {4}, {5})       i.e. 3 parts of cardinality 3

find bar : partition (minNumParts 1, maxNumParts 3, minPartSize 2, maxPartSize 4, regular) from int(1..20)
$ ({1, 2})                           i.e. 1 part of cadinality 2
$ ({1,2,5}, {3,4,12}, {6,7,15})      i.e. 3 parts of cardinality 3
$
$ ({2,3}, {5})                       this would be invalid for two reasons:
$                                       > it is not regular (different cardinalities)
$                                       > there is a minPartSize of 2, and one part has a cardinality of 1
Operators
apart: test if a list of elements are not all contained in one part of the partitionparticipants: union of all parts of a partitionparty: part of partition that contains specified elementparts: partition to its set of partstogether: test if a list of elements are all in the same part of the partition
As of writing (26/04/2026): none of these Operators are implemented in conjure-oxide, partitions cannot be parsed using the native parser, and there is no support for rewriting or solving with partitions.
Variants
What Are Variants
A variant domain stores key value domain pair fields. However, unlike a record, a variant literal can only use one of these fields at once. This field is referred to as active.
Variants contain a list of fields, with domains, which they can take. They are defined for both GroundDomain and UnresolvedDomain, and stored as Variant(Vec<FieldEntry>).
The result of a variant is a single field value. As such the AbstractLiteral for variants is defined as Variant(Moo<FieldValue<T>>). This AbstractLiteral type means variants can be represented explicitly.
Operators
There is one special operator which is defined on only variants.
Active(v, f)- Returns whether field f is currently the field active in variant v.
Variants can also be indexed, which makes use of Conjure-Oxide’s UnsafeIndex and SafeIndex.
Note on Implementation
Currently variants are defined within the AST of Conjure-Oxide and can be parsed with the ‘legacy’ parser. However, there is no support as of Apr-2026 for rewriting rules or solving.
Sequences
What Are Sequences
A sequence is a datatype for storing a series of values, where values can occur multiple times and ordering is preserved. It differs from a matrix, in that it can have defined attributes; i.e. you can define a sequence to have varying lengths, and to restrict what values it can draw from it’s inner domain.
Attributes
- A cardinality attribute, as a range;
size,minSize,maxSize. - A jectivity attribute, with three options;
injective,surjective,bijective.
Sequences must have either a size or maxSize cardinality attribute.
The cardinality attribute is used with some value (i.e. size 4), whereas the jectivity attribute is used by itself.
For example;
$ Valid
find foo: sequence of int(1..5)
find bar: sequence (size 5, surjective) of int(1..5)
find fizz: sequence (minSize 2, maxSize 7, injective) of int(1..10)
find buzz: sequence (bijective) of int(1..5)

$ Syntactically Invalid
find biff: sequence (minSize 3, size 4) of int(2..7) $ Cardinality attribute cannot be single and not single
Operators
There are two operators which are defined on sequences. These are represented as Expressions in Conjure-Oxide.
subsequence: does the sequencesappear in the same order int(e.g.s=1,2,3andt=1,3are subsequences)substring: does the sequencesappear in the same order and contiguously int(e.g.s=1,2is a substring oft=1,2,3)
As of writing in April 2026, there is no support for rewriting rules or solving.
Domain Pruning
The Project
In Conjure-Oxide when we convert Essence-level domains into lower-level domains for the solver they can often be blown-up necessarily large, which negatively impacts solver performance.
We can see an example of this in the following Essence code:
find a : set (maxSize 2) of int(1..10)
find b : set of int(1..1000)
such that b subset a
Instead of being treated as a set of maximum size 1000, we can deduce that `b` has a maximum size of 1.
Domain Pruning is the process of shrinking the domain of an expression, by inferring the tightest bounds placed on the domain by that expression.
There is lot of domain pruning that can be done at an Essence level, making it a very interesting project. This has the potential to make measurable improvements to Conjure-Oxide in a way that goes beyond Conjure, and is the first step in an Essence-level solver.
How Would It Work
To calculate the tightest domains, we suggest creating an arc-consistency-style algorithm. This can be run between parsing and rule rewriting, to infer the minimal domains of all variables before they are expanded. The algorithm would iterate over constraints, stored as expressions in Conjure-Oxide, and refine the internal variable’s domains. Not all constraints in Conjure-Oxide are binary, and so a form of generalised arc consistency might be necessary. Once the domains have been refined any constraints also containing the newly changed variable must be rechecked.
What Are The Current Roadblocks
Currently all expressions contain the domain of the result of the expression. The first task and a current roadblock would be to propagate this expression domain to the internal variables involved. Conjure-Oxide does not currently use the expression domains in any way when it comes to rewriting.
A final roadblock for this project is how to test it. In specific cases, where you know pruning has occurred, you can use Conjure-Oxide Pretty’s expression-domains option to view all domains in the model. However, for a more comprehensive testing you need a large number of test cases. One consideration was using a LLM to generate these cases. As of Dec-2025 the free AI models included in APIs were not capable of doing this at scale.
What Has Been Done So Far
To aid with explainability and debugging while tightening the domains, an option has been added to Conjure-Oxide Pretty to print out the domains of all expressions as a trace. This can be accessed using --output-format=expression-domains and when combined with custom tests can effectively test the domain pruning.
Before work on the consistency algorithm could have began it was important that the domain of expressions is actually fully-tightened. This will allow for maximum inference. As such, all work up to this point has been focused on tightening the domains returned from the Expression::domain_of() function.
Set Operators
The intersect and union set expressions have been tightened, such that both the domain and the set attributes which are returned are optimal.
Function Operators
The operators on functions have a lot of potential to be tightened due to them resulting in sets and functions. These operators include defined, range, imageSet, preimage, and restrict. For a function domain we can infer information from both its attributes and the length of its domain and codomain.
To understand this, consider the defined operator, which results in a set of all domain values defined for the function. This has the domain of a set containing the same domain as the function. However, we can infer a tighter set domain using set attributes. For this operator, the size attributes of the function directly map to the set. We consider the partiality and jectivity attributes.
For example:
- If the function is total we know the size of the set will be the size of the function’s domain;
- If the function is injective we know we cannot exceed the size of the codomain, because every domain element must map to a different codomain element;
- If the function is surjective or bijective then the size of the set must be either at least the size of the codomain or exactly equal to it respectively, so every codomain element is defined.
Whilst these conditions are specific to defined as an operator, similarly logic is applied to all other function operators. All partiality and jectivity inference is based around the length of the domain / codomain, and so can only be done if the domain is ground.
There is however, one currently known limitation, so the results are not always completely minimal. We cannot guarantee a domain is ground and the lengths are known, so there are specific cases where we could infer simple bounds based on domain size, but the added complexity is not worth it in individual parts of the code. In these cases, the size is left as UnboundedR. Instead of adding these extra checks, I propose a separate small project could be to add the inferred domain size of a function as size attributes to that function, when the domain lengths are first known as ground. This means we do not need to separately check the domain size every time.
Sequence Operators
There are 2 operators for Sequences (Subsequence, Substring), and booth return booleans. They are both of the form s sub.. t, where s must occur in t. You can conclude that either a Subsequence or Substring is definitively false if s is strictly larger than t, but as of writing this documentation there is no mechanism to ‘restrict’ the domain of a boolean to being strictly true or false.
When it becomes possible to alter the domains of children of an expression, s and t may be able to trim each others domains. Take the following example:
find s : sequence (minSize 3, maxSize 5) ...
find t : sequence (minSize 2, maxSize 4) ...
s subsequence t
- You can alter the attribute of
ssuch that it has a maximum size of 4 (it cannot be longer thant) - You can alter the attributes of
tsuch that it has a minimum size of 3 (it cannot be shorter thans) This was quickly attempted in PR #1786 just for experimentation, but was abandoned because there was not a clear way of mutating the state inside theMoo- after all, the Moo exists to stop that from happening.
Cardinality Operator
One other operator which can be tightened is the cardinality operator. As opposed to returning an unbounded integer, we can make inferences on the maximum size of a type using its attributes and domain length. This inference is also limited by the domains being ground. When the domains are ground, we can get an exact length for matrices, and a tightened bound for the size of set, multisets, relations and functions using their attributes.
Testing
Types of Tests
Conjure-Oxide currently has four forms of tests:
- Integration tests
- Custom tests
- Roundtrip tests
- A small number of unit tests
Test generation
The test generation occurs in the file ./tests_integration/build.rs. This generates the integration, custom and roundtrip tests all in a similar manner.
For each test framework we define a base directory for all these tests:
./tests_integration/tests/integration./tests_integration/tests/custom./tests_integration/tests/roundtrip
Any sub-directory of these defined directories containing the necessary files to make a test, will be considered a test.
- For integration and roundtrip tests this is containing a singular file with a
.essenceor.eprimeextension. - For custom tests this is containing a
run.shscript file.
Once these tests are identified a Rust #[test] is created using the defined templates (<test type>_test_template). This test is within the pre-generated file gen_tests_<test type>.rs within the specified output directory (OUT_DIR).
This template contains the code to call a new function which carries out the test. The values passed to the template determines its test name, through sanitation of the path, and determine the arguments to this test function.
Finally, the test function itself includes the line include!(concat!(env!("OUT_DIR"), "/gen_tests_<test type>.rs"));, such that it is accessible during the test through insertion using the include macro.
This format improves scalability and allows new tests to be created by just creating the input file.
Ideal Scenario of Testing for Conjure-Oxide
Introduction
What is the goal of this document?
The goal of this document is to provide an ideal testing outline for Conjure-Oxide, a project in development. To do so, this document will be split into definitions (of Conjure-Oxide and other relevant components, as well as key testing terms), current Conjure-Oxide testing, and idealised (to an extent) Conjure-Oxide testing. When discussing idealised testing, any key limitations will also be discussed. Further, this document will address the use of GitHub actions in this project, including code coverage.
What is Conjure-Oxide
Conjure-Oxide is a constraint modelling tool which is implemented in Rust. Of note, it is a reimplementation of the Conjure automated constraint modelling tool and the Savile Row Modelling Assistant, functionally merged and rewritten in Rust - largely because Rust is an efficient high-performance language. Conjure-Oxide takes in a problem written in a high level constraint language, which is called Essence, and creates a model from this. This model is then transformed into a solver-friendly form, and solved using one of the available back-ends. At the moment, these solver back-ends include Minion (a Constraint Satisfiability Problem (CSP) solver) and in-development translation and bindings to a SAT (Propositional Satisfiability Problem) solver. To put it simply, Conjure-Oxide is a compiler to different modelling languages, the result of which is passed into the respective solver. These solvers act as back-ends and must be given bindings to Conjure-Oxide, but are not actually part of it themselves.
How is the model made ‘solver-friendly’?
Conjure-Oxide has a rule engine, which applies rules onto the model passed in as Essence, to lower the level of the language into one which can be parsed and solved by the back-end solvers. This engine applies rewriting rules, such as (x = - y) to (x + y = 0), to transform the model. As Essence is a fairly high-level language, with compatibility for sets and matrices and a number of keywords, there are a lot of rewrite rules which may be needed before the model can be passed into a solver. This translation is one of the key roles of Conjure-Oxide, and this rule application refines the language from a higher level to a lower level. The exact rules applied and the degree of simplification varies on the language requirement of the solver: for example, Minion has higher-level language compatibility than a SAT solver1.
Conjure and Savile Row
Also relevant to the testing of Conjure-Oxide is Conjure and Savile Row 2. This is because as Conjure-Oxide is a merge and reimplementation of these programs, the testing can be performed comparatively against Conjure and Savile Row. When this document uses the term “Conjure suite”, it refers to both Conjure and Savile Row, being used in combination, generally using the Minion solver. Where there is deviation from this, it will be explicitly clarified.
What is Conjure?
Conjure is a constraint modelling tool, implemented in Haskell. It uses a rule engine similarly to Conjure-Oxide to simplify from Essence to Essence’ (a subset of Essence which is slightly lower-level), and this “refinement” produces the lower-level model to pass to Savile Row.
What is Savile Row?
Savile Row is a constraint modelling assistant which translates from Essence’ to a solver-friendly language. Alongside translating the model to the target language, it can reformat the model with an additional set of rules. This provides a performance increase by improving the model itself. Functionally, the better a model is, the faster a solver will solve it.
What is Minion?
Minion is a Constraint Satisfiability Problem solver, which has bindings to both Conjure suite and Conjure-Oxide. Minion is a fast, scalable, CSP solver, designed to be capable of solving difficult models while still being time optimised. This is the main solver in use by both the Conjure suite and by Conjure-Oxide, due to its flexibility and efficiency.
Definitions for Testing
Two main forms of testing will be addressed within this document: correctness testing and performance testing. Fuzz testing (inputting malformed instances to see the program response) is not currently intended as part of testing Conjure-Oxide, and so will not be outlined or addressed. Metamorphic testing may have applications to this project, and so will be defined, but will not be considered as part of the ideal implementation at present as it is not possible to implement at this point in time.
What is correctness testing?
In the field of computer science, correctness can be formally defined as a program which behaves as expected by it’s formal specification, in all cases. As such, testing for correctness essentially consists of testing that the program produced the correct result for all given test cases. Correctness testing does not require exhaustiveness (checking all inputs on all states), but instead requires testing that all (or most) states function with varied inputs, which can then be used as a proof of correctness.
What is performance testing?
Performance testing refers to a range of methodologies designed to measure or evaluate a software’s performance. By performance, this generally refers to time taken to complete a process and the stability under load. The time taken for processes will vary not only by system, but also by device depending on factors such as background processes. As not all performance testing methodologies are relevant to Conjure-Oxide, they will not be outlined in this document. The two most common forms of performance testing are load testing and stress testing. Load testing examines the performance of a program to support its expected usage, and is used to identify bottlenecks in software, as well as possibly identify a relationship of usage to time. Stress testing places the program under extremely high load to see the ability of the software to function under exceptional load. This is generally used to find the functional upper load of a program before it breaks.
What is metamorphic testing?
Most tests use oracles, where the answer is known and is explicitly checked against. This is what is done in correctness testing, as laid out above. Metamorphic testing, instead, uses Metamorphic relations to generate new test cases from existing previous ones. A metamorphic relation is the relation between the test (the inputs) and the result (the outputs). An example of this is (sin(x) = sin( \pi -x)), where, regardless of x, there is a consistent relation between the input and output. As such, test cases can be generated to test the correctness of this output.
Test Scenario for Conjure-Oxide
As Conjure-Oxide is a reimplementation, it is possible to perform a large amount of the testing comparatively. By this, it means that testing can be done independently on Conjure-Oxide, and the results can be directly compared against the results of the same test being ran in the Conjure suite. This is true not only for the correctness testing, but also for the performance testing. Tests run in the Conjure suite are run by Conjure, which uses Savile Row and the required solvers to produce the correct output.
Correctness Testing
There are several areas which should be tested for correctness in Conjure-Oxide: that the Essence is correctly parsed; that the correct Essence translation is generated; that the correct rules are applied in the correct order; and finally that the correct solution is reached by Minion. For something to be ‘correct’ in Conjure-Oxide, it means it must behave as expected. As Conjure-Oxide reimplements Conjure and Savile Row, the expected behaviour is that of the Conjure suite. As such, correctness testing is performed exclusively comparative to the results produced by this suite. Correctness testing as implemented is looking to ensure that all expected files match the files which are actually produced. Where there is a difference, the initial assumption is that Conjure-Oxide has the mistake. This is not necessarily always correct - the Conjure suite may have bugs or areas where it is not producing the expected outcome - but usually is.
Current Correctness Testing
Correctness testing is the main form of testing performed in Conjure-Oxide at present, mainly through integration testing. Integration testing tests how the whole application works together as a whole, and as such is the most applicable to test all areas of testing needing to be done in Conjure-Oxide. In the current testing implementation, a test model is produced, and then the parse, rule-based transformation and result file are compared against those produced by calling the same test case on Conjure. In this, we assume that the result produced by the Conjure suite is always going to be correct. Theoretically, this is completely functional - as Conjure-Oxide is a reimplementation, any bugs which exist in Conjure or Savile Row could also exist in Conjure-Oxide without causing Conjure-Oxide to violate it’s correctness. However, this defeats the point of an evolving project, so assuming the complete correctness of the Conjure suite is not sufficient for testing.
Comparative Correctness Testing
As it is possible to perform the testing comparatively, the current implementation forms a functional basis for any ideal implementation, because it is built on this comparison. The current implementation functions well (although with limitations, as addressed below) in showing a degree of correctness, however it is not necessarily holistic enough to show the full correctness of the project. The primary solution for this issue is simply increasing the test coverage through developing a broader repository of models to be tested. Conjure has a very broad set of translation rules, meaning that there is a large number of rules which can be reimplemented in Conjure-Oxide. This enables a demonstration of the functionality of Conjure-Oxide in more scenarios, by ensuring not only are all rules tested individually, but rules in combination, with specific priority, are also tested and return results as expected. There may be some benefit to having tests that are not solved and compared against results from the Conjure suite, but rather solved independently (e.g., by mathematicians) and then compared to the results of the same model produced by Conjure-Oxide. By proving these results as correct, it is possible to go beyond simply assuming Conjure and Savile Row are always right. However, this is not particularly feasible in a broader implementation and would be fairly limited in scale due to this, especially as Conjure-Oxide is not a large project. Solver Testing Part of the larger Conjure-Oxide project is the implementation of a Satisfiability (SAT) solver. This implementation will require integration testing alongside the rest of the Conjure-Oxide project. As Conjure has a SAT solver, this is possible to be done comparatively, although would require the implementation of the ability to select a specific solver to solve a model. The comparative testing would simply compare the translated essence to SAT, and the output of the Conjure suite’s SAT solver to that of the Conjure-Oxide SAT solver, and debug where the tests do not pass.
Limitations of Correctness Testing
Conjure-Oxide is, in part, a refinement based program. A large part of it’s function is to refine from Essence down to a solver-friendly language. One part of the way that this is done in Conjure-Oxide is through a rule engine. This rule engine applies modifications to the constraints problems given to the project. At current, we just assume the rules applied are true. For example, (x = -y + z) becoming (x + y - z = 0) is a simple transformation which could be made by the rule engine. We do not formally prove that this transformation is correct, we just assume that it is the correct transformation. In simpler transformations such as this one, that is a valid assumption - it is possible to confirm that the modification is correct with minimal effort. In cases where more complex rules may be applied, the lack of a proof poses a limitation on the project. In an ideal scenario, this limitation could be removed by having proofs for every single rule applied in the rule engine, therefore not having to rely on an assumed correctness. Another of the primary limitations in correctness testing as implemented is that it assumes that the output being produced by Minion (or the SAT solver in development) is correct. As there are no known bugs in Minion, this is an acceptable assumption to make. That said, it is not necessarily accurate that all output from Minion is correct. Other mature (having existed, and been used and updated, over a protracted period of time), state of the art solvers can produce incorrect results3.
If Minion has similar unknown bugs, it may fail to fulfil the correctness element of correctness testing. The SAT solver which is being implemented is in it’s infancy and as such is much less reliable. It is likely that it will have a number of bugs and logical errors which will be gradually harder to find as time goes on (operating under the assumption that easy-to find and solve bugs will be removed earlier, leaving only more hidden or complex bugs).
Performance Testing
It is of note that a large motivation behind the reimplementation of the Conjure suite into a single Rust program is to improve the performance of the compilation from Essence to a solver-friendly language, without compromising on the time taken to solve a model. Currently, Conjure translates Essence into Essence’, and then Savile Row refines and reformats the resultant Essence’ into a solver-friendly language. Conjure-Oxide translates directly from Essence into a solver-friendly language, which should cut down on the amount of steps necessary and as such result in a shorter translation time. When testing for overall performance of Conjure-Oxide, the primary metrics that we are are concerned with is the total time taken for a model to be parsed, translated, and solved through the solver back-end. This total time can be split into two components: the translation time and the time taken by the solver. We can also use solver nodes as a measure of performance of the solver, as the time the solver takes may vary depending on background processes. In the performance testing addressed in this document, though there will be consideration for the solver time, the primary measurement of value is translation time.
Current Performance Testing
At present, there is no formal performance testing implemented in Conjure-Oxide. While stats files are generated on each test run, tracking a number of fields (rewrite time, solver time, solver nodes, total time, etc.), nothing is done with this information. As such, while there is some measure of ‘performance’, it lacks context, is not reliable (since data is produced from a single run) and overall does not create a measure of Conjure-Oxide’s performance. Performance testing, both load and stress based, can be performed both comparatively (as in checking speed or efficiency of one program directly against another (or several other) programs), but also individually on the given program. As such, both ‘methods’ of Performance testing will be discussed.
Performance Testing of just Conjure-Oxide
Sole examination of the performance of Conjure-Oxide cannot show whether there is a performance improvement as desired. However, the goal of individual performance testing is rather to enable the development of a relationship between complexity (of translation) and time (to translate). In addition, this will allow for the identification of any notable bottlenecks in the program, allowing these specific problem areas to be targeted for improvement. To performance test a program, a number of things need to be established. Firstly, what the metric(s) are being considered - as established above, for Conjure-Oxide this is the translation-, and to some degree solver-, time. Secondly, what is the independent variable - as in, what is being varied to result in different outputs. In Conjure-Oxide, this will be size or complexity of a given Essence file. Size and complexity will be defined contextually below.
Distinction between Size and Complexity
Size and complexity of a given Essence file are separate, although certainly correlated. Put simply, size refers more directly to the number of components that make up an Essence input problem, whereas complexity refers to specific aspects which complicate translation, rather than directly increase its size. When applying rules to a model, the rules are applied by priority. The implementation of this is essentially that each rule is checked against the model, and if it applies, it is applied to transform the model in order of priority (e.g., two rules are valid, the higher priority rule is the one selected). Use of a dirty-clean (this will not try to apply rules to a finished model) or naive (this will try and apply all rules until they have all been checked, applied, checked again, etc.) rewriter will also result in variance on translation time, so when experiments are being defined it is best to account that all models are using the same version of the rewriter. Size refers to the number of variables, constraints, or size of input data (for example, a larger set or array) given as part of an input file. A ‘larger’ problem has more constraints and variables than a ‘smaller’ one. This will impact translation time (the relationship of this change should be examined by the performance testing) because there is more to parse and translate, even if the actual rule application is simple. On the other hand, in this context, complexity can be loosely defined as elements of the model which make it difficult to translate, without regard for the size. Features which could increase complexity include nesting, conditional constraints, dynamic constraints, etc. When testing for size, it is best to use very simple, repeated rules, and when testing complexity it is best to try to ensure that this is not also linked into increasing size, although these two features are tied together and therefore difficult to isolate from one another.
Performance Experiments to run
There are two main types of experiment to be considered in the performance testing of Conjure-Oxide. \textbf{Load testing}, where the size or complexity is varied in order to measure translation time under different conditions; and \textbf{stress testing}, specifically to see whether higher complexity or larger files disproportionately increase translation time. As stress testing requires some measure of what is proportional and what is not, load testing is addressed first.
Load testing for Conjure-Oxide
When designing performance testing for a system, there are several considerations to be made. Primarily, it is of importance that data gathered and aggregated is suitable to be used for graphing and building relationships. To do this, data must be reliable, consistent and accurate. Single runs of data cannot provide this, as many factors may influence the results. In order to fulfil these needs, substantial amounts of data should be gathered. Anomalies should be removed (for example, using interquartile range or using Z-Scores) or simply averaged over (this is less accurate but more achievable). As size or complexity varies, these averaged results should be plotted into a graph. This is the most effective way of providing understanding of the relationship between size/complexity and translation time.
Stress testing for Conjure-Oxide
Once a relationship has been established by load testing, stress testing can occur. Although it is possible to see the point at which a program fails without prior load testing, having determined the relationship between size/complexity and time allows for a consideration of what is disproportionate. Implementing this in Conjure-Oxide would simply involve the program under abnormally high load to find it’s breaking point, using repeated results to ensure reliability and accuracy of the data.
Additional Performance Profiling
Many parts of Conjure-Oxide (such as specific rules, string manipulations, memory allocation to solvers, etc.) are also not capable of being directly examined for their complexity, and the complexity of these things cannot be manipulated to perform experiments as outlined above. However, it is important that these are still being tested for their performance. This is because it is important to catch irregular memory allowances, excessive time spending, expensive Rust functions, etc., in order to ensure that Conjure-Oxide runs both as quickly and as smoothly as possible, One way to do this is to run profilers, such as Perf, which allow for the areas that time or memory is being spent to be analysed more specifically. Given this analysis, it is then possible to examine these areas for improvements, as was done in Issue #2884.
Comparative Performance Testing
As established, Conjure-Oxide is a reimplementation of a pre-existing set of programs, these being Conjure and Savile Row. One of the primary goals of this reimplementation is to improve the performance of Translation time, while also ensuring that the time taken to solve a given essence problem is not worsened. Considering that Minion is simply rebound to Conjure-Oxide, much as it was in the Conjure suite, it is unlikely that these bindings would be responsible for a slower solve time. As such, the primary impact on solve time is the model passed into the solver. A worse model will take substantially more time than a model which has been well translated and refined, and substantial increases in the time taken to solve should be avoided. Performance testing should be performed on the Conjure suite (primarily on Savile Row, since the time of Conjure is amortised over each instance) to establish the relationship of size/complexity to time, as in Conjure-Oxide. The results of both may then be plotted on one graph, to see at which point(s) Conjure-Oxide is faster than Savile Row at translation, and vice versa. Comparative testing also allows for the solver nodes (which represent, to some degree, solver time) from both the Conjure suite and Conjure-Oxide. As established, the goal of Conjure-Oxide is to improve translation performance without sacrificing solving performance. As such, it is vital to also consider at which size/complexity of translation the solver nodes start to vastly differ between Conjure suite and Conjure-Oxide, and to examine the rules to see why this is (and whether there is a requisite decrease in translation time which could possibly balance this increase). Though having a small number of nodes which differ (e.g., by 10) is not an issue, when there is a large disparity between number of solver nodes, this reflects poorer quality translation or (possibly) an issue with the binding to Rust.
Limitations of Performance Testing
One limitation of performance testing is the impact that other processes running on the computer or server when testing. Other processes running at the same time mean that less threads can be allocated to Conjure-Oxide or its solver backends when dealing with a model, and as such slow down the speed at which these models can be parsed, translated, and solved. However, this is mainly removed as an issue by a combination of repeated runs, and identifying and removing anomalies (using Z-Score). Another issue present in performance testing is that completely decoupling size and complexity is rather difficult, if not entirely impossible. This is because there is overlap in the definitions, and because as a model becomes more complex, it often becomes larger, and vice versa. Although fully separating these two metrics is the aim in an ideal scenario, an actual implementation would struggle to follow through with this requirement.
GitHub Actions and Testing
GitHub Actions allow for integration of the CI’/CD pipeline to GitHub and the automation of the software development cycle. Automated workflows can be used to build, test and deploy code into a GitHub VM, allowing for flexibility in the development of a project.
What is a workflow?
In GitHub Actions, a workflow is an automated process which is set up within a GitHub repository with the aim to accomplish a specific task. They are triggered by an Event, such as pushing or pulling code. Workflows are made up of the combination of a trigger (the Event) and a set of processes (made up of Jobs, which are sets of steps in a workflow).
Test Rerun
This involves the automated rerunning of tests when a push or pull request is made on the GitHub repository. This is already implemented in Conjure-Oxide, through “test.yml”. Test.yml runs tests every push request made to the main branch, and on all pull requests. This allows for correctness testing to be performed on all pushes made to the main, to ensure that no additional tests fail.
Code Coverage
When pushes are made to the main branch of Conjure-Oxide on GitHub, a code coverage automated workflow is run. This workflow generates a documentation coverage report which outlines what percentage of the code in the repository is being executed when tests are run. The higher the percentage, the more of the code can be relied upon as working under test conditions. This is also already implemented in the GitHub repository, through “code-coverage.yml”, “code-coverage-main.yml” and “code-coverage-deploy.yml”. One of the goals of correctness testing is to increase the code coverage percentage, because this would show that more of the code is functioning correctly.
Automated Performance Testing
GitHub workflows can be used to create further custom processed to be automated. Automating performance testing in GitHub allows for them to be run routinely (e.g., every X pushes, or every X days) to ensure consistent performance of the project. As they occur automatically, this means that benchmarks can be set, and failure on any of these benchmarks can result in a flag, allowing for early detection when performance of the program begins to regress, or fall far behind that of the Conjure suite. GitHub Actions allow for the results to be placed into files, and from here an interactive dashboard could be generated (as in PR #291. 5
Brief Outline of Possible Future Sub-Projects
Having outlined at least a portion of the ideal testing scenario above, as well as some limitations of this scenario, it is now possible to outline to some degree future sub-projects which could be added to the overall Conjure-Oxide project.
Improving Code Coverage
One method of improving the code coverage is by creating a broader repository of integration tests. This project focuses on the correctness aspect of the testing, and in itself can be split into several sub-projects or subsumed into other projects (e.g., if someone is writing a parser, they may decide to write the tests for this parser). The code coverage report is updated every-time a PR is made, and by examining the coverage report (see: {Code Coverage Report}), it is possible to see which areas would benefit from additional testing. Although code coverage testing itself is not concerned with correctness, increasing the amount of correctness testing increases code coverage, and so they are related. It may be beneficial to target areas of the code which have a very low line or function coverage, as this is likely easier to increase.
Producing Proofs for Correctness
As established, one of the limitations of the current correctness testing is that there is an assumption of correctness, that being that we either assume the Conjure suite is correct, or we assume that the rules we are applying are correct. These assumptions are largely valid, but do limit the factual correctness of the project. One possible sub-project, which would have a heavy reliance on mathematical knowledge, is to produce these proofs. This does not necessarily have to be exhaustive: in the case of the correctness testing exhausting the proofs would be extremely time consuming, but having proofs to additionally prove correctness overcomes one of the project limitations. In the case of proving the existing rules, though there are a currently increasing set of rules, they are finite, so this may be more manageable as a project.
Measuring Performance Through Load Testing
The outline of this subproject is to fulfil, at least in part, the requirement for performance testing on this project. There are several ways that this could be approached, all of which vary somewhat, so this project is flexible in its details. One method which may be effective regarding performance testing is to use GitHub Actions to automate the performance testing, as outlined in GitHub Actions and Testing. This is because this would allow flexibility and repeated performance testing, as well as the ability to flag early on when there is a performance decrease. To outline this, it would be necessary to make a directory of tests to be run for their performance, and then create the GitHub workflow to repeatedly run tests on that directory and aggregate the translation time. This can then be plotted graphically and statistically analysed.
Comparative Load Testing
This is an extension of the above project, in that it cannot be created until there is a basis of load performance testing. The essential outline of this project is to repeat the above, except aggregating the data from the results of Savile Row’s rewriter, and then graph both Conjure-Oxide and Conjure suite together. This will allow for a direct visual comparison, as well as help with statistical analysis. Furthermore, if GitHub Actions are used, it is possible to flag where there is a large degree of difference in rewriter or solver between Conjure suite and Conjure-Oxide.
Benchmark Testing for Performance
Another sub-project which is possible to derive from this document is to benchmark test elements of the project which cannot be done by varied-load testing, as outlined in the Performance Testing section. Tools, such as Perf, can measure benchmarks and find specific problem areas. When problem areas have been found, these can be raised as an issue, and either fixed as part of this sub-project, or given to another member of the project to complete. This kind of benchmark testing will ensure that the entirety of the Conjure-Oxide is running as efficiently as possible.
Possible Stress Testing
There is also the possibility of adding stress testing to see at which point the rewrite engine fails to be able to parse through an extremely long or especially complex model. This can be done following much the same outline as that of \textit{Measuring Performance Through Load Testing}, however rather than gradually changing the load (dictated by size or complexity) on the system, the change is rapid, in order to find the system’s point of failure. As with load testing, this may also be automated by GitHub Actions, though this is a lower priority, as the failure point is less likely to change than the overall system performance.
Conclusion
This document outlines definitions relevant for understanding both the project and the types of testing most applicable. A scenario of testing is then produced, which outlines what testing exists and what testing can be added, as well as any large limitations on an implementation of this ideal state. This allows for any individuals working on testing in the future to have a holistic overview of the state of testing on this project. Finally, a number of smaller sub-projects are outlined as a product of this document, aiming to improve the tested-ness of Conjure-Oxide and compare its success as a reimplementation to Conjure and Savile Row. In the future, it may also be worth examining the possibility and likelihood of being able to apply Metamorphic testing to Conjure-Oxide, to ensure consistency in it’s results by developing metamorphic relations between input and output. At present, this is not feasible, and although this document is idealised, it is not intended to be entirely unreasonable or detached from the current reality of the project.
This section had been taken from the ‘Ideal Scenario of Testing (Dec 2024)’ page of the conjure-oxide wiki
-
Ian P. Gent, Chris Jefferson, and Ian Miguel. 2006. MINION: A Fast, Scalable, Constraint Solver. In Proceedings of the 2006 conference on ECAI 2006: 17th European Conference on Artificial Intelligence August 29 – September 1, 2006, Riva del Garda, Italy. IOS Press, NLD, 98–102. ↩
-
Hussain, B. S. 2017. Model Selection and Testing for an Automated Constraint Modelling Toolchain; Thesis ↩
-
{Berg, J., Bogaerts, B., Nordström, J., Oertel, A., & Vandesande, D. 2023. Certified Core-Guided MaxSAT Solving. \textit{Lecture Notes in Computer Science}, 1–22. https://doi.org/10.1007/978-3-031-38499-8_1 ↩
-
conjure-cp. 2024, April 3. Possible optimisation: Intern the UserName in Name · Issue #288 · conjure-cp/conjure-oxide. \textit{GitHub}. https://github.com/conjure-cp/conjure-oxide/issues/288 ↩
-
conjure-cp. 2024, April 3. Benchmark Visualizer: Conjure Native vs Oxide · Pull Request #291 · conjure-cp/conjure-oxide. GitHub. https://github.com/conjure-cp/conjure-oxide/pull/291 ↩
Roundtrip Testing
Overview
Roundtrip tests check that parsing is valid and that there is no unexpected behaviour during a full roundtrip of an Essence file. Roundtrip tests do not consider rewriting or solving.
Full Test Structure
The structure of a roundtrip test is shown in the following diagram:
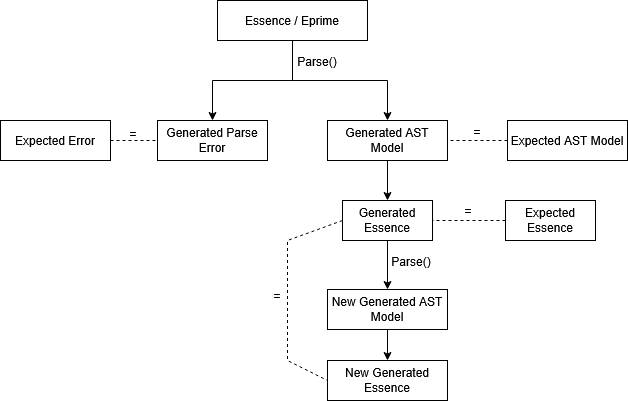
The first phase tests that the parser is still performing as expected. As with the other tests in the suite, if the expected should have changed the suite can be run with ACCEPT=true to overwrite these expected files with whatever is generated.
- The test parses a provided Essence or Essence’ file.
- If this parse is valid, it saves the generated AST model JSON and generated Essence representation and compare these to the expected versions.
- Otherwise, is the parse fails; it saves the generated error outputs and compares this to the expected version.
The second phase tests that the structure of the input does not change during parsing without applying any rules to it, ensuring validity.
- If the initial parse was successful the roundtrip phase of the test occurs.
- The newly generated Essence is then parsed back into Conjure-Oxide and used to generate a new AST and output Essence file
- This new Essence file is then compared with the previously generated one and asserted equal.
Multiple Parsers
Roundtrip tests support both the ‘legacy’ and ‘native’ parser.
The parser used for the test can be specified in a config.TOML in the test directory using the form parsers = [<string list of parsers>]
Both parsers will be used by default for each test unless specified and will use separate generated and expected files as this may be different per parser.
Creating a New Roundtrip Test
To create a new roundtrip test you must create a new directory under ./tests-integration/tests/roundtrip/.
Any directories within here than contain a singular .essence or .eprime file will be treated as a test.
After creating the Essence or Essence’ file for your test you should run the test suite with ACCEPT=true to generate the expected files.
Overview
Custom tests were created as a solution to the problem that integration tests do not allow for testing of error messages, which automatically return from the integration test method and therefore cannot be analyzed. The custom tests, however, work for both erroneous and non-erroneous code. Each test contains an input, a run.sh file to execute the test, and an expected standard output/error (or both) to compare against. Conjure Oxide is set up to automatically create and execute a test for each test folder in the tests/custom directory when cargo test is run, so to add a test case all one must do is add a folder in the directory which contains the necessary components.
How to add a test case
Adding a test case is simple. First add a folder with the test case name to the tests/custom directory. Tests can be organized within folders in the directory–only folders with a run.sh file will be treated as a test case. Within the test folder, add these components:
-
run.shfile: This will typically be in the formatconjure-oxide <options> <command>with the command beingsolve model.eprime(assuming the input file is namedmodel.eprime). Custom tests simply use whicheverconjure-oxideis available onPATH. The usual workflow ismake installormake test, which refreshes~/.cargo/bin/conjure-oxide, andmake testprepends~/.cargo/bintoPATHbefore runningcargo test.ex)
conjure-oxide --solver Minion --enable-native-parser solve model.eprime -
input file: This file will be the Essence code that is inputted into Conjure Oxide. It can be named anything but be sure to reference it correctly in the
run.shfile.ex)
find x : bool -
stdout.expected/stderr.expected: These files will be what the output is compared against. They will also be what is overwritten if the test is run withACCEPT=true. Avoid creating empty files: if there is no expected error from the input, do not create astderr.expectedfile and if there is no output, do not create astdout.expectedfile.
The custom tests are run automatically when cargo test is run. You can run just the custom tests with cargo test custom and a specific test with cargo test custom_<test_path>. To overwrite the expected output/error with the actual output/error, run the tests with ACCEPT=true.
Code structure
The code to run the custom tests is integrated into the build.rs file. Much like for the integration tests, the custom tests directory is traversed and a test is dynamically written at compile time for any folder containing a run.sh file. Tests are based on a custom test template (shown below) which calls the custom_test function (passing in the test folder path). They are written into a generated file, which is included at the bottom of the custom_tests.rs file (which contains the custom_test function).
#[test]
fn {test_name}() -> Result<(), Box<dyn Error>> {{
    custom_test("{test_dir}")
}}
The custom_test function takes the test directory as a parameter. It inherits the current PATH and runs the commands from the run.sh file, saving the produced output. It then overwrites the expected output and error if accept was set to true and compares the actual and expected outputs/errors if not. If either does not match, the expected and actual output are printed and the test fails. Otherwise, the test passes.
Code Coverage
Introduction
Code coverage is a test which shows how much of the codebase gets automatically tested. There are two main metrics - Function and Line - both given as percentage points. We use Rust’s testing function which comes with cargo, and GRCov to generate the reports.
Line Coverage
Line coverage gives the percentage of lines that were run during testing of all the lines total. It will show which lines were ran during testing, and which were not.
Function Coverage
Function coverage gives the percentage of compiler functions that were run during testing.
A simple function with no procedural macros will count as one function. However, a function can be extended (e.g. with #[derive(Debug)]) which when compiled appear as extra LLVM functions. This extra implementation is counted as another function by the coverage report, which means even though you see a single function signature, the report says there are multiple functions. There is no need to test implementations generated by #[derive(..)] since those implementations are not written by us.
How to Test
There are two ways of interrogating code coverage:
- Push your commits to the remote, and look at the PR
- Run
tools/coverage.sh, and opentarget/debug/coverage/index.htmlin a browser
The second option (the coverage script) gives a much more verbose breakdown for which areas of the repo are starved of testing, breaking down to each and every line.
How to Improve
There are numerous way of improving our current code coverage. Below are some some considerations.
Test-as-you-go
TL;DR - leave the repo in at least as good a condition as you found it. Make sure whenever you commit something, that you add sufficient tests for it such that the coverage isn’t worse than before. This is very easy to forget!
Search and Destroy
Use the coverage script to find which files are badly covered, and add tests for them.
Quirks and Implications
Cloning (instead of Forking) the Repository
For the most up to date testing advice, look at the contributing guide. As of December 2025, we primarily work by cloning the main repository instead of working in our own forks. To prevent remote code execution, GitHub prevents a GH Action from running code on a fork. This means that our Action for reporting test coverage whenever you push your commits only works if your upstream branch is in the main repository (and not your own fork of it).
Conjure-Oxide-Tester
The conjure-oxide-tester repository provides an external test suite to compare the performance and correctness of conjure-oxide against the Conjure and Savile Row.
The test suite provides documentation that you can follow to understand, and use the tooling.
What Are Nuggets
Semantics of Rewriting Expressions with Side‐Effects
Overview
When rewriting expressions, a rule may occasionally introduce new variables and constraints. For example, a rule which handles the Min expression may introduce a new variable aux which represents the minimum value itself, and introduce constraints aux <= x for each x in the original Min expression. Conjure and Conjure Oxide provide similar methods of achieving these “side-effects”.
Reductions
In Conjure Oxide, reduction rules return Reduction values. These contain a new expression, a new (possibly empty) set of top-level constraints, and a new (possibly empty) symbol table. The two latter values are brought up to the top of the AST during rewriting and joined to the model. These reductions, or “local sub-models” therefore can define new requirements which must hold across the model for the change that is made to a specific node of the AST to be valid.
The example with Min given in the overview is one case where plain Reductions are used, as a new variable with a new domain is introduced, along with constraints which must hold for that variable.
Bubbles
Reductions are not enough in all cases. For example, when handling a possibly undefined value, changes must be made in the context of the current expression. Simply introducing new top-level constraints may lead to incorrect reductions in these cases. The Bubble expression and associated rules take care of this, bringing new constraints up the tree gradually and expanding in the correct context.
Essentially, Bubble expressions are a way of attaching a constraint to an expression to say “X is only valid if Y holds”. One example of this is how Conjure Oxide handles division. Since the division expression may possibly be undefined, a constraint must be attached to it which asserts the divisor is != 0.
An example of division handling is shown below. Bubbles are shown as {X @ Y}, where X is the expression that Y is attached to.
!(a = b / c)                 Original expression

!(a = {(b / c) @ c != 0})    b/c is possibly undefined, so introduce a bubble saying the divisor is != 0

!({(a = b / c) @ c != 0})    "bubble up" the expression, since b / c is not a bool-type expression

!(a = b / c /\ c != 0)       Now that X is a bool-type expression, we can simply expand the bubble into a conjunction
Why not just use Reductions to assert at the top-level of the model that c != 0? In the context of undefinedness handling, the final reduction is dependent on the context it occurs in. In the above example, if we continue by simplifying (apply DeMorgan’s), we can see that it becomes a != b / c \/ c = 0. Thus, c = 0 is a valid assignment for this example to be true, and setting c != 0 on the top-level would be incorrect.
In Conjure Oxide, Bubbles are often combined with the power of Reductions to provide support for solvers like Minion.
This section had been taken from the ‘Semantics of Rewriting Expressions with Side‐Effects’ page of the conjure-oxide wiki
2024‐03: Implementing Uniplates and Biplates with Structure Preserving Trees
Contents:
- Recap: Uniplates and Biplates
- Definition of Children
- Storing The Structure of Children
- Uniplates and Biplates Using Structure Preserving Trees
Comments and discussion about this document can be found in issue #261.
In #180 and #259 we implemented the basic Uniplate interface and a derive macro to automatically implement it for enum types. However, our current implementation is incorrect and problematic: we have defined children wrong; and our children list does not preserve structure, making more complex nested structures hard to recreate in the context function.
Recap: Uniplates and Biplates
A quick recap of what we are trying to do - for details, see the Uniplate Haskell docs, our Github Issues, and the paper.
Uniplates are an easy way to perform recursion over complex recursive data types.
It is typically used with enums containing multiple variants, many of which may be different types.
data T = A T [Integer]
       | B T T
       | C T U
       | D [T]
With Uniplate, one can perform a map over this with very little or no boilerplate.
This is implemented with a single function uniplate that returns a list of children of the current object and a context function to rebuild the object from a list of children.
Biplates provide recursion over instances of type T within some other type U. They are implemented with a single function biplate of similar type to uniplate (returning children and a context function).
These functions are able to be implemented on any data type through macros making Uniplate operations boilerplate free.
Definition of Children
We currently take children of T to mean direct descendants of T inside T. However, the correct definition of children is maximal substructures of type T.
For example, consider these Haskell types:
data T = A T [Integer]
       | B T T
       | C T U
       | D [T]

data U = E T T
       | F Integer
       | G [T] T
Our current implementation would define children as the following:
children (A t1 _) = [t1]
children (B t1 t2) = [t1, t2]
children (C t1 u) = [t1]
children (D ts) = ts
However, the proper definition should support transitive children - i.e. T contains a U which contains a T:
children (A t1 _) = [t1]
children (B t1 t2) = [t1, t2]
children (C t1 (E t2 t3)) = [t1,t2,t3]
children (C t1 (F _)) = [t1]
children (C t1 (G ts t3)) = [t1] ++ ts ++ [t3]
children (D ts) = ts
While a seemingly small difference, this complicates how we reconstruct a node from its children: we now need to create a context that takes a list of children and creates an arbitrarily deeply nested data structure containing multiple different types. In particular, the challenge is keeping track of which elements of the children list go into which fields of the enum we are creating.
We already had this problem dealing with children from lists, but a more general approach is needed.
Storing The Structure of Children
How do we know which children go into which fields of the enum variant?
For example, consider this complicated instance of T:
data T = A T [Integer]
       | B T T
       | C T U
       | D [T]

data U = E T T
       | F Integer
       | G [T] T

myT = C(D([t0,...,t5),G([t6,...,t12],t13))
Its list of children is: [t0,...,t13].
Try creating a function to recreate myT based on a new list of children. Hint: it is difficult, and even more so in full generality!
If we instead consider children to be a tree, where each field in the original enum variant is its own branch, we get:
data Tree A = Zero | One A | Many [(Tree A)]

myTChildren =
  Many [(Many [One(t0),...,One(t5)]),      -- C([XXX], _) field 1 of C
        (Many [                            -- C([_],XXX)  field 2 of C
          (Many [One(t6),...,One(t12)]),   -- G([XXX],_)  field 2.1 of C
          (One  t13))]                     -- G([_],XXX)) field 2.2 of C
This captures, in a type-independent way, the following structural information:
myThas two fields.- The first field is a container of Ts.
- The second field contains two inner fields: one is a container of Ts, one is a single T.
Representing non-recursive and primitive types
Often primitive and non-recursive types are found in the middle of enum variants. How do we say “we don’t care about this field, it does not contain a T” with our Tree type? Zero can be used for this.
For example:
data V = V1 V Integer W
       | V2 Integer

data W = W1 V V

myV = (V1
        (V2 1)
        1
        (W1
          (V2 2)
          (V2 3)))

myVChildren =
  (Many [
    (One v1),  -- V1(XXX,_,_)
    Zero,      -- V1(_,XXX,_)
    (Many [    -- V1(_,_,XXX)
      (One v2),
      (One v3)
   ]))
This additionally encodes the information that the second field of myV has no Ts at all.
While this information isn’t too useful for finding or traversing over the target type, it means that the tree structure defines the structure of the target type completely: there are always the same number of tree branches as there are fields in the enum variant.
Uniplates and Biplates Using Structure Preserving Trees
Recall that the uniplate function returns all children of a data structure alongside a context function that rebuilds the data structure using some new children.
To implement this, for each field in an enum variant, we need to ask the questions: “how do we get the type Ts in the type U”, and “how can we rebuild this U based on some new children of type T?”.
This is just a Biplate<U,T>, which gives us the type T children within a type U as well as a context function to reconstruct the U from the T.
Therefore:
-
We build the children tree by combining the children trees of all fields of the enum (such that each field’s children is a branch on the tree).
-
We build the context function by calling each fields context function on each branch of the input tree.
This is effectively a recursive invocation of Biplate.
What happens when we reach a T? Under the normal definition, Biplate<T,T> would return its children. This is wrong - we want to return T here, not its children!
When T == U we need to change the definition of a Biplate: Biplate<T,T> operates over the input structure, not its children.
For our example AST:
data T = A T [Integer]
       | B T T
       | C T U
       | D [T]

data U = E T T
       | F Integer
       | G [T] T
Here are some Biplate and Uniplates and their resultant children trees:
-
Biplate<Integer,T> 1isZero. -
Uniplate<T> (A t [1,2,3])is(Many [Biplate<T,T> t ,Zero]).This evaluates to
(Many [(One t),Zero]) -
Biplate<T,T> tisOne t. -
Biplate<T,U> (G ts t1)is(Many [Biplate<T,[T]> ts , Biplate<T,T> t ]).This evaluates to
(Many [(Many [(One t0),...(One tn)]),(One t)]) -
Uniplate<T,T> (C t (G ts t1))is(Many [Biplate<T,T> t, Biplate<U,T> (G ts t1))This evaluates to
(Many [(One t), (Many [(Many [(One t0),...,(One tn)]), (One t)]))
2023‐11: High Level Plan
This page is a summary of discussions about the architecture of the project circa November 2023.
In brief:
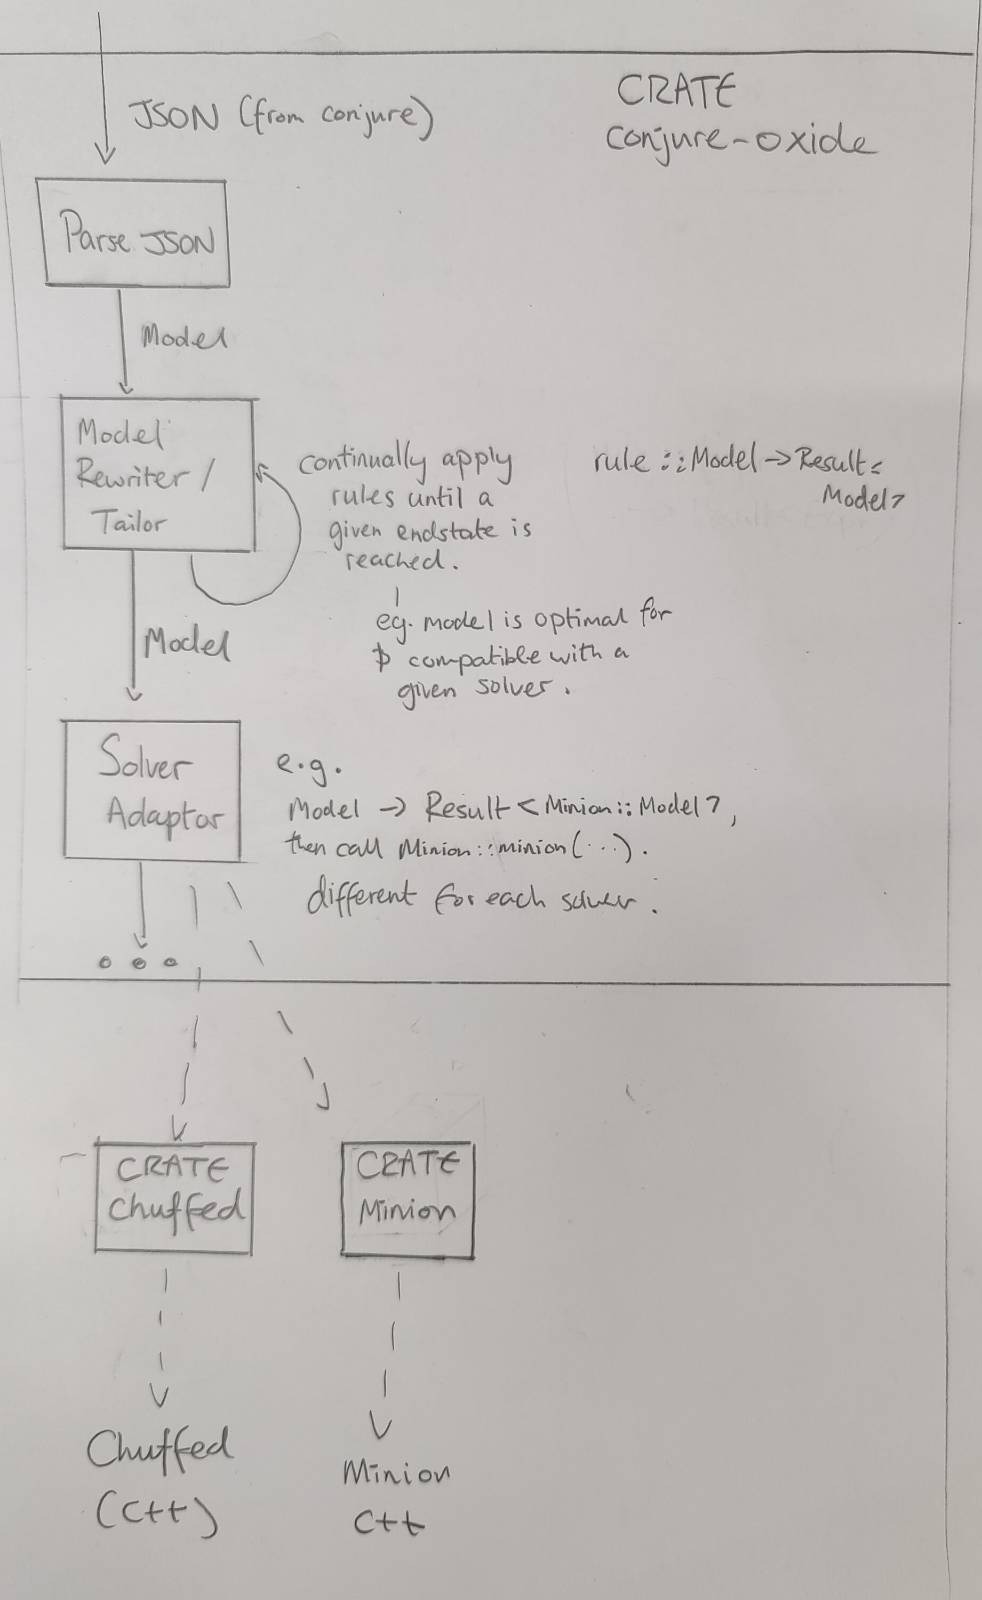
Conjure Oxide
Model Rewriting Engine
The purpose of the model rewriting engine is to turn a high level constraints model into one that can be run by various solvers. It incrementally rewrites a given model by applying a series of rules.
Rules have the type:
rule :: fn(Expr) -> Result<Expr,Error>
The use of Result here allows for the type checking of the Model at each stage (amongst other things).
A sketch of a rewriting algorithm is below. As we are using a Result type, backtracks occur when an Err is returned.
#![allow(unused)]
fn main() {
fn apply(rules,x) {
  new_rules = getApplicable(rules)

  if shouldStop(x) {
    return Ok(x)
  }

 // Recursive case - multiple rules
  while len(rules') > 0 {
   rule = select(new_rules)
   new_rules.remove(rule)
   res = apply(rules,rule(x))

   if res is Ok, return Ok
  }

  // No rules - base case
  if (compatibleWithSolver(x)) {
    return Ok(x)
  }

  return Err()
}
}
This is, in effect, a recursive tree search algorithm. The behaviour of the search can be changed by changing the following functions:
- getApplicable:
fn(Vec<Rule>) -> Vec<Rule> - select:
fn(Vec<Rule>) -> Vec<Rule> - shouldStop:
fn(x) -> bool
The following functions are also important to implement the rewriting engine:
domainOf:: Expr -> Domain
typeOf:: Expr -> Type
typeOfDomain:: Domain -> Type
categoryOf:: Expr -> Category

data Category = Decision | Unknown | Quantified
Solver Adaptors
Once we have a Model object that only uses constraints supported by a particular solver, we are able to translate it to a form the solver understands.
The solver adaptor layer translates a Model into solver specific data-structures, and then runs the solvers.
If the given Model isn’t compatible with the solver, the use of a Result type here could allow a type error to be thrown.
Other crates inside this repository
This repository contains the code for Conjure Oxide as well as the code for some of its dependencies and related works.
Currently, these are just Rust crates that provide low level bindings to various solvers.
There should be a strict separation of concerns between each crate and Conjure Oxide. In particular, each crate in this project should be considered a separate piece of work that could be independently published and used. Therefore:
- The crate should have its own complete documentation and examples.
- The public API should be safe and make sense outside the context of Conjure Oxide.
Solver Crates
Each solver crate should have a API that matches the data structures used by the solver itself.
Eventually, there will be a way to generically call solvers using common functions and data structures. However, this is to be defined entirely in Conjure Oxide and should not affect how the solver crates are written. See Solver Adaptors.
This section had been taken from the ‘2023‐11: High Level Plan’ page of the conjure-oxide wiki
What is this section?
The conjure-oxide project is a VIP module at the University of St Andrews, and – as of recently – it is also a potential alternative to a year-long group project that all third years have to take. This section contains experiences of those third year sub-teams. If you want some wisdom from the previous generations of teams on this project, you’re welcome to read it!
SAT Team Reflection (2025-2026)
Project Management Evolution
Semester 1: Structured Agile
In the first semester, we used a standard Agile approach. We had a Scrum Master to manage tasks and the GitHub board, and a Project Owner to talk to Oz. We had weekly meetings to plan and group tasks into “Must-have,” “Should-have,” and “Ideally.” Later, we added the +1/+2 review system based on advice from Nik Dewally. Even with these roles, everyone had the freedom to manage their own work.
Semester 2: Flexible Autonomy
In the second semester, we stopped using formal Agile roles. Instead, people picked their own tasks and worked on them. We replaced regular meetings with updates in Teams to keep everyone informed and had meetings on demand. We kept using the +1/+2 system to keep the code consistent. We also got rid of “Must-have,” “Should-have,” and “Ideally.”
The +1/+2 Review Technique
The +1/+2 system meant we didn’t send pull requests to senior reviewers until the whole team agreed. Everyone had to review and approve the PR on GitHub. If one person hadn’t approved it, it wasn’t ready. This helped keep the team aligned.
What Worked
The +1/+2 system worked well to keep us on track. It prevented Oz from wasting time on simple fixes like syntax errors or hygiene issues, and because the entire team reviewed every PR, almost everyone stayed up to date with the codebase and current development.
Communication also improved when we changed how we used the GitHub board. In the first semester, we there was an unspoken assumption that everyone was following the board, but that didn’t work for everyone. After some discussion within the team, we agreed to primarily using Teams instead, which worked much better. Although some people found it useful to still have their task on the board.
Breaking work into small tasks was especially successful in the second semester for two reasons:
- Since we already had the direct/order base implemented, adding to that structure was easy. It allowed for clear separation between tasks. Keeping elements decoupled was very useful for our team’s progress. If your team can do that, then please do it since it saves hours of time that you would’ve spent trying to administrate these tasks.
- After a series of discussion we agreed to only pick up one task at a time, and actually followed through. That prevented people from taking on more than they could handle.
Challenges and Lessons Learned
- Using only the GitHub board was hard because it was often out of date, and as mentioned before, we had an implicit assumption that everyone is keeping track of it which slowed us down.
Also, our “Must/Should/Ideally” labels didn’t always work. Tasks that looked easy often turned out to be hard, which meant some people took on too much work.
Reflections on Meeting Cadence
We aren’t sure how often we should meet. Weekly meetings in the first semester were good for syncing but took time away from coding, and it was sometimes difficult to find the time where everyone is free. In the second semester, “meeting only when needed” helped us code faster, but we sometimes did the same work twice. For example, we missed chances to share code between similar rules because we weren’t talking enough, even with the +1/+2 system.